Aurora Dune Colorblock Cardigan Free Pattern – Cuff-to-Cuff Knit
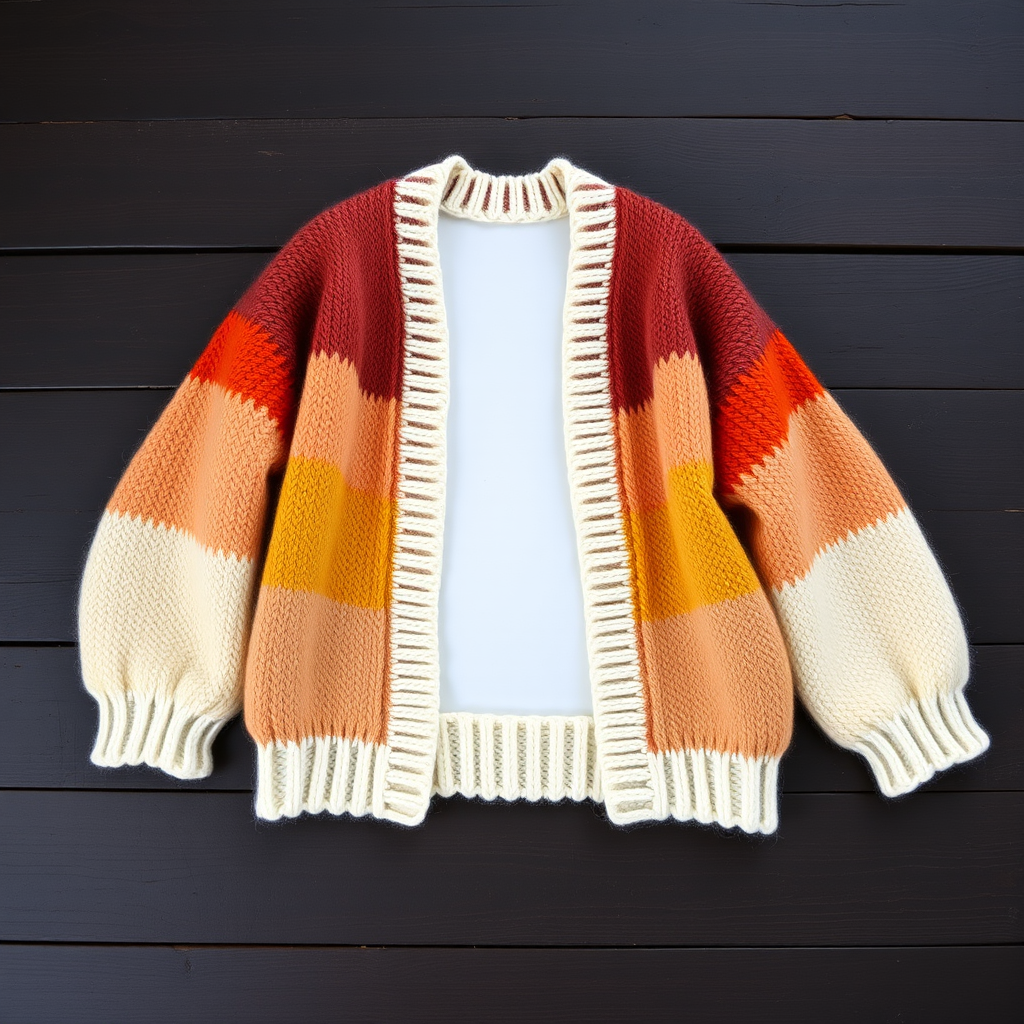
Introducing the Aurora Dune Colorblock Cardigan
Wrap yourself in the shifting hues of a desert sunset with this stunning cuff-to-cuff colorblock cardigan. Knitted in soft, chunky yarn, this seamless construction flows from one sleeve to the other, creating a modern, draped silhouette that's as cozy as it is striking. The four warm, earthy tones—dusty rose, terracotta, golden sand, and cream—transition horizontally across the body, evoking the natural beauty of layered dunes at dusk.
This free pattern is perfect for intermediate knitters looking to expand their skills with a unique construction method. The cuff-to-cuff technique means you'll knit the entire garment in one piece—no seaming the body to sleeves, no fiddly set-in sleeves. Just pure, uninterrupted knitting that builds into a beautiful, boxy, oversized cardigan with a relaxed, open front. The stockinette stitch keeps the pattern simple, while the color changes add visual interest and a modern, artistic gradient effect.
Materials Needed
Before you begin, gather the following materials to ensure a smooth knitting experience:
- Yarn: Bulky weight yarn (size 5) in 4 colors:
- Color A: Dusty Rose (muted pink) – approx 500g
- Color B: Terracotta (burnt orange) – approx 500g
- Color C: Golden Sand (soft yellow-beige) – approx 500g
- Color D: Cream (warm off-white) – approx 500g
- Needle: US 10.5 (6.5 mm) circular knitting needle, 32-inch length (the long cord is essential for holding the many stitches of the body)
- Notions: Stitch markers (at least 4), tapestry needle for weaving in ends, scissors, measuring tape
- Buttons: 5-7 buttons of your choice (for the front closure)
Gauge: 14 stitches and 20 rows = 4 inches in stockinette stitch (knit on RS, purl on WS). Always knit a gauge swatch first to ensure your finished cardigan matches the intended measurements.
Step-by-Step Instructions
This cardigan is worked in one piece from cuff to cuff, starting at the left sleeve and ending at the right sleeve. The body is shaped with increases and decreases to create the sleeves and torso. Use stitch markers to track sections clearly.
Abbreviations
- K = knit
- P = purl
- K2tog = knit two together (decrease)
- M1 = make one (increase) by lifting the bar between stitches and knitting through the back loop
- Sl = slip stitch
- PM = place marker
- RM = remove marker
- BO = bind off
Left Sleeve
- With color A (Dusty Rose), cast on 40 stitches.
- Work in stockinette stitch (K on RS, P on WS) for 2 inches. The edges will naturally roll, creating a nice cuff detail.
- Increase row (RS): K1, M1, K to last stitch, M1, K1. (42 stitches)
- Continue in stockinette, repeating the increase row every 6th row until you have 60 stitches. This creates a gentle taper for the upper arm.
- Work even (no increases) until the sleeve measures 18 inches from the cast-on edge. This is the full length of your left sleeve from wrist to underarm.
Body (Left Front, Back, Right Front)
Now you'll begin shaping the body. This is where the magic of cuff-to-cuff construction happens. You'll work in sections, using increases and decreases to create the left front, back, and right front.
Left Front Section
- Continue with color A. Now you'll increase at the beginning of every RS row (for the front edge) only. This creates the slope of the left front panel.
- Row 1 (RS): K1, M1, K to end. (61 stitches)
- Row 2 (WS): P all stitches.
- Row 3 (RS): K1, M1, K to end. (62 stitches)
- Repeat rows 2-3 until you have 80 stitches. This forms the left front panel. The increases are all on the same side, creating a diagonal edge that will become the center front of the cardigan.
Back Section
- Now you'll shape the back. Continue increasing at the beginning of every RS row (for the left front), but also start increasing at the end of every RS row (for the back edge).
- Next RS row: K1, M1, K to last stitch, M1, K1. (82 stitches)
- Continue this increase pattern (increase at both ends of every RS row) until you have 120 stitches. This wide section forms the back of the cardigan. The increases at both ends create a symmetrical expansion.
- At this point, you should switch to color B (Terracotta) and then color C (Golden Sand) as you work through the back section. The pattern calls for the color blocks to transition horizontally across the body. A good rule of thumb: switch colors when the back measures about 6-7 inches into the section for each color, so the back is roughly divided into thirds of terracotta, golden sand, and cream. However, feel free to adjust the color transitions to your preference—the beauty of this pattern is its artistic freedom.
Right Front Section
- Now you'll shape the right front. Decrease at the beginning of every RS row (to shape the right front edge) while continuing to increase at the end of every RS row (to complete the back).
- Next RS row: K2tog, K to last stitch, M1, K1. (still 120 stitches—you're decreasing one at the start and increasing one at the end, so the count stays the same)
- Continue this pattern until the back measures 20 inches from the start of the back section. This ensures the back is wide enough to cover your torso comfortably.
- Now, for the right front, decrease at both ends of every RS row. This creates the mirror-image slope of the right front panel.
- Next RS row: K2tog, K to last 2 stitches, K2tog. (118 stitches)
- Continue decreasing this way on every RS row until you have 60 stitches. This completes the right front panel. Switch to color D (Cream) as you begin this section if you haven't already, to complete the colorblock gradient.
Right Sleeve
- Continue in stockinette stitch, but now decrease at the beginning and end of every 6th row to taper the sleeve.
- Decrease row (RS): K2tog, K to last 2 stitches, K2tog. (58 stitches)
- Work 5 rows even (no decreases).
- Repeat these 6 rows (1 decrease row + 5 even rows) until you have 40 stitches. This creates a symmetrical taper mirroring the left sleeve.
- Work even for 2 inches. This creates the right cuff.
- Bind off all stitches loosely. Your cardigan is now one complete piece!
Finishing
- Seam the underarms: Fold the cardigan in half with the right sides together, matching the sleeve seams. Sew the underarm seams from the cast-on edge to the start of the body increases (about 18 inches). This creates the sleeve openings and the side seams of the body.
- Button placement: Try on the cardigan to determine the button placement. The left front edge (the edge that was increased first, starting with color A) will be the button band. The right front edge (the edge that was decreased last, ending with color D) will be the buttonhole band.
- Sew buttons along the left front edge, spacing them evenly (about 4-5 inches apart).
- Create buttonholes on the right front edge. The simplest method for this chunky yarn is to use the natural spaces between stitches—just mark where the buttons fall and use those gaps. Alternatively, you can create small yarn-over buttonholes by working a yarn over and knitting two together at the marked spots on a WS row. For a cleaner look, you can also sew the buttons through both layers and use the gaps between stitches as buttonholes.
- Weave in all ends with a tapestry needle, being careful to secure the color change points well.
- Block the cardigan to shape and even out the color transitions. Lay it flat on a blocking mat, pin it to the desired dimensions, and mist with water. Allow it to dry completely. This will help the stockinette stitch relax and the color blocks to lay flat and even.
Tips for Success
- Use stitch markers at the increase/decrease points to keep track of where you are in the pattern. Place a marker at the beginning of each section (left front, back, right front) to avoid confusion.
- Count your stitches regularly, especially after increase and decrease rows, to ensure you're on track.
- When changing colors, do so at the beginning of a RS row for the cleanest transition. Twist the old and new yarns together on the WS to avoid holes.
- The rolled edges from the stockinette stitch are intentional—they create a modern, minimalist finish without needing ribbing or edging.
- If you prefer a longer cardigan, work more rows in the back section before starting the right front decreases. If you prefer a shorter one, work fewer rows.
This pattern is a wonderful way to create a statement piece that's both fashionable and functional. The cuff-to-cuff construction is a joy to knit—there's something magical about watching the entire garment grow from one sleeve, across the body, and into the other sleeve. The colorblocking in warm, earthy tones makes this cardigan a versatile layering piece that pairs beautifully with everything from jeans to dresses.
Enjoy the process, and don't be afraid to make it your own. Happy knitting!



