Crimson Berry Holly Leaf Coasters Free Knitting Pattern
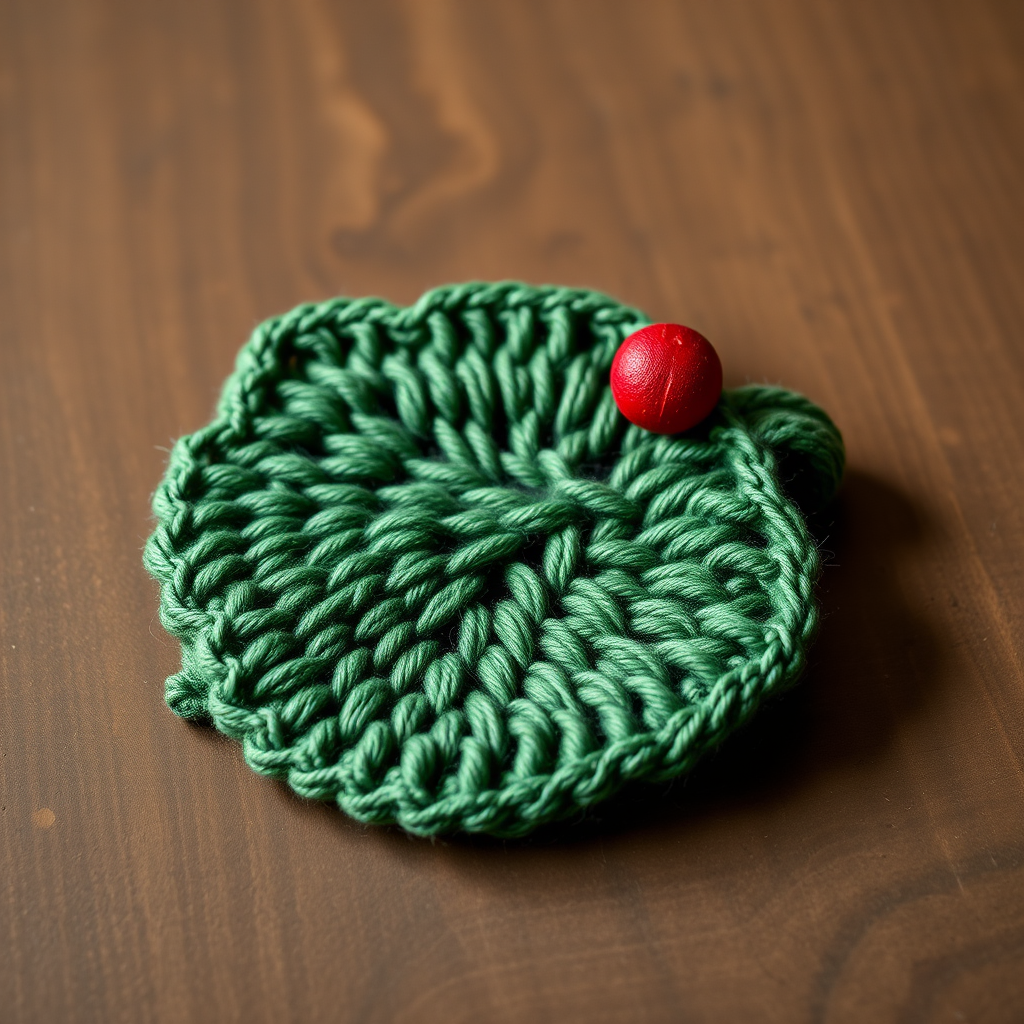
Crimson Berry Holly Leaf Coasters: A Free Knitting Pattern for Festive Home Decor
Bring a touch of woodland charm to your holiday table with these exquisite knitted holly leaf coasters, featuring a rich crimson berry accent. This quick and satisfying project uses simple knit and purl stitches to create a textured, botanical design that's perfect for gifting or decorating. Whether you're a seasoned knitter looking for a fast holiday project or a beginner ready to tackle your first shaped piece, these coasters are an ideal choice. The natural cotton yarn makes them absorbent and practical, while the festive design adds a cozy, rustic touch to any gathering.
Why You'll Love This Pattern
This pattern is a true gem for the holiday season. It's a quick knit that produces stunning results, making it perfect for last-minute gifts or hostess presents. The leaf shape is created through simple increases and decreases, giving you practice with essential shaping techniques without overwhelming complexity. The addition of the knitted berry adds a delightful three-dimensional element that makes these coasters truly special. Plus, they're made from cotton, so they're functional as well as beautiful—protecting your tables in style.
Materials Needed
Before you begin, gather the following materials. This project is wonderfully portable and requires minimal supplies, making it perfect for knitting on the go or during cozy evenings by the fire.
- Yarn: Worsted weight cotton yarn in forest green and deep red (approx. 20g green and 5g red per coaster)
- Needles: US 6 (4.0 mm) knitting needles
- Gauge: 20 stitches and 28 rows = 4 inches in stockinette stitch (gauge is not critical for this project, but matching it will ensure your coaster is the perfect size)
- Extras: Yarn needle for weaving in ends and sewing the berry, scissors
Pro Tip: Choose a high-quality cotton yarn like Lion Brand Kitchen Cotton or Cascade Ultra Pima for the best stitch definition and durability. The natural fiber is absorbent and washes well, making these coasters both beautiful and practical.
Step-by-Step Instructions
This pattern creates a leaf-shaped coaster with a central vein and a rolled edge. Make as many as you like—they look wonderful in sets of four or six! The pattern is broken down into two parts: the leaf and the berry. Follow along carefully, and you'll have a beautiful coaster in no time.
Abbreviations
- K: Knit
- P: Purl
- M1: Make one (increase) - pick up the bar between stitches and knit into the back of it
- SSK: Slip, slip, knit (decrease) - slip two stitches knitwise one at a time, then knit them together through the back loop
- K2tog: Knit two together (decrease)
- K3tog: Knit three together (decrease)
- RS: Right side
- sts: Stitches
Leaf Coaster (Make 1)
Using green yarn, cast on 3 stitches. This will be the base of your leaf, and the increases will create the wide, rounded shape of a holly leaf.
Section 1: Increasing to Form the Leaf Body
In this section, you'll gradually increase your stitch count to create the wide, rounded body of the leaf. The increases are placed symmetrically on each side, with a knit stitch at each edge to create a neat border.
Row 1 (RS): Knit all stitches. (3 sts)
Row 2: Purl all stitches. (3 sts)
Row 3: K1, M1, K1, M1, K1. (5 sts)
Row 4: Purl all stitches. (5 sts)
Row 5: K1, M1, K3, M1, K1. (7 sts)
Row 6: Purl all stitches. (7 sts)
Row 7: K1, M1, K5, M1, K1. (9 sts)
Row 8: Purl all stitches. (9 sts)
Row 9: K1, M1, K7, M1, K1. (11 sts)
Row 10: Purl all stitches. (11 sts)
Row 11: K1, M1, K9, M1, K1. (13 sts)
Row 12: Purl all stitches. (13 sts)
Row 13: K1, M1, K11, M1, K1. (15 sts)
Row 14: Purl all stitches. (15 sts)
Row 15: K1, M1, K13, M1, K1. (17 sts)
Row 16: Purl all stitches. (17 sts)
Row 17: K1, M1, K15, M1, K1. (19 sts)
Row 18: Purl all stitches. (19 sts)
Row 19: K1, M1, K17, M1, K1. (21 sts)
Row 20: Purl all stitches. (21 sts)
Row 21: K1, M1, K19, M1, K1. (23 sts)
Row 22: Purl all stitches. (23 sts)
Row 23: K1, M1, K21, M1, K1. (25 sts)
Row 24: Purl all stitches. (25 sts)
Row 25: K1, M1, K23, M1, K1. (27 sts)
Row 26: Purl all stitches. (27 sts)
Row 27: K1, M1, K25, M1, K1. (29 sts)
Row 28: Purl all stitches. (29 sts)
Row 29: K1, M1, K27, M1, K1. (31 sts)
Row 30: Purl all stitches. (31 sts)
Note: The purl rows create the subtle "vein" effect on the right side of your work. This is the natural line of purl bumps that will run down the center of your leaf, giving it beautiful texture and dimension.
Section 2: Decreasing to Shape the Leaf Tip
Now that you've reached the widest point of the leaf, you'll begin decreasing to create the pointed tip. The decreases are placed two stitches in from each edge, maintaining the neat border stitch while tapering the leaf symmetrically.
Row 31: K1, SSK, K to last 3 sts, K2tog, K1. (29 sts)
Row 32: Purl all stitches. (29 sts)
Row 33: K1, SSK, K to last 3 sts, K2tog, K1. (27 sts)
Row 34: Purl all stitches. (27 sts)
Row 35: K1, SSK, K to last 3 sts, K2tog, K1. (25 sts)
Row 36: Purl all stitches. (25 sts)
Row 37: K1, SSK, K to last 3 sts, K2tog, K1. (23 sts)
Row 38: Purl all stitches. (23 sts)
Row 39: K1, SSK, K to last 3 sts, K2tog, K1. (21 sts)
Row 40: Purl all stitches. (21 sts)
Row 41: K1, SSK, K to last 3 sts, K2tog, K1. (19 sts)
Row 42: Purl all stitches. (19 sts)
Row 43: K1, SSK, K to last 3 sts, K2tog, K1. (17 sts)
Row 44: Purl all stitches. (17 sts)
Row 45: K1, SSK, K to last 3 sts, K2tog, K1. (15 sts)
Row 46: Purl all stitches. (15 sts)
Row 47: K1, SSK, K to last 3 sts, K2tog, K1. (13 sts)
Row 48: Purl all stitches. (13 sts)
Row 49: K1, SSK, K to last 3 sts, K2tog, K1. (11 sts)
Row 50: Purl all stitches. (11 sts)
Row 51: K1, SSK, K to last 3 sts, K2tog, K1. (9 sts)
Row 52: Purl all stitches. (9 sts)
Row 53: K1, SSK, K to last 3 sts, K2tog, K1. (7 sts)
Row 54: Purl all stitches. (7 sts)
Row 55: K1, SSK, K to last 3 sts, K2tog, K1. (5 sts)
Row 56: Purl all stitches. (5 sts)
Row 57: K1, SSK, K1, K2tog. (3 sts)
Row 58: Purl all stitches. (3 sts)
Row 59: SSK, K1. (2 sts)
Row 60: K2tog. (1 st)
Cut yarn, leaving a 6-inch tail. Thread the tail through the last stitch and pull tight to secure. This completes the leaf shape.
Berry (Make 1 per Coaster)
The berry is a small, quick knit that adds the perfect pop of crimson color. It's worked flat and then gathered to form a round ball.
Using red yarn, cast on 1 stitch.
Row 1: K1, M1, K1. (3 sts)
Row 2: Purl all stitches. (3 sts)
Row 3: K1, M1, K1, M1, K1. (5 sts)
Row 4: Purl all stitches. (5 sts)
Row 5: K2tog, K1, K2tog. (3 sts)
Row 6: Purl all stitches. (3 sts)
Row 7: K3tog. (1 st)
Cut yarn, leaving a long tail (about 10 inches). Thread the tail through the remaining stitch and pull tight to form a small ball. The tail will be used to sew the berry to the leaf.
Finishing and Assembly
Now it's time to bring your coaster together. Follow these steps for a polished, professional finish.
- Weave in ends: Using your yarn needle, weave in the cast-on tail at the base of the leaf and any other loose ends on the wrong side of your work. Be careful not to pull too tightly, as this can distort the shape.
- Attach the berry: Position the berry at the base of the leaf, just above the vein (about 1-2 inches from the cast-on edge). Using the long tail from the berry, sew it securely to the leaf with small, invisible stitches. Pass the needle through the center of the berry and into the leaf several times to ensure it's firmly attached. Weave in the remaining tail.
- Create the rolled edge: To give your coaster its lifelike, dimensional quality, gently fold the edges of the leaf upward. The natural tendency of stockinette stitch to curl will help this happen. To set the shape, lightly steam press the coaster. Place a pressing cloth over the coaster and use a steam iron held just above the surface—do not press down heavily, as this can flatten the texture. The gentle steam will help the rolled edges hold their shape.
- Final check: Ensure all ends are woven in securely and the berry is attached firmly. Your coaster is now ready to use or gift!
Tips for Perfect Results
- Count your stitches: Especially during the increase and decrease sections, it's easy to lose track. Count your stitches at the end of each row to ensure you're on track.
- Use stitch markers: If you find it helpful, place a stitch marker at the center of your work to help you keep track of your increases and decreases.
- Blocking: While steam pressing is recommended, you can also wet block your coasters for a more defined shape. Soak the coaster in lukewarm water, gently squeeze out excess water, and lay flat to dry, shaping the rolled edges as desired.
- Make a set: These coasters look beautiful in sets of four or six. They make wonderful handmade gifts for hostesses, teachers, or anyone who appreciates festive home decor.
Creative Variations
Once you've mastered the basic pattern, feel free to get creative! You could experiment with different color combinations—try a silver or white leaf with a red berry for a winter wonderland theme, or use a variegated yarn for a unique effect. You could also add a small hanging loop to turn your coasters into ornaments for the Christmas tree. The possibilities are endless!
These Crimson Berry Holly Leaf Coasters are more than just practical accessories—they're a celebration of the cozy, festive spirit of the holiday season. The combination of the deep forest green, the rich crimson berry, and the natural cotton texture creates a piece that's both rustic and elegant. Whether you're knitting them for your own home or as heartfelt gifts, these coasters are sure to bring warmth and joy to any holiday table.
Happy knitting, and may your holidays be filled with warmth, creativity, and the simple pleasure of handmade things!


