Crimson Bloom Mary Jane Booties Free Pattern – Cozy Knit Baby Shoes with Cable Details
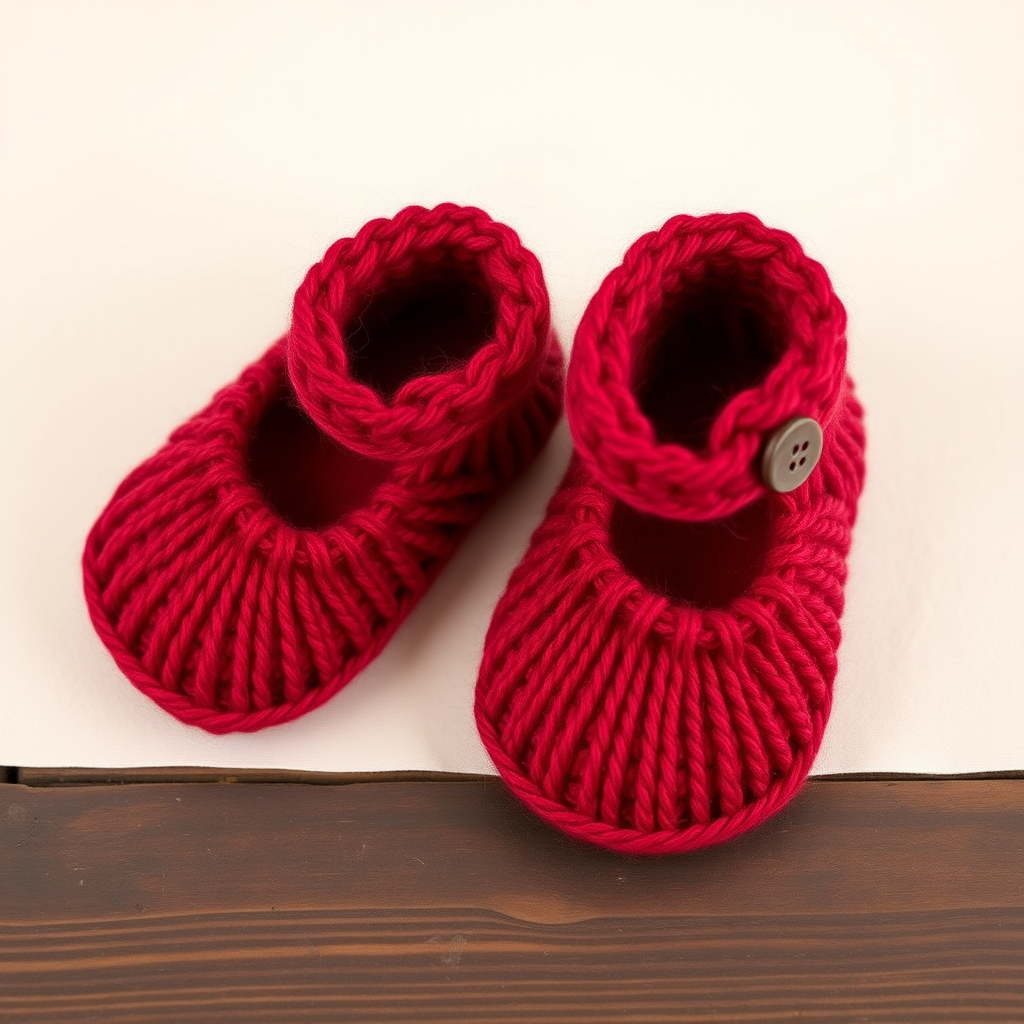
Crimson Bloom Mary Jane Booties: A Free Knitting Pattern for Timeless Baby Shoes
There is something truly special about knitting for a new baby. The tiny scale, the soft yarn, and the love stitched into every row create a gift that store-bought items simply cannot replicate. Today, I am thrilled to share a pattern that perfectly captures this handmade magic: the Crimson Bloom Mary Jane Booties. These ruby red, cable-knit baby shoes are the perfect blend of classic elegance and cozy comfort. With a delicate cable detail running up the instep and a charming button strap, these booties are as beautiful as they are functional. Whether you are preparing for a baby shower or looking for a quick, satisfying project, these booties are sure to become a favorite.
This pattern is designed with the beginner in mind, offering clear, step-by-step instructions that will guide you through the process of creating a professional-looking finish. The rich, deep red color makes a bold and heartfelt statement, while the soft, worsted-weight yarn ensures tiny toes stay warm and snug. Let’s dive into this delightful project and create a pair of heirloom-quality booties that will be treasured for years to come.
Materials Needed
Before you begin, gather the following materials to ensure a smooth and enjoyable knitting experience. All items are readily available at your local craft store or online.
- Yarn: Worsted weight yarn in ruby red (approx. 100g). A small amount of contrasting yarn for the button (optional, for a decorative touch).
- Knitting Needles: US Size 6 (4.0 mm) knitting needles. You will also need a cable needle for the cable stitch.
- Notions: Tapestry needle for weaving in ends and sewing seams, stitch markers (optional but helpful), and two small round buttons (approx. ½ inch in diameter).
- Gauge: 20 stitches and 28 rows = 4 inches in stockinette stitch. *Always check your gauge to ensure the correct finished size.*
Step-by-Step Instructions
This pattern is worked flat in two pieces: the sole and the upper. The instructions are provided for three sizes: 0-3 months (3-6 months, 6-12 months). Finished sole length is 3.5 (4, 4.5) inches. Please read through the entire pattern before beginning.
Abbreviations
- K = Knit
- P = Purl
- K2tog = Knit two stitches together (decrease)
- SSK = Slip, slip, knit (decrease)
- C4F = Cable 4 front (slip 2 stitches to cable needle, hold in front, knit 2, knit 2 from cable needle)
- M1 = Make one (increase)
- BO = Bind off
- RS = Right side
- WS = Wrong side
Sole (Make 2)
The sole is worked in garter stitch (knit every row), which creates a flexible, textured base for the bootie.
- Cast on 8 (10, 12) stitches.
- Row 1: Knit all stitches.
- Row 2 (Increase Row): K1, M1, knit to the last stitch, M1, K1. (10, 12, 14 stitches)
- Row 3: Knit all stitches.
- Row 4 (Increase Row): K1, M1, knit to the last stitch, M1, K1. (12, 14, 16 stitches)
- Rows 5-14: Knit every row. This creates the main body of the sole.
- Row 15 (Decrease Row): K1, SSK, knit to the last 3 stitches, K2tog, K1. (10, 12, 14 stitches)
- Row 16: Knit all stitches.
- Row 17 (Decrease Row): K1, SSK, knit to the last 3 stitches, K2tog, K1. (8, 10, 12 stitches)
- Row 18: Knit all stitches.
- Bind off all stitches loosely. Weave in the yarn ends. Set the sole aside.
Upper (Make 2)
The upper features a beautiful, subtle cable pattern that runs vertically along the instep. This section is worked in a combination of stockinette and garter stitch, with a purl background to make the cable pop.
- Cast on 24 (28, 32) stitches.
- Row 1 (RS): K6 (7, 8), P2, K8 (10, 12), P2, K6 (7, 8).
- Row 2 (WS): P6 (7, 8), K2, P8 (10, 12), K2, P6 (7, 8).
- Repeat Rows 1 and 2 until the piece measures 1.5 (1.75, 2) inches from the cast-on edge, ending with a WS row. This forms the ankle cuff.
Shape Instep
Now we will shape the toe and instep by working decreases in the center cable section.
- Row 1 (RS): K6 (7, 8), P2, SSK, K4 (6, 8), K2tog, P2, K6 (7, 8). (22, 26, 30 stitches)
- Row 2 (WS): P6 (7, 8), K2, P6 (8, 10), K2, P6 (7, 8).
- Row 3 (RS): K6 (7, 8), P2, SSK, K2 (4, 6), K2tog, P2, K6 (7, 8). (20, 24, 28 stitches)
- Row 4 (WS): P6 (7, 8), K2, P4 (6, 8), K2, P6 (7, 8).
- Row 5 (RS): K6 (7, 8), P2, SSK, K0 (2, 4), K2tog, P2, K6 (7, 8). (18, 22, 26 stitches)
- For sizes 3-6 and 6-12 months only: Continue decreasing in this manner (working SSK and K2tog at the edges of the center knit section) every RS row until you have 18 (20, 22) stitches total.
- Work even in pattern (knit the knit stitches and purl the purl stitches as they appear) until the piece measures 2.5 (3, 3.5) inches from the cast-on edge, ending with a WS row.
Strap
This section creates the classic Mary Jane strap that will fasten with a button.
- Next row (RS): K6 (7, 8), BO the next 6 (6, 8) stitches in pattern, knit the remaining 6 (7, 8) stitches. (6, 7, 8 stitches remain on the needle)
- Work back and forth on these remaining stitches only for the strap. Knit every row (garter stitch) for 1.5 (1.75, 2) inches.
- Bind off all stitches. Weave in the ends.
Finishing
This is where the bootie comes together. Take your time with the seaming for a polished, professional look.
- Sew the Back Seam: Fold the upper piece in half with the RS together. Using your tapestry needle and a length of yarn, sew the back seam of the upper, matching the edges. Turn the upper RS out.
- Attach the Upper to the Sole: Pin the upper to the sole, matching the center of the instep (the toe area) to the center of the toe of the sole. The back seam of the upper should align with the center of the heel. Using a whipstitch or mattress stitch, sew the upper to the sole, ensuring the seam is secure and neat.
- Attach the Button: Sew a small button on the side of the bootie opposite the strap. Fold the strap over the button to mark the correct placement. Sew the button securely in place.
- Weave in All Ends: Use your tapestry needle to weave in any remaining yarn ends on the inside of the bootie to hide them.
- Repeat: Repeat all steps to create the second bootie.
Optional Embellishments
For an extra touch of charm, consider adding a crocheted flower or a small knitted bow to the strap. This is a wonderful way to personalize the booties and make them even more special for the new arrival.
Your Crimson Bloom Mary Jane Booties are now complete! These adorable shoes are perfect for a baby shower gift, a new addition to your family, or a cherished keepsake. The rich red color and intricate cable detail make them a standout piece in any baby's wardrobe. Happy knitting!


