Free Pattern: The Honeycomb Pebble Stitch – A Textured Crochet Swatch for Cozy Sweaters
Free Pattern: The Honeycomb Pebble Stitch – A Textured Crochet Swatch for Cozy Sweaters
Introduction
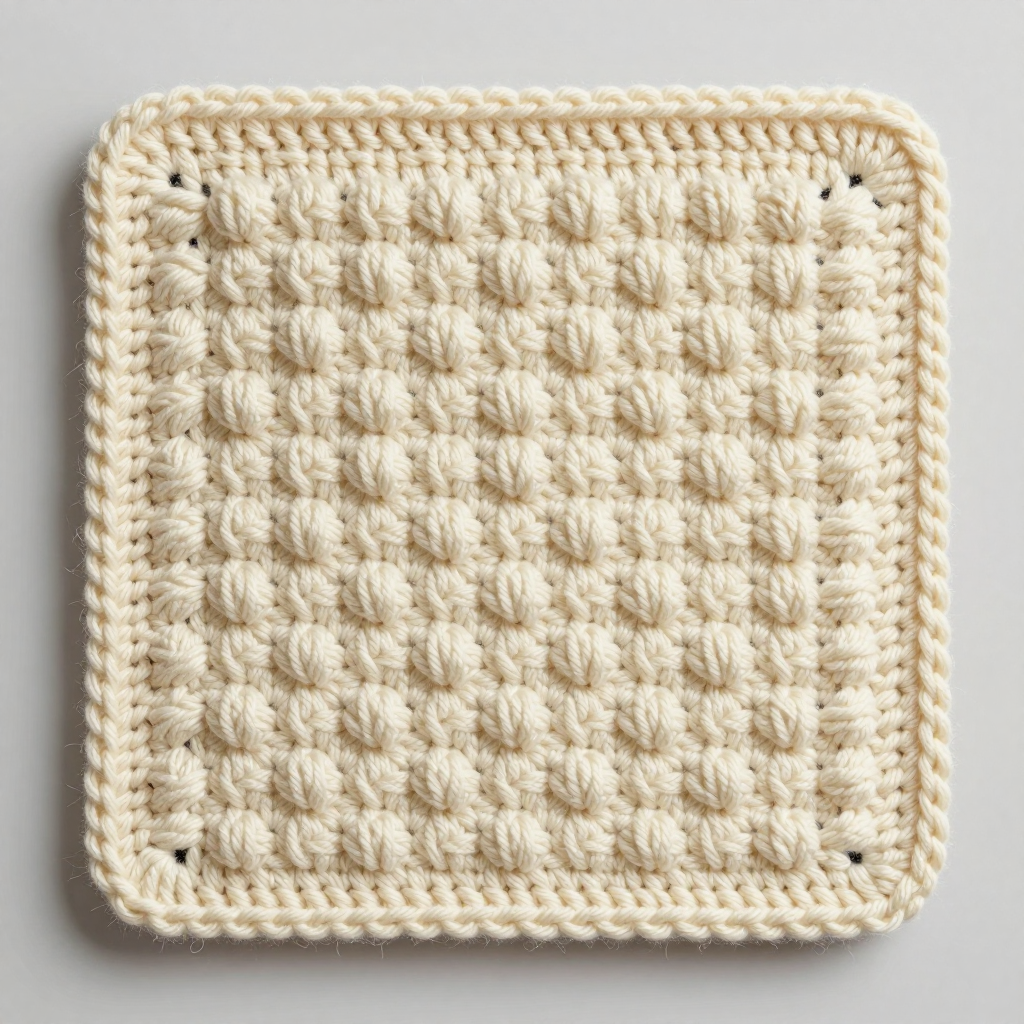
Welcome to your very first textured crochet adventure! The Honeycomb Pebble Stitch is a wonderfully bumpy, cozy stitch pattern that looks impressive but is built from just two simple stitches you will master in minutes. This pattern is perfect for complete beginners who have never held a hook before, because every single step is spelled out for you and nothing is assumed. When you finish, you will hold a 6-inch (15 cm) square swatch covered in raised, rounded "pebbles" arranged in a staggered honeycomb grid across a smooth single-crochet background. The fabric feels thick, warm, and delightfully squishy in your hands — exactly the kind of texture that makes cozy sweater panels feel special. Let's make something beautiful together!
Materials Needed
- Yarn: Worsted weight yarn (also called Category 4 or medium weight). You will need approximately 30–40 yards (about 27–37 meters). A soft, light-colored yarn (cream, pale gray, or soft mustard) is best because light colors show off the bumpy texture most clearly.
- Crochet hook: Size G/6 (4.0 mm). The "G/6" is the US size and "4.0 mm" is the metric size — they are the same hook.
- Stitch markers: At least 2. These are small clips or loops of plastic you place into a stitch to mark your place so you never lose track.
- Tapestry needle: A large, blunt-tipped sewing needle with an eye big enough for yarn. Used for weaving in yarn tails at the end.
- Scissors: Any sharp pair for cutting yarn.
- Finished size: The finished swatch measures 6 inches by 6 inches (15 cm by 15 cm) square, including the optional border.
Abbreviations and Beginner Glossary
Every abbreviation used in this pattern is listed below and explained in plain English. Read through this list once before you begin — you do not need to memorize it!
- ch – chain. Make a loop with the yarn on your hook (this is called a slip knot), then wrap the yarn over your hook and pull it through the loop already on your hook. That is one chain. Chains look like a row of little V's.
- sc – single crochet. Insert your hook into the stitch, wrap the yarn over the hook, pull up a loop (you now have 2 loops on your hook), wrap the yarn over again, and pull it through both loops. One single crochet made.
- dc – double crochet. Wrap the yarn over your hook first, insert the hook into the stitch, wrap the yarn over and pull up a loop (3 loops on hook), wrap the yarn over and pull through 2 loops (2 loops remain), wrap the yarn over and pull through the last 2 loops. One double crochet made. (You will only use dc inside the bobble — see below.)
- bobble – 4-dc bobble. This is a special stitch made of four double crochets squeezed together into one stitch so they puff out into a bump. Full instructions are in the "Special Stitch" section below.
- st(s) – stitch or stitches. One completed loop or "V" in your fabric.
- sp – space. The gap between stitches (used in the border).
- sl st – slip stitch. Insert your hook into the stitch, wrap the yarn over, and pull it through both the stitch and the loop on your hook in one motion. It creates almost no height — used to join rounds neatly.
- turn – flip your work over (like flipping a pancake) so you can work back across the row you just made.
- right side – the front, "pretty" side of your fabric that will face outward.
- wrong side – the back side of your fabric.
- fasten off – cut the yarn a few inches from your work, then pull the tail all the way through the last loop on your hook to lock it. This secures your work so it cannot unravel.
- weave in ends – thread a yarn tail onto a tapestry needle and sew it back and forth through the back of your fabric to hide it.
Special Stitch – 4-dc Bobble
Yarn over, insert hook into the indicated stitch, yarn over, pull up a loop, yarn over, pull through 2 loops (2 loops on hook). Repeat this 3 more times in the same stitch (5 loops on hook). Yarn over and pull through all 5 loops. Push the bobble to the front (wrong side) of the work.
Important note: The bobbles are worked on the wrong side of the fabric so they pop out on the right side. When you work a bobble, you will complete it and then push it away from you.
Gauge
Gauge: 18 stitches by 19 rows in pattern = 4 inches (10 cm) square.
Why gauge matters: Gauge is simply how big your stitches turn out. If your stitches are bigger than the pattern expects, your finished piece will be bigger than 6 inches; if smaller, it will shrink. For a swatch this is a learning exercise, but for a sweater it is the difference between a garment that fits and one that does not. Checking gauge now teaches you exactly how your hands work with this yarn and hook.
How to make a gauge swatch: Chain 28 and work Rows 1–5 of this pattern (the same as the main instructions below). Lay the piece flat without stretching it. Place a ruler across the middle and count how many stitches fit in 4 inches (10 cm) across, then how many rows fit in 4 inches (10 cm) up. If you have more stitches than 18, your tension is tight — try a hook one size larger. If you have fewer than 18, your tension is loose — try a hook one size smaller. The bobble rows will naturally make the fabric a little denser, which is expected and correct.
Beginner Tips Before You Start
- Count your chains carefully at the start. The foundation chain of 28 is the backbone of the whole square. Count it twice before working Row 1 — it is much easier to fix now than later.
- Use a stitch marker in your first stitch of every row. The first stitch of a row is easy to lose, and a marker tells you exactly where the next row begins. Move the marker up as you go.
- Do not pull your yarn too tight. New crocheters often grip the yarn like a lifeline. Hold it gently — the bobbles need a little room to puff out, and tight yarn makes them flat and stiff.
- Push each bobble away from you as soon as you finish it. This is what makes the pebbles pop out on the right side. If you forget, the bobble will hide inside the fabric.
- Remember the turning chain. Each row begins with "ch 1" — this little chain gives your row height. It does not count as a stitch, so your first actual stitch goes into the very first stitch of the row.
- Go slowly and enjoy the rhythm. This stitch is meditative: single crochet, bobble, single crochet, bobble. Once you feel the pattern, your hands will take over.
Step-by-Step Instructions
Finished size: 6" x 6" (15 cm x 15 cm) square.
Foundation
Foundation: Ch 28. (28 ch)
Body
Row 1 (right side): Sc in 2nd ch from hook and in each ch across. Turn. (27 sc)
Row 2 (wrong side): Ch 1, sc in first sc. *Bobble in next sc, sc in next sc; repeat from * to end. Turn. (13 bobbles, 14 sc)
Row 3 (right side): Ch 1, sc in each st across. Turn. (27 sc)
Row 4: Ch 1, sc in first 2 sc. *Bobble in next sc, sc in next sc; repeat from * to last sc, sc in last sc. Turn. (12 bobbles, 15 sc)
Row 5: Ch 1, sc in each st across. Turn. (27 sc)
Rows 6–33: Repeat Rows 2–5 in order (Row 6 = Row 2, Row 7 = Row 3, Row 8 = Row 4, Row 9 = Row 5, and so on) until the piece measures approximately 6 inches (15 cm) from the foundation, ending after a Row 3 or Row 5 (a plain single-crochet row). Do not fasten off yet. (27 sts on every row; bobble rows alternate 13 bobbles/14 sc and 12 bobbles/15 sc)
Border
Round 1: Ch 1, sc evenly around the entire square, working 3 sc in each corner. Join with sl st to first sc. Fasten off. (Even sc count around all four sides, with 3 sc in each of the 4 corners)
Assembly and Finishing
Weaving in ends: Thread each yarn tail onto your tapestry needle. Turn the square to the wrong side and sew the tail back and forth through the backs of several stitches (about 1 inch / 2.5 cm), changing direction once so it cannot work loose. Trim the excess yarn close to the fabric.
Blocking: Lightly dampen the square with clean water (a spray bottle works well). Lay it flat on a towel or blocking mat and gently pat it into a perfect 6-inch (15 cm) square, nudging the corners straight. Do not pull hard — you only want to even out the fabric. Let it dry completely. Blocking opens up the bobbles and makes the texture pop beautifully.
Seaming (if joining swatches into a sweater panel): Place two squares right sides together, lining up the edges. Thread your tapestry needle with matching yarn and sew a simple running stitch through the edge stitches of both squares, working from one corner to the other. Keep your stitches small and even so the seam lies flat. Fasten off and weave in the end on the wrong side.
Pro Tips and Variations
- Change colors every few rows: Work Rows 2–5 in one color, then switch to a second color for the next repeat. Carry the unused color loosely up the side edge, or fasten off and rejoin. Alternating colors makes the honeycomb grid stand out even more.
- Adjust the size: To make a wider swatch, chain any multiple of 2 plus 1 (for example, ch 40 for a wider square), then follow the same row instructions. To make it taller, simply keep repeating Rows 2–5 until you reach your desired length.
- Substitute yarn: A DK weight (Category 3) yarn with a 4.0 mm hook will give a slightly smaller, denser square; a bulky (Category 5) yarn with a 6.0 mm hook will give a larger, loftier one. Always check your gauge again after changing yarn.
- Make the pebbles bigger: For chunkier bumps, work a 5-dc bobble instead of a 4-dc bobble (add one more "yarn over, pull up a loop, pull through 2 loops" repeat before closing the bobble). Keep everything else the same.


