Frosted Fir Tote Free Pattern – Textured Knit Christmas Bag
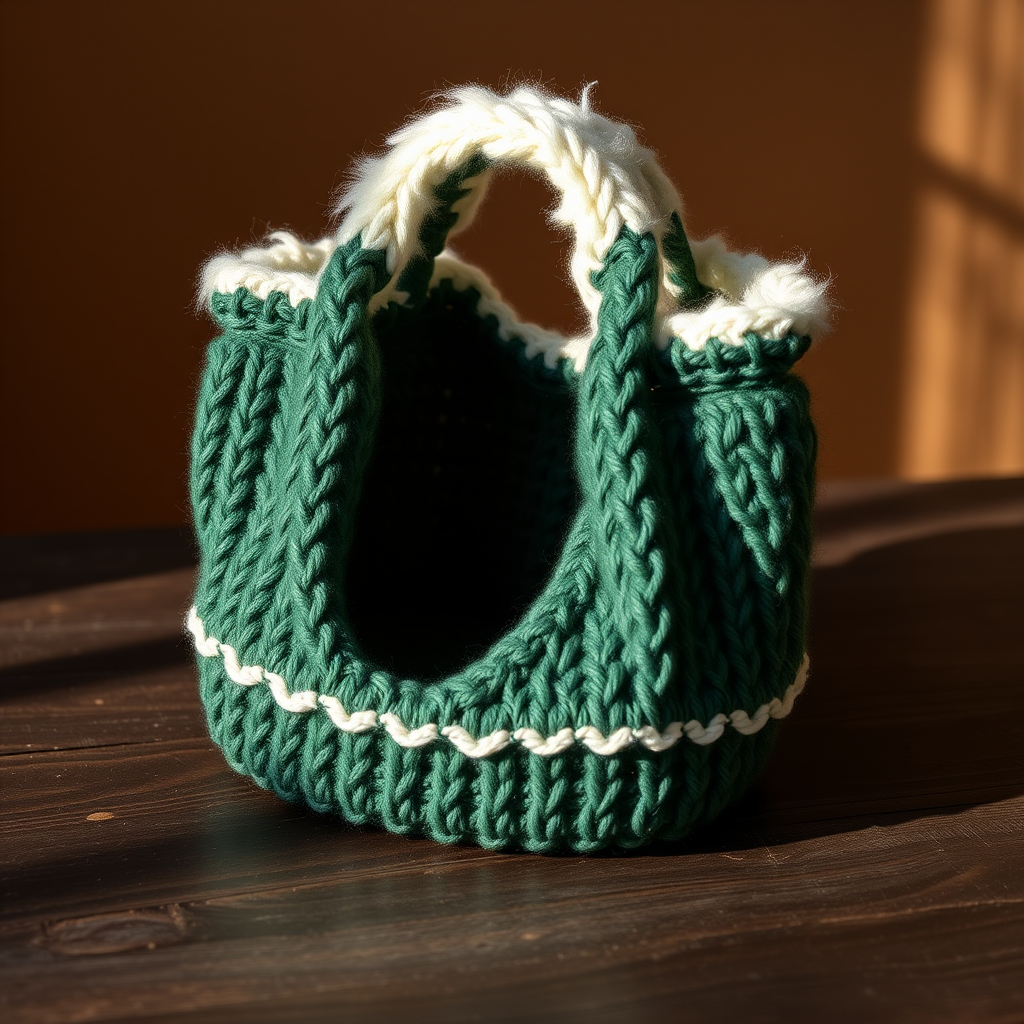
Introducing the Frosted Fir Tote: A Cozy Christmas Knit
Carry your holiday cheer in this luxuriously textured knit tote, featuring a snowy white fur trim and a deep evergreen body. This unique bag is as cozy to make as it is to hold, perfect for gifting, seasonal storage, or simply adding a handmade touch to your winter wardrobe. The Frosted Fir Tote is an intermediate-friendly pattern that combines classic stockinette stitch with a playful faux fur accent, resulting in a soft, rounded rectangle that feels both rustic and refined. Whether you're a seasoned knitter looking for a quick holiday project or a confident beginner ready to try something new, this pattern offers clear, step-by-step guidance to create a stunning, functional accessory.
The design features a smooth, deep forest green body with a subtle garter stitch base, two integrated handles formed by cleverly placed bind-offs, and a fluffy snow-white crocheted trim that mimics freshly fallen frost. The result is a bag that's not only beautiful to display but also sturdy enough for everyday use. Let's dive into the materials and instructions so you can start crafting your own Frosted Fir Tote today.
Materials Needed
Before you begin, gather the following supplies. All items are readily available at most craft stores or online yarn retailers.
Yarn
- Main Color (MC): Worsted weight yarn in Deep Forest Green – approximately 250-300 yards (230-275 meters). A smooth, plied yarn works best to showcase the stockinette stitch.
- Contrast Color (CC): Worsted weight yarn in Ivory White – approximately 50-75 yards (46-69 meters) for the crocheted trim base.
- Faux Fur Yarn: A small amount (about 20-30 yards) of fluffy, faux fur yarn in snow white for the final trim round. This yarn is typically bulky and should be worked with a larger hook if needed.
Needles & Hooks
- Knitting Needles: US Size 8 (5 mm) – straight or circular, whichever you prefer for flat knitting.
- Crochet Hook: US Size G/6 (4 mm) for the trim. If your faux fur yarn is very bulky, you may need a larger hook (e.g., US H/8 or I/9) to work comfortably.
Additional Supplies
- Tapestry needle for weaving in ends and seaming.
- Stitch markers (optional, but helpful for marking handle openings).
- Scissors.
- Measuring tape or ruler.
- Blocking mats and pins (optional, for finishing).
Gauge
18 stitches and 24 rows = 4 inches (10 cm) in stockinette stitch (knit on RS, purl on WS) using US 8 needles. Always knit a gauge swatch before starting to ensure your finished bag matches the intended dimensions. If your gauge is off, adjust your needle size accordingly.
Step-by-Step Instructions
Follow these detailed instructions carefully. The bag is knitted flat in one piece, then seamed and finished with a crocheted trim. Take your time, and don't hesitate to refer back to the gauge and materials sections if needed.
Bag Body (Knitted in One Piece)
Step 1: Cast On
With your Main Color (MC) yarn and US 8 needles, cast on 40 stitches using your preferred method (long-tail cast on is recommended for a sturdy edge).
Step 2: Garter Stitch Base
Row 1: Knit all stitches.
Row 2: Purl all stitches.
Note: This creates a garter stitch texture, which forms a firm, non-curling base for the bag. This will be the bottom of your tote.
Step 3: Stockinette Body
Row 3: Knit all stitches (this is the right side of your work).
Row 4: Purl all stitches (this is the wrong side).
Repeat Rows 3 and 4 (stockinette stitch) until the piece measures 12 inches (30.5 cm) from the cast-on edge, ending with a purl row (wrong side). This forms the main body of the bag. If you're using a circular needle, simply turn your work at the end of each row.
Step 4: Create Handle Openings
This is the trickiest part, but it's simple once you understand the stitch counts. You will be binding off stitches to create gaps for the handles, then casting them back on in the next row.
Next Row (Right Side): Knit 10 stitches. Then, bind off the next 8 stitches loosely (knit 2, pass the first stitch over the second, repeat until 8 stitches are bound off). You will have one stitch remaining on your right needle after the bind-off. Knit the next 4 stitches (these are the center of the bag). Then, bind off the next 8 stitches loosely again. Finally, knit the remaining 10 stitches. You should now have 10 stitches on each side and 4 stitches in the middle, with two gaps where the handles will be.
Next Row (Wrong Side): Purl 10 stitches. Now, you need to cast on 8 stitches to fill the first gap. Use the backward loop cast-on method: simply loop the yarn around your thumb and place the loop on the needle, repeating 8 times. Purl the next 4 stitches (the center). Cast on 8 stitches again for the second gap. Purl the final 10 stitches. You should now have 40 stitches total on your needle again.
Step 5: Continue Stockinette
Continue in stockinette stitch (knit on RS, purl on WS) for another 4 inches (10 cm), ending with a purl row. This section forms the top of the bag above the handles.
Step 6: Top Border
Next Row (RS): Knit all stitches.
Next Row (WS): Purl all stitches.
Repeat these two rows (garter stitch) for 1 inch (2.5 cm). This creates a neat, non-rolling border that will hold the crocheted trim. Bind off all stitches loosely on the right side. Cut yarn, leaving a long tail for seaming.
Seaming the Bag
Step 7: Fold and Sew
Fold the knitted piece in half with right sides together, matching the cast-on edge to the bind-off edge. The handle openings should be at the top, and the garter stitch base at the bottom. Using your tapestry needle and the long tail from the bind-off, sew the side seams from the bottom up to the handle openings. Important: Leave the top 1 inch (2.5 cm) open – this is the border area that will be turned and trimmed. Sew both side seams securely, then turn the bag right side out. The handle openings should now be on the sides, and the border should fold naturally outward.
Faux Fur Trim (Crocheted)
Step 8: Base Round in CC
Using your Contrast Color (CC) yarn and US G/6 (4 mm) crochet hook, attach the yarn to the top edge of the bag with a slip stitch. Work a round of single crochet (sc) evenly around the entire top edge, inserting your hook through both layers of the garter stitch border. This secures the border and creates a foundation for the fur. Join with a slip stitch to the first single crochet. Do not turn.
Step 9: Faux Fur Round
Now, switch to your faux fur yarn. Attach it with a slip stitch to the first stitch of the previous round. Work a round of single crochet into each stitch of the previous round. Tip: The faux fur yarn can be slippery and difficult to see, so work slowly and feel for the stitches. If the fur yarn is too bulky for the 4 mm hook, switch to a larger hook (US H/8 or I/9) for this round only. Join with a slip stitch to the first single crochet. Fasten off and weave in the end securely.
Finishing Touches
Step 10: Weave in Ends
Using your tapestry needle, weave in all loose ends from the cast-on, bind-off, and yarn joins. Be sure to weave them in on the inside of the bag so they're hidden.
Step 11: Blocking (Optional)
To give your bag a professional finish, lightly block it. Mist the bag with water (or use a steam iron on a low setting, holding it above the fabric) and shape it gently. Pay special attention to the handle openings and the top border. Allow it to dry completely before using. This step helps even out the stitches and gives the bag a crisp, polished shape.
Your Frosted Fir Tote is now complete! Fill it with gifts, use it for holiday shopping, or display it as a cozy seasonal decoration. The combination of the deep green body and the fluffy white trim makes it a standout piece that you'll be proud to say you made yourself. Happy crafting, and enjoy your beautiful new bag!


