Gold Trinity Knot Mouse Disc Free Pattern: A Beginner Crochet Ornament
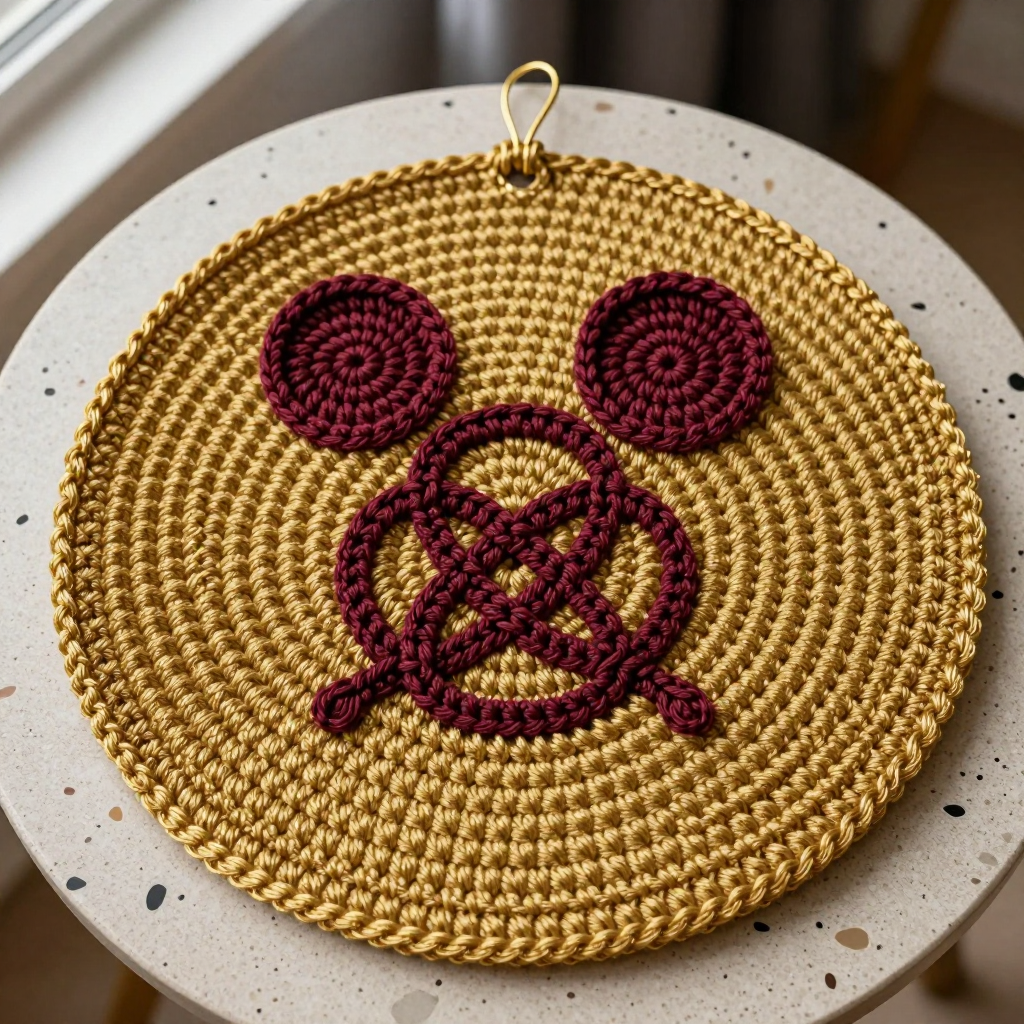
Gold Trinity Knot Mouse Disc: A Beginner Crochet Ornament
Introduction
If you have never held a crochet hook before, this little ornament is the perfect first project to fall in love with. It is a flat, round gold disc about 4 inches across, topped with a burgundy Irish trinity-knot motif that cleverly doubles as a stylized mouse face with two tiny round ears. Because it is worked almost entirely in one simple stitch (single crochet) in easy, continuous rounds, it builds confidence fast and finishes in a single cozy evening. The finished piece is dense, slightly textured, and wonderfully tactile, with a warm metallic gold surface and a crisp burgundy accent that pops against it. Hang it on a tree, tie it to a gift, or keep it as a modern handmade keepsake you will be proud to say you made yourself.
Materials Needed
- Yarn (gold): Bulky weight (weight 5) wool yarn, approximately 30 yd / 27 m in gold for the disc.
- Yarn (burgundy): Bulky weight (weight 5) wool yarn, approximately 12 yd / 11 m in burgundy for the motif and ears.
- Crochet hook: Size H-8 / 5.0 mm (or the size you need to match gauge).
- Stitch marker: 1 removable marker (or a scrap of contrasting yarn) to track the start of each round.
- Yarn needle: A blunt-tipped tapestry/yarn needle for sewing pieces together and weaving in ends.
- Scissors: Any small sharp pair for trimming yarn.
- Optional: A spray bottle of water for light blocking, and pins if you want to shape the disc flat while it dries.
- Finished size: Disc measures 4 in / 10 cm in diameter. The motif measures about 2 1/2 in / 6.5 cm across. Each ear measures about 3/4 in / 2 cm.
Abbreviations and Beginner Glossary
Every abbreviation used in this pattern is listed here and explained as if you have never crocheted before. Read through once before you begin.
- ch – chain. Make a slip knot on your hook, then wrap the yarn over the hook and pull it through the loop on your hook. That is one chain stitch.
- sc – single crochet. Insert your hook into the stitch, wrap the yarn over the hook, pull up a loop (you now have 2 loops on the hook), wrap the yarn over again, and pull it through both loops. One single crochet made.
- sl st – slip stitch. Insert your hook into the stitch, wrap the yarn over, and pull it straight through both the stitch and the loop on your hook at the same time. It joins without adding height.
- st / sts – stitch / stitches. One completed stitch, or several of them.
- 2 sc in next st – work two single crochets into the same stitch. This is an increase and makes the piece wider.
- magic ring – an adjustable loop you make with your yarn, then crochet stitches into. Pulling the tail closes the center hole tightly. (If you prefer, chain 4 and join with a slip stitch to form a ring, then work into that ring instead.)
- round – one complete circle of stitches worked around the center. Rounds are numbered.
- fasten off – cut the yarn a few inches from your work, then pull the tail all the way through the last loop to lock it.
- weave in ends – thread a yarn tail onto the yarn needle and run it back and forth through the back of the work so it disappears and stays secure.
- lark's head knot – fold a length of yarn in half, push the folded loop through a stitch or edge, then pull the two loose ends through that loop and tighten.
- gauge – how many stitches and rounds fit in a set measurement (see next section).
Gauge
Gauge: 12 sc x 13 rounds = 4 in / 10 cm in single crochet worked in the round.
Why gauge matters: Gauge is simply how big your stitches come out. If your stitches are looser than the pattern's, your disc will be larger than 4 inches; if tighter, it will be smaller. Matching gauge means your finished ornament comes out the size listed and the motif fits nicely on the disc.
How to make a gauge swatch: With your gold yarn and H-8 hook, make a magic ring, work 6 sc into it, then increase as in Rounds 2–4 of the disc below until you have a small flat circle. Measure across the middle: 12 single crochets should measure 4 inches, and 13 rounds should measure 4 inches. If you get more stitches than 12 in 4 inches, your stitches are too tight — try a larger hook. If you get fewer, your stitches are too loose — try a smaller hook. The disc itself is a great practice swatch, so you can simply begin and check your measurement after Round 8.
Beginner Tips Before You Start
- Use a stitch marker. Because the disc is worked in a continuous spiral, the rounds never "line up." Place your marker in the very first stitch of each round and move it up every time you start a new round so you always know where you are.
- Do not pull your yarn too tight. Tension is the number one beginner struggle. Keep your loops relaxed and even; tight stitches make a stiff, cupped disc that will not lie flat.
- Count out loud. Count your stitches at the end of every increase round to confirm the count in parentheses. Catching a mistake early is far easier than fixing it later.
- Keep the gold disc flat. After each increase round, lay the disc on the table. If it ruffles, your increases are too tight; if it cups upward, you may have missed an increase.
- Work the motif pieces first if you are nervous. The three small loops and two ears are quick, low-pressure practice before you commit to the big disc.
- Change colors only when joining a new piece. In this pattern the gold and burgundy never blend mid-round; each piece is made in a single color, which keeps things simple.
Step-by-Step Instructions
Part 1: Gold Disc
Notes: Work in continuous single crochet rounds in gold. Do not join rounds unless instructed. Move the stitch marker up as you go. The disc is worked flat with no stuffing.
Round 1: With gold, make a magic ring. Work 6 sc into the ring. Pull the tail to close the center. Place marker in first st. (6 sc)
Round 2: 2 sc in each st around. (12 sc)
Round 3: [2 sc in next st, 1 sc in next st] around. (18 sc)
Round 4: [2 sc in next st, 1 sc in each of next 2 sts] around. (24 sc)
Round 5: [2 sc in next st, 1 sc in each of next 3 sts] around. (30 sc)
Round 6: [2 sc in next st, 1 sc in each of next 4 sts] around. (36 sc)
Round 7: [2 sc in next st, 1 sc in each of next 5 sts] around. (42 sc)
Round 8: [2 sc in next st, 1 sc in each of next 6 sts] around. (48 sc)
Rounds 9–100: Sc in each st around. (48 sc) — Repeat this plain round 92 times total, ending on Round 100. (This builds the flat, even body of the disc to its full 4-inch diameter.)
Fasten off gold. Weave in ends.
Part 2: Burgundy Trinity Knot Motif
Notes: The motif is made as three separate interlocking loops worked in burgundy, then arranged into a trinity knot and sewn in place. Work each loop the same way.
Loop 1: With burgundy, ch 12. Join with sl st to first ch to form a ring. Work 18 sc evenly around the ring. Join with sl st to first sc. Fasten off, leaving a 6 in / 15 cm tail. (18 sc)
Loop 2: Work as Loop 1. (18 sc)
Loop 3: Work as Loop 1. (18 sc)
Shaping the knot: Arrange the three loops so they overlap and interlock at the center, forming a three-lobed knot with a small open center. Thread the tails onto the yarn needle and sew the loops together at the overlap points to hold the knot shape.
Part 3: Burgundy Ears (make 2)
Round 1: With burgundy, make a magic ring. Work 6 sc into the ring. Pull the tail to close the center. (6 sc)
Round 2: 2 sc in each st around. (12 sc)
Rounds 3–4: Sc in each st around. (12 sc)
Fasten off, leaving a 6 in / 15 cm tail. Flatten each ear slightly.
Assembly and Finishing
- Position the motif. Center the burgundy trinity knot on the gold disc, about 1/2 in / 1.3 cm below the top edge. Pin it in place so it does not shift.
- Sew the motif down. Thread a burgundy tail onto the yarn needle. Sew the motif to the disc with small, even stitches, catching only the surface of the gold disc so the stitches do not show on the back. Work around the loops until the knot is secure.
- Add the ears. Position one ear at the upper left of the motif and one at the upper right, about 1 in / 2.5 cm apart, so the motif reads as a stylized mouse face. Pin and sew each ear securely with the burgundy tails, again catching only the surface of the disc.
- Weave in ends. Turn the ornament over and thread each remaining tail onto the yarn needle. Run it back and forth through the back of the stitches for about an inch, then trim close to the work so it disappears.
- Add a hanging loop (optional). Cut a 6 in / 15 cm length of gold yarn. Fold it in half and attach it to the top edge of the disc with a lark's head knot (push the folded loop through a stitch, then pull the two loose ends through that loop and tighten), or simply sew a small loop at the top center. Trim ends.
- Block. Lightly mist the ornament with water, shape it flat into a 4 in / 10 cm circle, and let it dry completely. If you like, pin the edges flat to a towel while it dries. Trim any loose yarn tails.
Pro Tips and Variations
- Play with color. Keep the gold disc but swap the burgundy for deep green, cream, or navy for a different holiday look. You can also make the disc in cream and the motif in gold for a softer, vintage feel.
- Adjust the size. To make a smaller ornament, stop the increase rounds earlier (for example, end after Round 6 for a 3-inch disc) and work fewer plain rounds. To make a larger one, add one more increase round and a few extra plain rounds, keeping the same gauge.
- Substitute yarn. Any bulky (weight 5) yarn works well, but wool gives the crispest stitch definition. If you use a smoother acrylic, check your gauge again, since the disc may come out slightly larger.
- Make a set. These discs work up so quickly that you can crochet a whole garland in an evening — string several together on a length of yarn or ribbon for a handmade holiday decoration.


