Meadow Mallow Bunny Amigurumi Free Pattern – Crochet a Cloud-Soft Easter Companion
Meadow Mallow Bunny Amigurumi Free Pattern – Crochet a Cloud-Soft Easter Companion
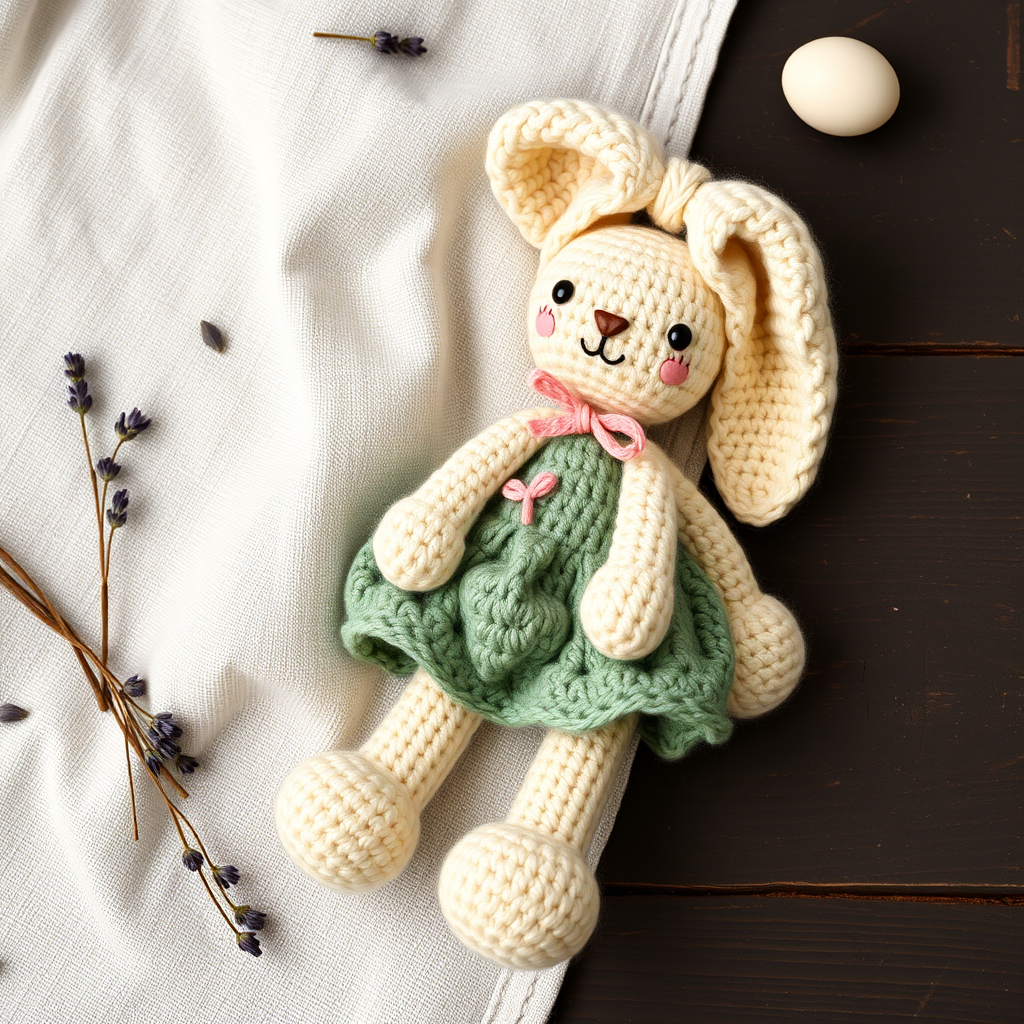
There's something truly magical about creating a handmade keepsake that will be treasured for years to come. The Meadow Mallow Bunny is exactly that kind of project—an heirloom-quality amigurumi that combines modern aesthetics with classic crochet charm. This dreamy bunny is worked in a palette of oat, sage, and blush, featuring a textured bobble tail and floppy ears that practically beg to be cuddled. Whether you're crafting it for an Easter basket, a nursery shelf, or as a thoughtful gift for someone special, this pattern offers a gentle, handmade touch that store-bought toys simply can't replicate. Let's dive into creating your very own cloud-soft companion!
Materials Needed
Before we begin, gather these supplies to ensure a smooth crochet session:
- Yarn: Worsted weight cotton or cotton-blend yarn in four colors:
- Oat (MC) – for the bunny's body, head, ears, arms, and legs
- Sage (CC1) – for the dress
- Blush (CC2) – for the tail and bow
- Small amount of dark brown – for the face embroidery
- Hook: 3.5mm (E) crochet hook
- Stuffing: Polyester fiberfill or your preferred amigurumi stuffing
- Yarn needle: For sewing pieces together and weaving in ends
- Stitch markers: To keep track of rounds
- Scissors: For cutting yarn
Gauge Note: Gauge is not critical for this pattern, but aim for a tight tension so the stuffing doesn't show through. Approximately 4 single crochet stitches = 1 inch.
Step-by-Step Instructions
Abbreviations
Familiarize yourself with these standard crochet abbreviations before starting:
- MR = magic ring
- sc = single crochet
- inc = increase (2 sc in one stitch)
- dec = decrease (invisible decrease)
- sl st = slip stitch
- ch = chain
- FO = fasten off
Head (MC)
Begin with the head, which forms the foundation of your bunny's sweet expression.
- Round 1: MR, 6 sc (6)
- Round 2: inc in each st around (12)
- Round 3: (sc in next st, inc) around (18)
- Round 4: (sc in next 2 sts, inc) around (24)
- Round 5: (sc in next 3 sts, inc) around (30)
- Round 6: (sc in next 4 sts, inc) around (36)
- Rounds 7-12: sc in each st around (36) – work these 6 rounds without increases to create the head's height.
- Round 13: (sc in next 4 sts, dec) around (30)
- Round 14: (sc in next 3 sts, dec) around (24)
- Round 15: (sc in next 2 sts, dec) around (18)
- Stuff firmly with fiberfill, shaping the head as you go.
- Round 16: (sc in next st, dec) around (12)
- Round 17: dec around (6). FO and weave in the end.
Body (MC)
The body is worked similarly to the head but with a slightly different increase pattern to create a pear-like shape that allows the bunny to sit.
- Round 1: MR, 6 sc (6)
- Round 2: inc in each st around (12)
- Round 3: (sc in next st, inc) around (18)
- Round 4: (sc in next 2 sts, inc) around (24)
- Round 5: (sc in next 3 sts, inc) around (30)
- Rounds 6-10: sc in each st around (30) – work 5 rounds straight.
- Round 11: (sc in next 3 sts, dec) around (24)
- Round 12: (sc in next 2 sts, dec) around (18)
- Stuff firmly, ensuring the bottom is flat so the bunny can sit.
- Round 13: (sc in next st, dec) around (12)
- Round 14: dec around (6). FO, leaving a long tail for sewing. Sew the head to the body, aligning the decreases.
Ears (Make 2, MC)
These floppy ears are the signature feature of the Meadow Mallow Bunny. They're worked flat and then sewn closed at the bottom.
- Round 1: MR, 6 sc (6)
- Round 2: (sc in next st, inc) around (9)
- Round 3: sc in each st around (9)
- Round 4: (sc in next 2 sts, inc) around (12)
- Rounds 5-10: sc in each st around (12) – work 6 rounds straight to create the ear length.
- Round 11: (sc in next 2 sts, dec) around (9)
- Rounds 12-14: sc in each st around (9) – work 3 rounds straight.
- FO, leaving a long tail. Flatten the ear and sew the bottom closed with a few whip stitches. Sew ears to the top of the head, spacing them about 4 stitches apart. Position them slightly toward the back for a natural look.
Arms (Make 2, MC)
These small arms are lightly stuffed and attach to the sides of the body.
- Round 1: MR, 6 sc (6)
- Round 2: (sc in next st, inc) around (9)
- Rounds 3-7: sc in each st around (9) – work 5 rounds straight.
- Stuff lightly – just enough to give shape without making them stiff.
- Round 8: dec, sc in next 7 sts (8)
- Rounds 9-10: sc in each st around (8). FO, leaving a long tail. Sew arms to the sides of the body, about 2 rounds down from the neck.
Legs (Make 2, MC)
These sturdy legs allow your bunny to sit upright comfortably.
- Round 1: MR, 6 sc (6)
- Round 2: inc in each st around (12)
- Round 3: (sc in next st, inc) around (18)
- Rounds 4-6: sc in each st around (18) – work 3 rounds straight.
- Round 7: (sc in next st, dec) around (12)
- Stuff firmly to create a stable base.
- Round 8: dec around (6). FO, leaving a long tail. Sew legs to the bottom front of the body, positioning them so the bunny can sit with legs forward.
Tail (CC2 – Blush)
This textured bobble tail adds a delightful pop of color and texture.
- Round 1: MR, 6 sc (6)
- Round 2: inc in each st around (12)
- Round 3: (sc in next st, inc) around (18)
- Round 4: sc in each st around (18)
- Round 5: (sc in next st, dec) around (12)
- Stuff lightly – the tail should be soft and squishy.
- Round 6: dec around (6). FO, leaving a long tail. Sew to the back of the body, centered.
Dress (CC1 – Sage)
This adorable A-line dress is worked in continuous rounds from the neckline down. It's designed to fit snugly over the bunny's body.
- Round 1: Ch 20, sl st to join in a ring. Ch 1, sc in each ch around (20)
- Round 2: (sc in next 4 sts, inc) around (24)
- Round 3: (sc in next 5 sts, inc) around (28)
- Round 4: (sc in next 6 sts, inc) around (32)
- Round 5: (sc in next 7 sts, inc) around (36)
- Round 6: (sc in next 8 sts, inc) around (40)
- Rounds 7-9: sc in each st around (40) – work 3 rounds straight.
- Round 10: (sc in next 9 sts, inc) around (44)
- Rounds 11-12: sc in each st around (44) – work 2 rounds straight.
- Round 13: (sc in next 10 sts, inc) around (48)
- Rounds 14-15: sc in each st around (48) – work 2 rounds straight.
- FO and weave in the end. Place the dress over the bunny's body, with the neckline just below the head. Sew the dress to the body at the shoulders and sides to keep it in place.
Bow (CC2 – Blush)
This sweet little bow adds the perfect finishing touch.
- Ch 6, sc in 2nd ch from hook and in each ch across (5). Ch 1, turn.
- Repeat until you have a square (5 rows total).
- FO, leaving a long tail. Wrap the tail around the center of the square to form a bow shape, pulling tight to cinch the middle.
- Sew the bow to the top of the bunny's head between the ears.
Face Embroidery
This is where your bunny comes to life! Take your time with the facial features to achieve that sweet, gentle expression.
- Eyes: Using dark brown yarn, embroider two small eyes (French knots or satin stitches) on Round 10 of the head, about 6 stitches apart. Position them slightly toward the front of the head.
- Nose and Mouth: Embroider a small 'Y' shape below the eyes, centered on Round 12. The vertical line of the 'Y' should be short, with the two diagonal lines forming the mouth.
- Blush: Add a small blush of pink yarn (CC2) on each cheek, using a few short straight stitches. Position these just below and to the outside of each eye.
Finishing Touches
Once all pieces are assembled and the face is embroidered, take a moment to review your bunny. Ensure all seams are secure and all ends are woven in neatly. Gently shape the ears so they flop naturally to the sides, and fluff the tail slightly for that cloud-soft texture.
Your Meadow Mallow Bunny is now complete! This heirloom-quality companion is perfect for Easter baskets, nursery décor, or as a heartfelt handmade gift. The combination of natural oat, sage, and blush creates a modern, minimalist aesthetic that will complement any space. Enjoy your new cuddly friend, and don't be surprised if you find yourself making another one—they're simply irresistible!
Happy crocheting, and may your stitches always be tight and your bunnies always be cuddly!



