Meadow Whisper Baby Blanket Free Pattern – A Knitted Garden of Stitches
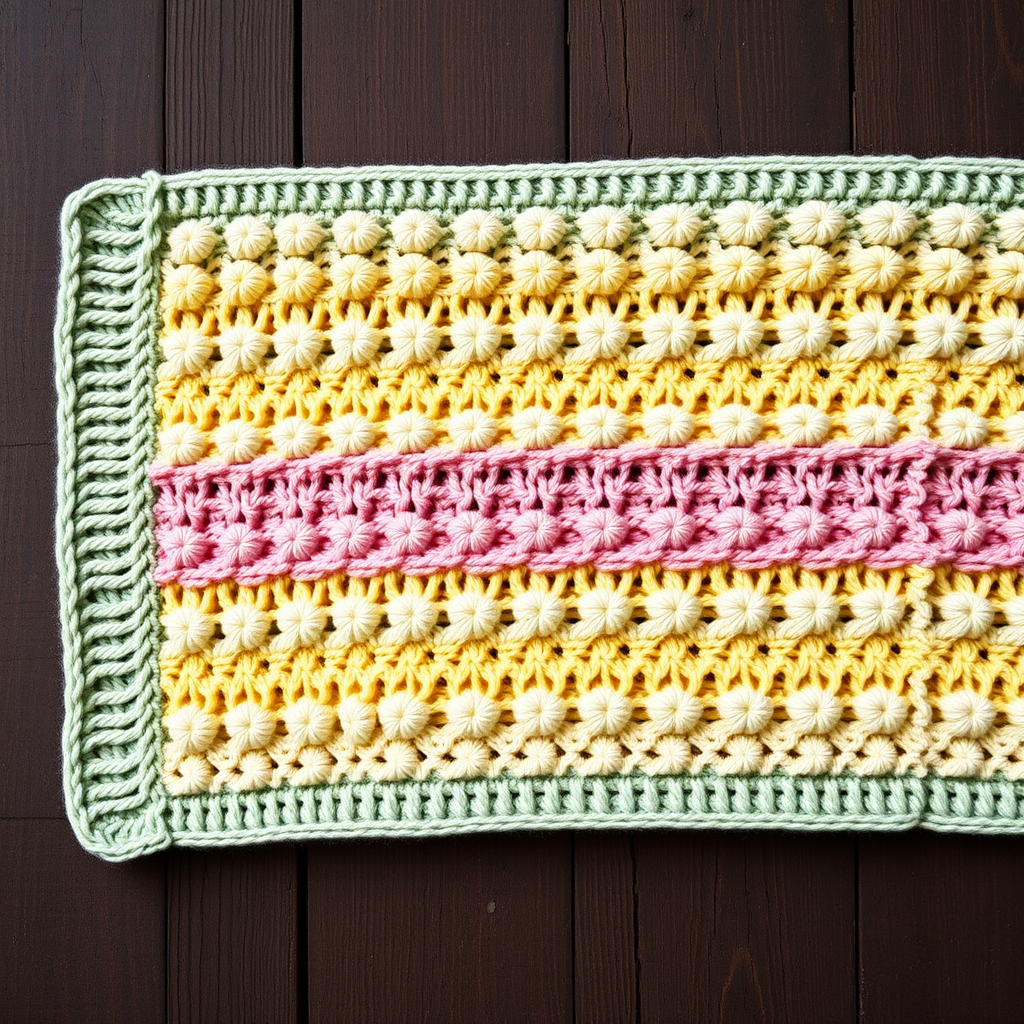
Meadow Whisper Baby Blanket Free Pattern – A Knitted Garden of Stitches
Wrap your little one in the softness of a spring meadow with this textured knitted blanket. The gentle bobbles and lace stripes evoke dewy grass and tiny blossoms, creating a heirloom piece that will be treasured for generations. This pattern is perfect for intermediate knitters looking to expand their skills, but with clear instructions, even confident beginners can create this stunning baby gift.
The Meadow Whisper blanket features a beautiful combination of raised bobbles that mimic tiny flowers and delicate lace holes that resemble leaves catching morning dew. Worked in soft pastel stripes of sage green, buttercup yellow, blush pink, and cream, this blanket brings the tranquility of a spring garden right into your nursery.
Materials Needed
Before you begin your knitting journey, gather these essential supplies:
- Yarn: DK weight (light worsted) cotton or cotton-blend yarn in 4 colors:
- Color A: Soft sage green (for borders)
- Color B: Buttercup yellow
- Color C: Blush pink
- Color D: Cream
- Needle: US 6 (4.0 mm) circular knitting needle with a 32-inch cable
- Gauge: 20 stitches and 28 rows = 4 inches in stockinette stitch (blocked)
- Finished Size: 30 x 36 inches (76 x 91 cm)
- Extras: Stitch markers (optional), tapestry needle for weaving ends, blocking mats and pins
Stitch Abbreviations
Familiarize yourself with these abbreviations before starting:
- k = knit
- p = purl
- yo = yarn over
- k2tog = knit two together (right-leaning decrease)
- ssk = slip, slip, knit (left-leaning decrease)
- bobble = (k1, p1, k1, p1, k1) into same stitch, then pass the 2nd, 3rd, 4th, and 5th stitches over the 1st stitch (5-stitch bobble)
- sl = slip
Pattern Notes
- The blanket is worked flat back and forth on a circular needle to accommodate the large number of stitches.
- All slipped stitches are slipped purlwise with yarn in back (unless otherwise noted).
- The border is worked first, then the body pattern, then the border is repeated at the end.
- Keep the first and last 2 stitches of every row as edge stitches – these create a neat, stable border.
Step-by-Step Instructions
Border (Worked First)
With Color A (sage green), cast on 152 stitches.
Row 1 (RS): k2, *p2, k2* repeat from * to end of row.
Row 2 (WS): p2, *k2, p2* repeat from * to end of row.
Repeat Rows 1-2 for 8 rows total. This creates 4 ridges of garter stitch on each side, forming a lovely ribbed border.
Body Pattern
Switch to Color B (buttercup yellow) and begin the main pattern. Remember to always keep the first and last 2 stitches as edge stitches (knit on RS, purl on WS).
Row 1 (RS): k2 (edge), *k1, yo, ssk, k3, bobble, k3, k2tog, yo, k1* repeat from * to last 2 stitches, k2 (edge).
Row 2 (WS): p2 (edge), *purl all stitches to last 2 stitches, p2 (edge)*.
Row 3 (RS): k2 (edge), *k2, yo, ssk, k2, bobble, k2, k2tog, yo, k2* repeat to last 2 stitches, k2 (edge).
Row 4 (WS): Same as Row 2.
Row 5 (RS): k2 (edge), *k3, yo, ssk, k1, bobble, k1, k2tog, yo, k3* repeat to last 2 stitches, k2 (edge).
Row 6 (WS): Same as Row 2.
Row 7 (RS): k2 (edge), *k4, yo, ssk, bobble, k2tog, yo, k4* repeat to last 2 stitches, k2 (edge).
Row 8 (WS): Same as Row 2.
Row 9 (RS): k2 (edge), *k4, k2tog, yo, k1, yo, ssk, k4* repeat to last 2 stitches, k2 (edge).
Row 10 (WS): Same as Row 2.
Row 11 (RS): k2 (edge), *k3, k2tog, yo, k3, yo, ssk, k3* repeat to last 2 stitches, k2 (edge).
Row 12 (WS): Same as Row 2.
Row 13 (RS): k2 (edge), *k2, k2tog, yo, k5, yo, ssk, k2* repeat to last 2 stitches, k2 (edge).
Row 14 (WS): Same as Row 2.
Row 15 (RS): k2 (edge), *k1, k2tog, yo, k7, yo, ssk, k1* repeat to last 2 stitches, k2 (edge).
Row 16 (WS): Same as Row 2.
Row 17 (RS): k2 (edge), *k2tog, yo, k9, yo, ssk* repeat to last 2 stitches, k2 (edge).
Row 18 (WS): Same as Row 2.
Row 19 (RS): k2 (edge), *k1, yo, ssk, k3, bobble, k3, k2tog, yo, k1* repeat to last 2 stitches, k2 (edge).
Row 20 (WS): Same as Row 2.
Row 21 (RS): k2 (edge), *k2, yo, ssk, k2, bobble, k2, k2tog, yo, k2* repeat to last 2 stitches, k2 (edge).
Row 22 (WS): Same as Row 2.
Row 23 (RS): k2 (edge), *k3, yo, ssk, k1, bobble, k1, k2tog, yo, k3* repeat to last 2 stitches, k2 (edge).
Row 24 (WS): Same as Row 2.
Row 25 (RS): k2 (edge), *k4, yo, ssk, bobble, k2tog, yo, k4* repeat to last 2 stitches, k2 (edge).
Row 26 (WS): Same as Row 2.
Row 27 (RS): k2 (edge), *k4, k2tog, yo, k1, yo, ssk, k4* repeat to last 2 stitches, k2 (edge).
Row 28 (WS): Same as Row 2.
Row 29 (RS): k2 (edge), *k3, k2tog, yo, k3, yo, ssk, k3* repeat to last 2 stitches, k2 (edge).
Row 30 (WS): Same as Row 2.
Row 31 (RS): k2 (edge), *k2, k2tog, yo, k5, yo, ssk, k2* repeat to last 2 stitches, k2 (edge).
Row 32 (WS): Same as Row 2.
Row 33 (RS): k2 (edge), *k1, k2tog, yo, k7, yo, ssk, k1* repeat to last 2 stitches, k2 (edge).
Row 34 (WS): Same as Row 2.
Row 35 (RS): k2 (edge), *k2tog, yo, k9, yo, ssk* repeat to last 2 stitches, k2 (edge).
Row 36 (WS): Same as Row 2.
Repeat Rows 1-36 two more times (for a total of 3 pattern repeats in the first color).
Color Stripes
To create the beautiful striped effect:
- Work Rows 1-36 with Color B (buttercup yellow) – this is your first stripe.
- Switch to Color C (blush pink) and work Rows 1-36 – this is your second stripe.
- Switch to Color D (cream) and work Rows 1-36 – this is your third stripe.
- Switch back to Color B (buttercup yellow) and work Rows 1-36 – this is your fourth stripe.
Tip: You can adjust the stripe sequence to your preference, but keep it symmetrical for a balanced look.
Border (Worked Last)
Switch back to Color A (sage green) and work 8 rows of k2, p2 ribbing exactly as you did at the beginning:
Row 1 (RS): k2, *p2, k2* repeat to end.
Row 2 (WS): p2, *k2, p2* repeat to end.
Repeat these 2 rows for a total of 8 rows.
Bind off loosely in pattern (knit the knits and purl the purls as you bind off).
Finishing
Complete your Meadow Whisper blanket with these final steps:
- Weave in all ends carefully using a tapestry needle. Be sure to weave in ends on the wrong side of the work, following the path of the yarn to keep them invisible.
- Block the blanket gently to the specified measurements of 30 x 36 inches. Pin the edges to shape, being careful not to stretch the bobbles or lace too aggressively.
- Allow to dry completely before removing pins. This may take 24-48 hours depending on humidity.
- Once dry, your blanket is ready to gift or use! The cotton yarn will soften beautifully with each wash.
Tips for Success
- Count your stitches after each pattern repeat to ensure you haven't accidentally added or dropped stitches.
- Use stitch markers between pattern repeats to help you keep track of where you are in the row.
- Practice the bobble stitch on a swatch first if you're new to this technique – it's easier than it looks!
- Keep your tension consistent, especially when switching between colors. Loose tension on color changes can create gaps.
- Blocking is essential for this pattern – it helps the lace open up and the bobbles pop beautifully.
This Meadow Whisper Baby Blanket makes a thoughtful handmade gift for baby showers, christenings, or new arrivals. The combination of texture and soft pastel colors creates a timeless piece that will be cherished for years to come. Happy knitting!



