Saguaro Sunset Coaster Set Free Pattern – Knit a Desert Oasis Table Accent
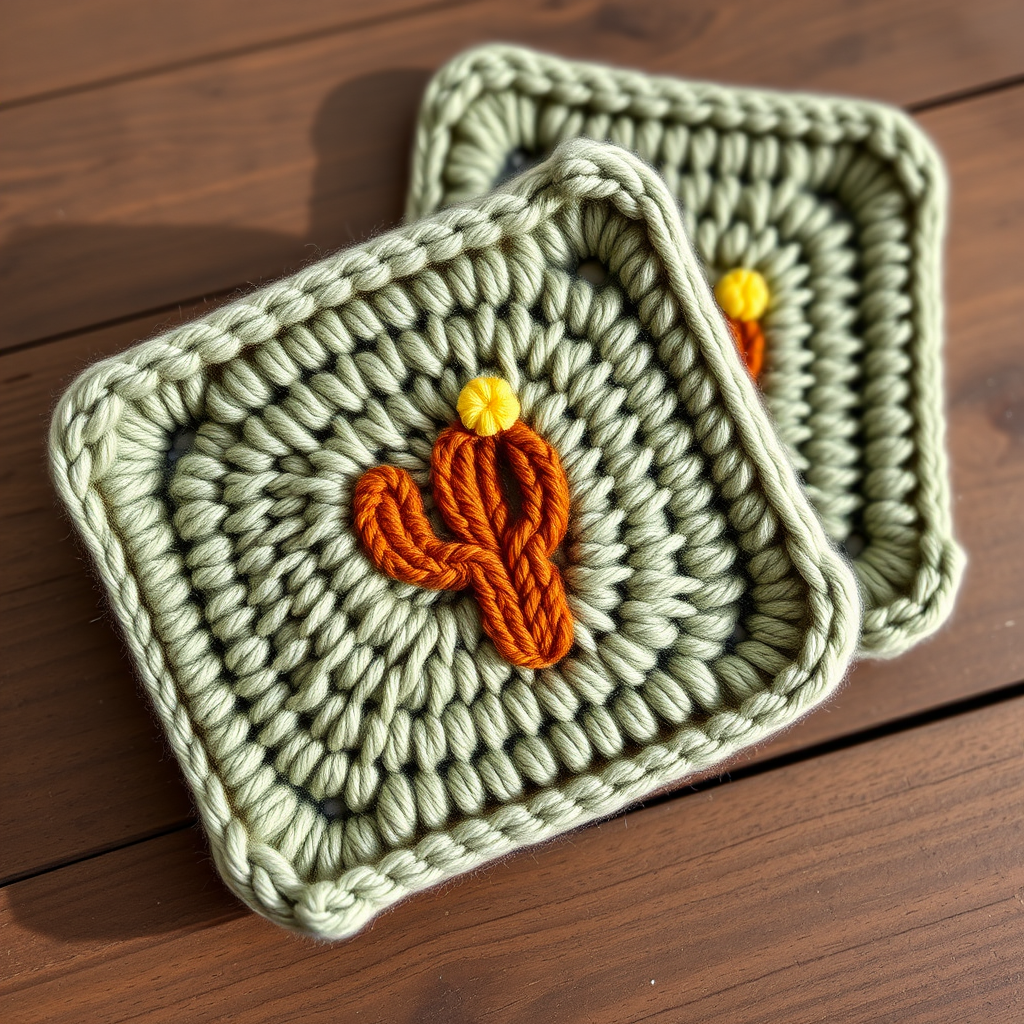
Bring the Desert to Your Table: The Saguaro Sunset Coaster Set
Imagine the warm, earthy tones of a desert sunset captured in a tiny, handcrafted work of art. That's the magic of the Saguaro Sunset Coaster Set. This free knitting pattern transforms simple worsted-weight cotton yarn into a textured, tactile coaster featuring a beautifully embroidered cactus motif. It's more than just a surface protector; it's a conversation starter, a touch of handmade serenity for your coffee table, and a perfect beginner-friendly project that delivers stunning results.
Whether you're looking to add a pop of southwestern charm to your own home or searching for a thoughtful, handmade gift, these coasters are a joy to create. The combination of a simple knitted base and easy embroidery makes this an ideal project for knitters who are ready to explore new techniques without feeling overwhelmed. Let's dive into the pattern and create a little desert oasis, one stitch at a time.
Materials Needed: Your Desert Palette
Before you begin, gather your supplies. This project is wonderfully portable and requires minimal materials, making it perfect for on-the-go crafting.
- Yarn: Worsted weight cotton yarn in the following colors:
- Sage Green: For the coaster base (approximately 50-60 yards per coaster).
- Terracotta: For the cactus embroidery (small amount).
- Cream: For the background or additional details (optional, for a different look).
- Yellow: A small amount for the blooming flower.
- Needles: US 6 (4.0 mm) knitting needles. Straight or circular, whichever you prefer.
- Notions:
- Tapestry needle for weaving in ends and embroidery.
- Scissors.
- Polyester fiberfill (a small handful for stuffing).
- Stitch markers (optional, but helpful).
Gauge: 20 stitches and 28 rows = 4 inches in stockinette stitch. While gauge isn't critical for a coaster, matching it ensures your finished piece is the correct size. Always take a moment to knit a small swatch to check your tension.
Step-by-Step Instructions: Knitting Your Coaster
This pattern creates a square coaster with softly rounded corners. You will knit two identical pieces for each coaster and then join them together for a plush, padded feel. Follow these detailed instructions to create one coaster, then repeat to make a set of four.
Part 1: The Coaster Base (Make 2 per coaster)
We'll start by knitting the main body of the coaster. This is a simple stockinette stitch rectangle with a gentle shaping at the top.
Step 1: Casting On
With your sage green yarn, cast on 20 stitches using your preferred method (long-tail cast on is recommended for a neat edge).
Step 2: Knitting the Main Body
Now, we'll work in stockinette stitch to create the smooth, textured surface of the coaster.
- Row 1 (Right Side): Knit all stitches.
- Row 2 (Wrong Side): Purl all stitches.
Repeat these two rows until your piece measures 4 inches from the cast-on edge. It's best to end after completing a Wrong Side (purl) row. This ensures you're ready to start the shaping on the Right Side.
Step 3: Shaping the Top (For a Rounded Look)
This step creates the gently curved top of the coaster, giving it a more organic, cactus-like feel.
- Next Row (Right Side): Knit 2 together (k2tog), knit to the last 2 stitches, then knit 2 together (k2tog). You will now have 18 stitches on your needle.
- Next Row (Wrong Side): Purl all stitches.
Repeat these two rows (the decrease row and the purl row) until you have only 6 stitches remaining on your needle. Always end with a Wrong Side (purl) row after a decrease row.
Step 4: Closing the Top
Now we'll finish off the top edge.
- Next Row (Right Side): Knit 2 together (k2tog) three times. You will now have 3 stitches left.
- Cut your yarn, leaving a 6-inch tail. Thread the tail onto your tapestry needle and slide it through the remaining 3 stitches. Pull tight to close the top of the coaster. Weave in this end securely on the inside of the piece.
Step 5: Repeat
Congratulations! You've completed the first half of your coaster. Repeat this entire process to create a second, identical piece. Set both pieces aside.
Part 2: The Cactus Motif (Embroidery)
Now for the fun part – bringing your coaster to life with the desert motif! You'll be embroidering directly onto the Right Side (the smooth, "V" side) of one of your knitted pieces.
Step 1: Positioning
Lay one coaster piece flat with the Right Side facing you. Identify the center of the piece. Your cactus will be embroidered here.
Step 2: The Cactus Body
Thread your tapestry needle with the terracotta yarn. We'll use a satin stitch to create the main body of the cactus.
- Visualize a vertical oval in the center of your coaster, about 1.5 inches tall and 0.75 inches wide.
- Bring the needle up from the back of the work at the bottom of your oval.
- Insert the needle back down at the top of the oval, creating a long, straight stitch.
- Continue making parallel, closely spaced stitches side-by-side until the entire oval is filled with solid terracotta color. This is your cactus body.
Step 3: The Cactus Arms
Now, add the two small arms extending from the sides of the main body.
- Each arm should be about 0.5 inches long and 0.25 inches wide.
- Using the same satin stitch technique, create a small horizontal or slightly angled oval on the upper left side of the main cactus body.
- Repeat on the upper right side to create a matching arm. Ensure they are symmetrical for a balanced look.
Step 4: Outline and Spines
To give your cactus definition, we'll add an outline and some spines.
- Using the terracotta yarn and a backstitch, carefully outline the entire shape of the cactus (body and arms). This will give it a crisp, clean edge.
- For the spines, use a few small, straight stitches. Bring the needle up from the back, make a tiny 1/8-inch stitch, and go back down. Place these small stitches along the sides of the cactus body and arms to represent the cactus spines.
Part 3: The Blooming Flower
Every cactus needs a moment of beauty. We'll add a delicate yellow flower at the top of your cactus.
- Switch to your yellow yarn.
- At the very top of the cactus body, create a small French knot or a lazy daisy stitch.
- For a French knot: Bring the needle up, wrap the yarn around the needle 2-3 times, insert the needle back down close to where it came up, and pull through to create a small, textured knot.
- For a lazy daisy stitch: Bring the needle up, form a small loop, insert the needle back down at the same point, and then make a tiny stitch over the loop to secure it, creating a petal shape. You can make 3-5 petals to form a flower.
Weave in all your embroidery ends on the wrong side of the piece.
Part 4: Finishing and Assembly
This is where your two knitted pieces come together to form a plush, finished coaster.
Step 1: Joining the Pieces
Place your two coaster pieces together with their Wrong Sides facing each other. The embroidered piece should be on top, with the Right Side facing you.
Step 2: Whip Stitching
Thread your tapestry needle with a long piece of sage green yarn. Starting at one edge, begin a whip stitch around the entire perimeter of the coaster.
- Insert the needle through both layers of fabric, from back to front, about 1/4 inch from the edge.
- Pull the yarn through, then bring the needle over the edge and insert it again from back to front, creating a diagonal stitch over the edge.
- Continue this process, keeping your stitches even and close together. This will create a neat, finished edge.
Step 3: Stuffing
When you are about 2 inches from where you started, stop whip stitching. You should have an opening.
- Take a small amount of polyester fiberfill and gently push it into the opening. Distribute it evenly to give the coaster a slight, soft puffiness. Don't overstuff; you want it to lie flat on a table.
Step 4: Closing and Finishing
Continue your whip stitch to close the opening completely. When you reach the starting point, tie off your yarn securely and weave in the end. Weave in any other remaining loose ends.
Step 5: Repeat for a Set
Repeat the entire process to create a total of four coasters for a complete set.
And there you have it! Your very own Saguaro Sunset Coaster Set. Place them on your coffee table, side table, or desk to add a touch of handcrafted desert warmth to your space. They also make wonderful, heartfelt gifts for plant lovers and southwestern decor enthusiasts. Enjoy your beautiful, functional art!


