The Ember & Pine Poinsettia Jar Cozy Free Pattern – Knit a Festive Candlelight Cover
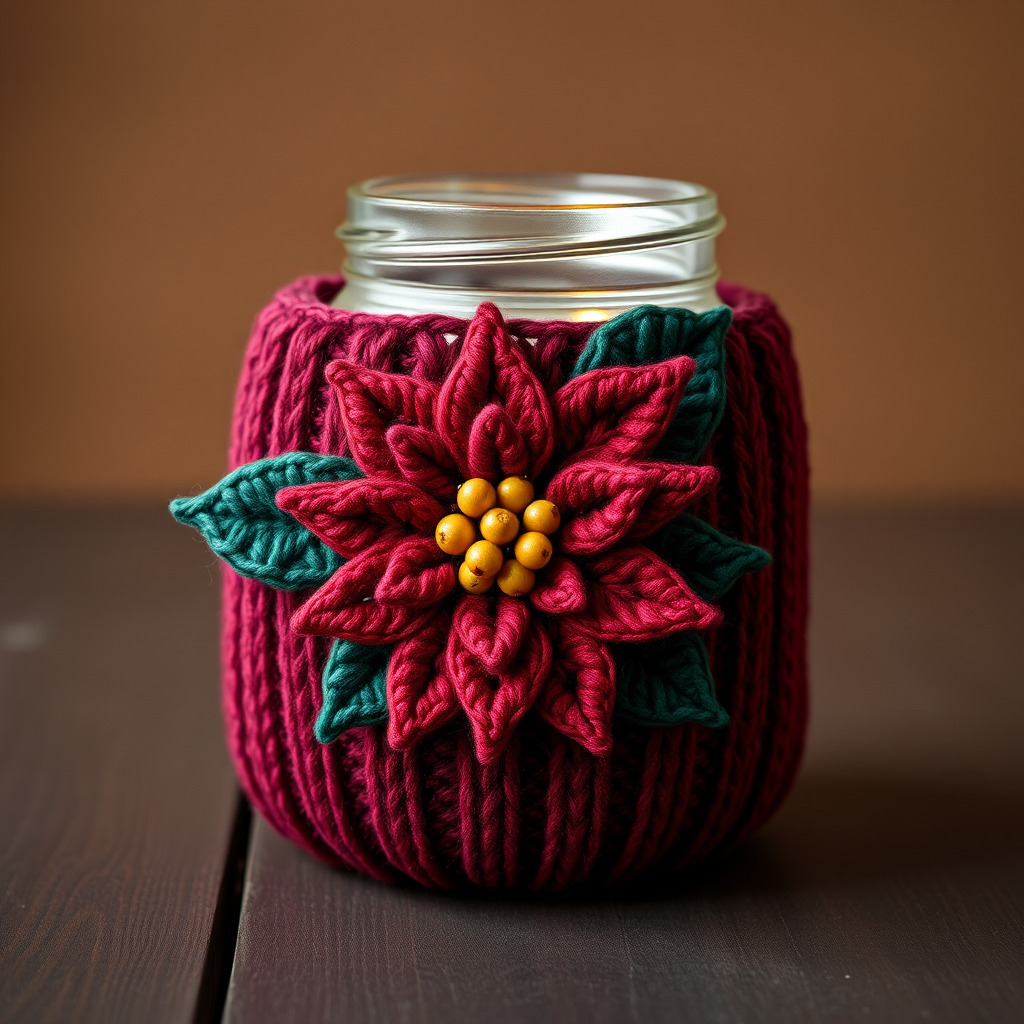
The Ember & Pine Poinsettia Jar Cozy: A Free Knitting Pattern for a Festive Glow
Imagine your favorite mason jar transformed into a glowing centerpiece, wrapped in a hand-knitted poinsettia bloom that radiates holiday warmth. The Ember & Pine Poinsettia Jar Cozy is a textured, nature-inspired cover that combines deep burgundy petals with forest-green leaves and a pop of golden-yellow berries. This beginner-friendly pattern is perfect for adding a handmade touch to your holiday décor, whether you're crafting a gift or creating a cozy ambiance for your own table. Let's dive into this delightful project that turns simple yarn into a stunning candlelight cover.
Materials Needed
Before you begin, gather the following materials to ensure a smooth knitting experience:
- Yarn: Worsted weight yarn in three colors:
- Burgundy (MC) – approximately 100g (for the jar cozy body and petals)
- Forest Green (CC1) – approximately 50g (for the leaves)
- Golden Yellow (CC2) – approximately 20g (for the center berries)
- Needles: US 7 (4.5 mm) knitting needles, or size needed to obtain gauge
- Notions: Tapestry needle for weaving in ends and seaming, stitch markers (optional)
Gauge: 20 stitches and 26 rows = 4 inches in stockinette stitch (knit one row, purl one row). Always check your gauge to ensure the cozy fits your jar perfectly.
Step-by-Step Instructions
Finished Size & Abbreviations
Finished Size: Fits a standard 16 oz mason jar (approximately 3.5 inches in diameter and 5 inches tall).
Abbreviations:
- K = knit
- P = purl
- K2tog = knit two stitches together (decrease)
- YO = yarn over (increase)
- PM = place marker
- SM = slip marker
- CO = cast on
- BO = bind off
Pattern Notes: The jar cozy is worked flat from the bottom to the top, then seamed. The poinsettia petals, leaves, and berries are knitted separately and sewn onto the cozy as an appliqué. This modular approach makes the pattern easy to follow and perfect for beginners.
Jar Cozy Body
This is the main cylindrical piece that wraps around your mason jar. It starts with a straight section and then decreases at the top to hug the jar's neck.
- With burgundy (MC), CO 44 stitches.
- Row 1 (Right Side): K all stitches.
- Row 2 (Wrong Side): P all stitches.
- Repeat Rows 1 and 2 (stockinette stitch) until the piece measures 4 inches from the cast-on edge, ending with a wrong-side row (a purl row).
Shape the Top (Decrease for Neck)
Now we'll decrease stitches to create a gentle taper that fits the jar's neck. Each decrease row reduces the stitch count by 2.
- Row 1 (RS): K2, K2tog, K to last 4 sts, K2tog, K2. (42 sts)
- Row 2 (WS): P all.
- Row 3 (RS): K2, K2tog, K to last 4 sts, K2tog, K2. (40 sts)
- Row 4 (WS): P all.
- Row 5 (RS): K2, K2tog, K to last 4 sts, K2tog, K2. (38 sts)
- Row 6 (WS): P all.
- Row 7 (RS): K2, K2tog, K to last 4 sts, K2tog, K2. (36 sts)
- Row 8 (WS): P all.
- Row 9 (RS): K2, K2tog, K to last 4 sts, K2tog, K2. (34 sts)
- Row 10 (WS): P all.
- Row 11 (RS): K2, K2tog, K to last 4 sts, K2tog, K2. (32 sts)
- Row 12 (WS): P all.
- BO all stitches loosely in pattern (knit the knits and purl the purls as they appear).
Poinsettia Petals (Make 5 Large, 5 Small)
These pointed, leaf-like petals form the flower. The large petals create the outer layer, while the small petals sit on top for depth. The increases (YO) create a beautiful, gradual widening shape.
Large Petals (Make 5)
- With burgundy (MC), CO 10 sts.
- Row 1 (RS): K all.
- Row 2 (WS): P all.
- Row 3 (RS): K1, YO, K to last st, YO, K1. (12 sts)
- Row 4 (WS): P all.
- Row 5 (RS): K1, YO, K to last st, YO, K1. (14 sts)
- Row 6 (WS): P all.
- Row 7 (RS): K1, YO, K to last st, YO, K1. (16 sts)
- Row 8 (WS): P all.
- Row 9 (RS): K1, YO, K to last st, YO, K1. (18 sts)
- Row 10 (WS): P all.
- Row 11 (RS): K1, YO, K to last st, YO, K1. (20 sts)
- Row 12 (WS): P all.
- Row 13 (RS): K1, YO, K to last st, YO, K1. (22 sts)
- Row 14 (WS): P all.
- Row 15 (RS): K1, YO, K to last st, YO, K1. (24 sts)
- Row 16 (WS): P all.
- Row 17 (RS): K1, YO, K to last st, YO, K1. (26 sts)
- Row 18 (WS): P all.
- Row 19 (RS): K1, YO, K to last st, YO, K1. (28 sts)
- Row 20 (WS): P all.
- Row 21 (RS): K1, YO, K to last st, YO, K1. (30 sts)
- Row 22 (WS): P all.
- Row 23 (RS): K1, YO, K to last st, YO, K1. (32 sts)
- Row 24 (WS): P all.
- Row 25 (RS): K1, YO, K to last st, YO, K1. (34 sts)
- Row 26 (WS): P all.
- Row 27 (RS): K1, YO, K to last st, YO, K1. (36 sts)
- Row 28 (WS): P all.
- Row 29 (RS): K1, YO, K to last st, YO, K1. (38 sts)
- Row 30 (WS): P all.
- BO all stitches loosely.
Small Petals (Make 5)
- Follow the same pattern as the large petals, but stop after Row 20 (when you have 30 sts on your needle).
- BO all stitches loosely.
Leaves (Make 5)
These forest-green leaves frame the flower and add a natural, festive contrast.
- With forest green (CC1), CO 8 sts.
- Row 1 (RS): K all.
- Row 2 (WS): P all.
- Row 3 (RS): K1, YO, K to last st, YO, K1. (10 sts)
- Row 4 (WS): P all.
- Row 5 (RS): K1, YO, K to last st, YO, K1. (12 sts)
- Row 6 (WS): P all.
- Row 7 (RS): K1, YO, K to last st, YO, K1. (14 sts)
- Row 8 (WS): P all.
- Row 9 (RS): K1, YO, K to last st, YO, K1. (16 sts)
- Row 10 (WS): P all.
- Row 11 (RS): K1, YO, K to last st, YO, K1. (18 sts)
- Row 12 (WS): P all.
- Row 13 (RS): K1, YO, K to last st, YO, K1. (20 sts)
- Row 14 (WS): P all.
- Row 15 (RS): K1, YO, K to last st, YO, K1. (22 sts)
- Row 16 (WS): P all.
- BO all stitches loosely.
Center Berries (Make 1)
This small, golden cluster sits in the middle of the flower, mimicking the stamen of a real poinsettia.
- With golden yellow (CC2), CO 6 sts.
- Row 1 (RS): K all.
- Row 2 (WS): P all.
- Row 3 (RS): K1, YO, K to last st, YO, K1. (8 sts)
- Row 4 (WS): P all.
- Row 5 (RS): K1, YO, K to last st, YO, K1. (10 sts)
- Row 6 (WS): P all.
- Row 7 (RS): K1, YO, K to last st, YO, K1. (12 sts)
- Row 8 (WS): P all.
- Row 9 (RS): K1, YO, K to last st, YO, K1. (14 sts)
- Row 10 (WS): P all.
- Row 11 (RS): K1, YO, K to last st, YO, K1. (16 sts)
- Row 12 (WS): P all.
- BO all stitches loosely.
Assembly
Now it's time to bring all the pieces together. Take your time with the seaming to ensure a polished, professional finish.
- Sew the jar cozy side seam: Using the tapestry needle and burgundy yarn, sew the side seam of the jar cozy body. Important: Leave a 1-inch opening at the top of the seam. This opening will stretch over the jar's neck for a snug fit.
- Arrange the large petals: Lay the 5 large burgundy petals in a circle, overlapping them slightly like a star. Sew them together at the center point using a few sturdy stitches.
- Add the small petals: Place the 5 small petals on top of the large ones, offset so they sit between the large petals. Sew them together at the center.
- Attach the leaves: Position the 5 green leaves around the outer edge of the flower, spacing them evenly. Sew each leaf to the back of the large petals.
- Sew the center berries: Place the golden-yellow berry cluster in the very center of the flower and sew it securely in place.
- Attach the flower to the cozy: Position the completed poinsettia on the front of the jar cozy, centered and about 1 inch down from the top edge. Sew it firmly to the cozy using the burgundy yarn, making sure the stitches are hidden on the inside.
- Weave in all ends: Use the tapestry needle to weave in any loose yarn ends on the wrong side of the work to keep the inside neat.
Finishing Touches
Your Ember & Pine Poinsettia Jar Cozy is complete! Slide it over a standard 16 oz mason jar. The top opening will hug the neck of the jar, while the bottom flares slightly for a snug, cozy fit. Place a tea light or small candle inside and watch the light glow through the knitted texture, casting a warm, festive ambiance. This makes a wonderful handmade gift or a charming addition to your own holiday table. Enjoy your creation!


