The Emberstone Hearth Mat Free Pattern – A Knitted Ode to Warmth and Texture
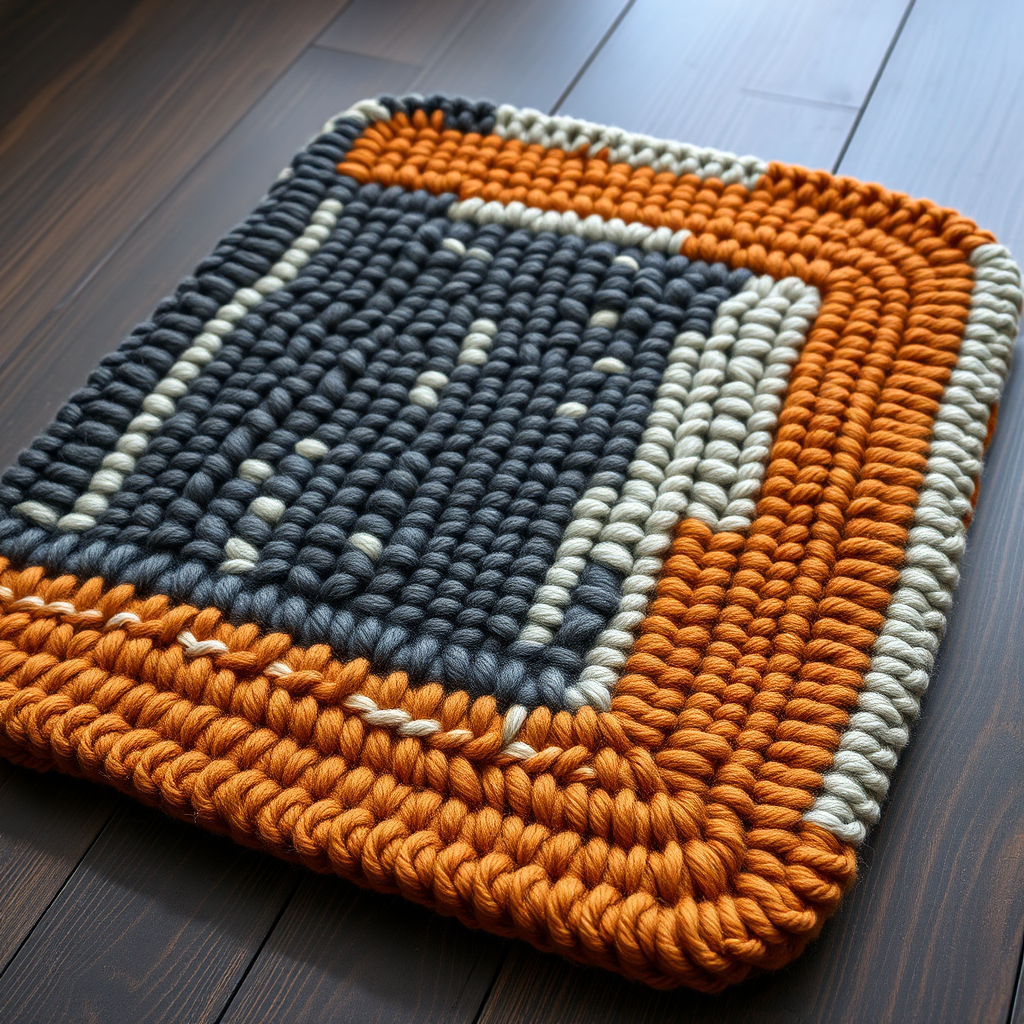
The Emberstone Hearth Mat Free Pattern – A Knitted Ode to Warmth and Texture
Wrap your floors in the cozy embrace of a hand-knitted mat that mimics the rugged beauty of river stones warmed by firelight. This textured, chunky mat adds a touch of organic elegance to any room, blending rustic charm with modern comfort. The Emberstone Hearth Mat is more than just a floor covering—it's a statement piece that brings warmth, depth, and handcrafted artistry into your living space. Whether placed beside a fireplace, in a cozy reading nook, or at a welcoming entryway, this mat transforms any area into a sanctuary of comfort.
What makes this pattern truly special is its clever combination of simple stitches that create a rich, pebbled texture reminiscent of natural stones. The alternating bands of smooth stockinette and bumpy seed stitch, paired with a warm palette of charcoal, heather gray, and burnt amber, produce a visually stunning piece that looks far more complex than it actually is. Even if you're new to knitting, this pattern is approachable and rewarding, guiding you through each step with clarity and precision.
Materials Needed
Before you begin your knitting journey, gather the following materials to ensure a smooth and enjoyable crafting experience:
Yarn
- Super bulky weight yarn (size 6) in three shades:
- Warm charcoal (approximately 300-350 yards)
- Soft heather gray (approximately 250-300 yards)
- Burnt amber (approximately 250-300 yards)
- Total yardage: Approximately 800-900 yards
Needles and Tools
- US Size 13 (9 mm) circular knitting needles, 36 inches long (the length is important to accommodate the width of your work comfortably)
- Tapestry needle for weaving in ends and finishing
- Scissors for cutting yarn
- Measuring tape to check your progress
- Steam iron or blocking tools (optional but recommended for a professional finish)
Gauge
8 stitches and 12 rows = 4 inches in stockinette stitch (knit one row, purl one row). Taking the time to check your gauge before starting will ensure your mat turns out the perfect size. If your gauge is off, simply adjust your needle size up or down until you achieve the correct measurements.
Step-by-Step Instructions
This mat is knitted in one piece from the bottom up, using a combination of stockinette, garter, and seed stitch to create a rich, pebbled texture. The color changes mimic the natural variation of stones, giving your finished mat an organic, handcrafted appearance that will be the envy of every guest who steps on it.
Abbreviations
- K = knit
- P = purl
- K2tog = knit two stitches together (decrease)
- P2tog = purl two stitches together (decrease)
- Sl = slip stitch purlwise
- Rep = repeat
- RS = right side (the front of your work)
- WS = wrong side (the back of your work)
Foundation
Cast on 60 stitches with the charcoal yarn. Work 6 rows in garter stitch (knit every row) to create a sturdy, non-curling edge. This foundation provides a stable base for your mat and prevents the edges from rolling, ensuring your finished piece lies flat and beautiful on the floor.
Main Body (Worked in Pattern)
Now we'll create the beautiful textured body of your mat. Follow these rows carefully, paying attention to when you switch colors and stitch patterns:
Row 1 (RS): With charcoal, K all stitches.
Row 2 (WS): With charcoal, P all stitches.
Row 3 (RS): Switch to heather gray. K1, *P1, K1; rep from * to end. (Seed stitch row)
Row 4 (WS): With heather gray, P1, *K1, P1; rep from * to end. (Seed stitch row)
Row 5 (RS): Switch to burnt amber. K all stitches.
Row 6 (WS): With burnt amber, P all stitches.
Row 7 (RS): Switch to charcoal. K1, *P1, K1; rep from * to end.
Row 8 (WS): With charcoal, P1, *K1, P1; rep from * to end.
Row 9 (RS): Switch to heather gray. K all stitches.
Row 10 (WS): With heather gray, P all stitches.
Row 11 (RS): Switch to burnt amber. K1, *P1, K1; rep from * to end.
Row 12 (WS): With burnt amber, P1, *K1, P1; rep from * to end.
Repeat Rows 1-12 until the piece measures approximately 28 inches from the cast-on edge, ending with a Row 12. You will have a beautiful, textured fabric with alternating bands of smooth stockinette and bumpy seed stitch in earthy tones. The rhythm of the pattern is meditative and soothing, making this project perfect for relaxing evenings with your favorite beverage nearby.
Shaping the Top Edge
To give the mat a gentle, rounded top like a smooth stone, we'll gradually decrease the number of stitches. This shaping creates the distinctive organic silhouette that makes the Emberstone Hearth Mat so special:
Row 1 (RS): With charcoal, K2tog, K to last 2 stitches, K2tog. (58 stitches)
Row 2 (WS): With charcoal, P all stitches.
Row 3 (RS): Switch to heather gray. K2tog, K to last 2 stitches, K2tog. (56 stitches)
Row 4 (WS): With heather gray, P all stitches.
Row 5 (RS): Switch to burnt amber. K2tog, K to last 2 stitches, K2tog. (54 stitches)
Row 6 (WS): With burnt amber, P all stitches.
Continue decreasing in this manner (2 stitches decreased every RS row) while alternating colors every two rows, until you have 20 stitches remaining. The decreases should be worked at the beginning and end of each right-side row, keeping the center of your work untouched. This creates a gentle, symmetrical curve that mimics the natural shape of a river stone.
Once you have 20 stitches remaining, work 4 rows in garter stitch with charcoal, then bind off loosely. A loose bind-off is essential here—if you bind off too tightly, the top edge will pucker and distort the beautiful shape you've created.
Finishing
Now for the final touches that will transform your knitted piece into a polished, professional-looking mat:
- Weave in all loose ends with a tapestry needle. Take your time with this step—secure ends ensure your mat will withstand years of use without unraveling. Weave each end through the wrong side of your work, changing direction at least once to lock it in place.
- Gently steam block the mat to even out the stitches and enhance the texture. Using a steam iron held slightly above the surface (never pressing directly down), apply steam evenly across the entire mat. This relaxes the fibers and helps the seed stitch sections pop beautifully.
- Lay flat to dry completely. Resist the urge to hang or fold the mat while it's still damp, as this can cause unwanted creases or stretching.
Once dry, your Emberstone Hearth Mat will be thick, plush, and wonderfully tactile. The combination of smooth stockinette bands and bumpy seed stitch sections creates a surface that's both visually interesting and delightful to walk on with bare feet. The warm, earthy color palette—charcoal, heather gray, and burnt amber—brings a cozy, rustic elegance to any room.
Place your finished mat beside a fireplace, in a sunlit reading corner, or at the foot of your bed. Wherever it lands, this handcrafted treasure will add warmth, texture, and a touch of artisanal charm to your home. The Emberstone Hearth Mat makes a thoughtful handmade gift as well—imagine the joy on a loved one's face when they receive such a beautiful, functional piece of art.
Happy knitting, and may your home be filled with the warmth of handmade treasures!


