The Frosted Fir Forest Stocking: A Free Knitting Pattern for a Textured, Fair Isle Christmas Stocking
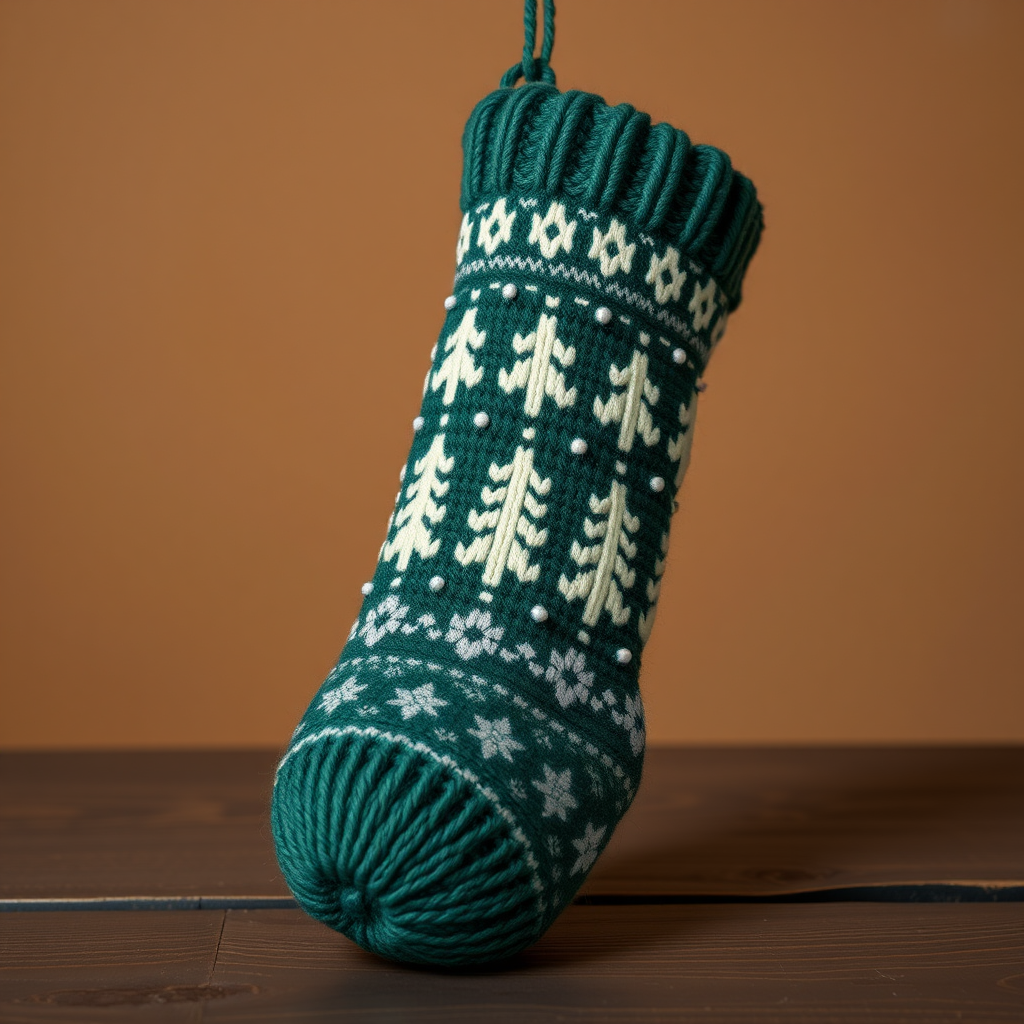
Knit an Heirloom: The Frosted Fir Forest Stocking
Imagine a Christmas stocking so beautiful and cozy that it becomes a family treasure, passed down through generations. The Frosted Fir Forest Stocking is exactly that—a stunning, heirloom-quality piece you knit yourself. This free pattern combines a modern Fair Isle design of frosted fir trees and delicate snowflakes with the soft, heathered texture of worsted weight yarn. The result is a rustic, cozy stocking that feels both timeless and contemporary. Whether you're an experienced knitter or a confident beginner ready for a rewarding challenge, this pattern will guide you to create a cherished holiday decoration.
Materials Needed
Before you begin, gather these supplies. The gauge and feel of the stocking depend on using the correct materials.
- Yarn: Worsted weight yarn in three colors:
- MC (Main Color): Heathered Forest Green – approximately 250 yards
- CC1 (Contrast Color 1): Cream – approximately 100 yards
- CC2 (Contrast Color 2): Silver Grey – approximately 50 yards
- Needles:
- US Size 6 (4.0 mm) double-pointed needles (or a circular needle for the magic loop method) for the main body.
- US Size 5 (3.75 mm) double-pointed needles for the ribbing.
- Other: Stitch markers, tapestry needle for weaving ends, scissors.
Gauge: 20 stitches and 24 rows = 4 inches in stockinette stitch on larger needles, after blocking. Always check your gauge to ensure the correct size.
Step-by-Step Instructions
This pattern is worked in the round from the top down. Follow each step carefully for a flawless finish.
Sizes & Abbreviations
Size: One size fits most (approx. 7 inches wide, 18 inches long from heel to top).
Abbreviations:
- k = knit
- p = purl
- k2tog = knit two together (right-leaning decrease)
- ssk = slip, slip, knit (left-leaning decrease)
- m1 = make one (increase)
- st(s) = stitch(es)
- MC = Main Color (Forest Green)
- CC1 = Contrast Color 1 (Cream)
- CC2 = Contrast Color 2 (Silver Grey)
Cuff (Worked in the Round)
- With smaller needles (US 5) and MC, cast on 60 stitches. Distribute evenly over 4 double-pointed needles (15 stitches per needle).
- Join in the round, being careful not to twist the stitches. Place a stitch marker to mark the beginning of the round.
- Work in k2, p2 ribbing for 2 inches. This creates a stretchy, snug cuff.
Leg (Worked in the Round with Fair Isle)
- Switch to larger needles (US 6).
- Knit 2 rounds in MC to create a smooth transition from the ribbing.
- Begin the Fair Isle chart below. Work the 20-row chart once. Tip: Carry the unused yarn loosely across the back of the work to keep the tension even.
- After completing the chart, knit 2 more rounds in MC.
Fair Isle Chart (20 rows, 30 sts repeat)
Work the chart across all 60 stitches. The pattern repeats twice per round.
- Row 1: (MC) k30
- Row 2: (CC1) k5, (MC) k5, (CC1) k5, (MC) k5, (CC1) k5, (MC) k5
- Row 3: (CC1) k2, (MC) k1, (CC1) k2, (MC) k1, (CC1) k2, (MC) k1, (CC1) k2, (MC) k1, (CC1) k2, (MC) k1, (CC1) k2, (MC) k1
- Row 4: (MC) k30
- Row 5: (CC2) k5, (MC) k5, (CC2) k5, (MC) k5, (CC2) k5, (MC) k5
- Row 6: (CC2) k2, (MC) k1, (CC2) k2, (MC) k1, (CC2) k2, (MC) k1, (CC2) k2, (MC) k1, (CC2) k2, (MC) k1, (CC2) k2, (MC) k1
- Row 7: (MC) k30
- Row 8: (CC1) k5, (MC) k5, (CC1) k5, (MC) k5, (CC1) k5, (MC) k5
- Row 9: (CC1) k2, (MC) k1, (CC1) k2, (MC) k1, (CC1) k2, (MC) k1, (CC1) k2, (MC) k1, (CC1) k2, (MC) k1, (CC1) k2, (MC) k1
- Row 10: (MC) k30
- Row 11: (CC2) k5, (MC) k5, (CC2) k5, (MC) k5, (CC2) k5, (MC) k5
- Row 12: (CC2) k2, (MC) k1, (CC2) k2, (MC) k1, (CC2) k2, (MC) k1, (CC2) k2, (MC) k1, (CC2) k2, (MC) k1, (CC2) k2, (MC) k1
- Row 13: (MC) k30
- Row 14: (CC1) k5, (MC) k5, (CC1) k5, (MC) k5, (CC1) k5, (MC) k5
- Row 15: (CC1) k2, (MC) k1, (CC1) k2, (MC) k1, (CC1) k2, (MC) k1, (CC1) k2, (MC) k1, (CC1) k2, (MC) k1, (CC1) k2, (MC) k1
- Row 16: (MC) k30
- Row 17: (CC2) k5, (MC) k5, (CC2) k5, (MC) k5, (CC2) k5, (MC) k5
- Row 18: (CC2) k2, (MC) k1, (CC2) k2, (MC) k1, (CC2) k2, (MC) k1, (CC2) k2, (MC) k1, (CC2) k2, (MC) k1, (CC2) k2, (MC) k1
- Row 19: (MC) k30
- Row 20: (CC1) k5, (MC) k5, (CC1) k5, (MC) k5, (CC1) k5, (MC) k5
Heel Flap (Worked Back and Forth)
The heel flap is worked on half the stitches (30 stitches). Place the other 30 stitches on hold for the instep.
- Set up: Work the heel flap on needles 3 and 4 (30 stitches).
- Row 1 (RS): Slip 1, k29. Turn.
- Row 2 (WS): Slip 1, p29. Turn.
- Repeat rows 1-2 for 30 rows total. You will have 15 slipped edge stitches on each side.
Turn Heel
This creates the cup of the heel.
- Row 1 (RS): Slip 1, k16, ssk, k1. Turn. (18 stitches remain on the needle)
- Row 2 (WS): Slip 1, p5, p2tog, p1. Turn.
- Row 3: Slip 1, k6, ssk, k1. Turn.
- Row 4: Slip 1, p7, p2tog, p1. Turn.
- Continue in this manner, working one more stitch before the decrease each time, until all stitches are worked. You should have 18 stitches on the needle.
Gusset
This section shapes the foot by picking up stitches along the heel flap.
- With MC, pick up and knit 15 stitches along the left side of the heel flap.
- Knit across the 30 instep stitches (keeping them in stockinette).
- Pick up and knit 15 stitches along the right side of the heel flap.
- Knit across the 18 heel stitches. You will now have 78 stitches total.
Decrease Round
- Round 1: Knit to the last 3 stitches of the first needle (heel), k2tog, k1. Knit across the instep stitches. On the last needle (heel), k1, ssk, knit to end.
- Round 2: Knit all stitches.
- Repeat these 2 rounds until 60 stitches remain (30 instep, 30 heel).
Foot
Knit all stitches in MC until the foot measures 7 inches from the back of the heel, or your desired length. Tip: For a custom fit, measure the recipient's foot from heel to toe and subtract 2 inches for the toe shaping.
Toe
Shape the toe with gradual decreases.
- Round 1: *K13, k2tog* repeat around (56 stitches).
- Round 2: Knit.
- Round 3: *K12, k2tog* repeat around (52 stitches).
- Round 4: Knit.
- Continue decreasing in this manner (one less stitch between decreases each round) until 20 stitches remain.
- Cut the yarn, leaving a 6-inch tail. Thread the tail through the remaining stitches, pull tight to close the toe, and weave in the end securely.
Finishing
- Weave in all ends with a tapestry needle, being careful to match the yarn color.
- Block the stocking lightly. Wet block by soaking in cool water, gently squeeze out excess, and lay flat to dry. This will open up the Fair Isle pattern and even out the stitches.
Your Frosted Fir Forest Stocking is now complete! Hang it with pride and enjoy the cozy, rustic charm it brings to your holiday home.


