Velvet Antler Reindeer Brooch Free Pattern – Cozy Knit Holiday Pin
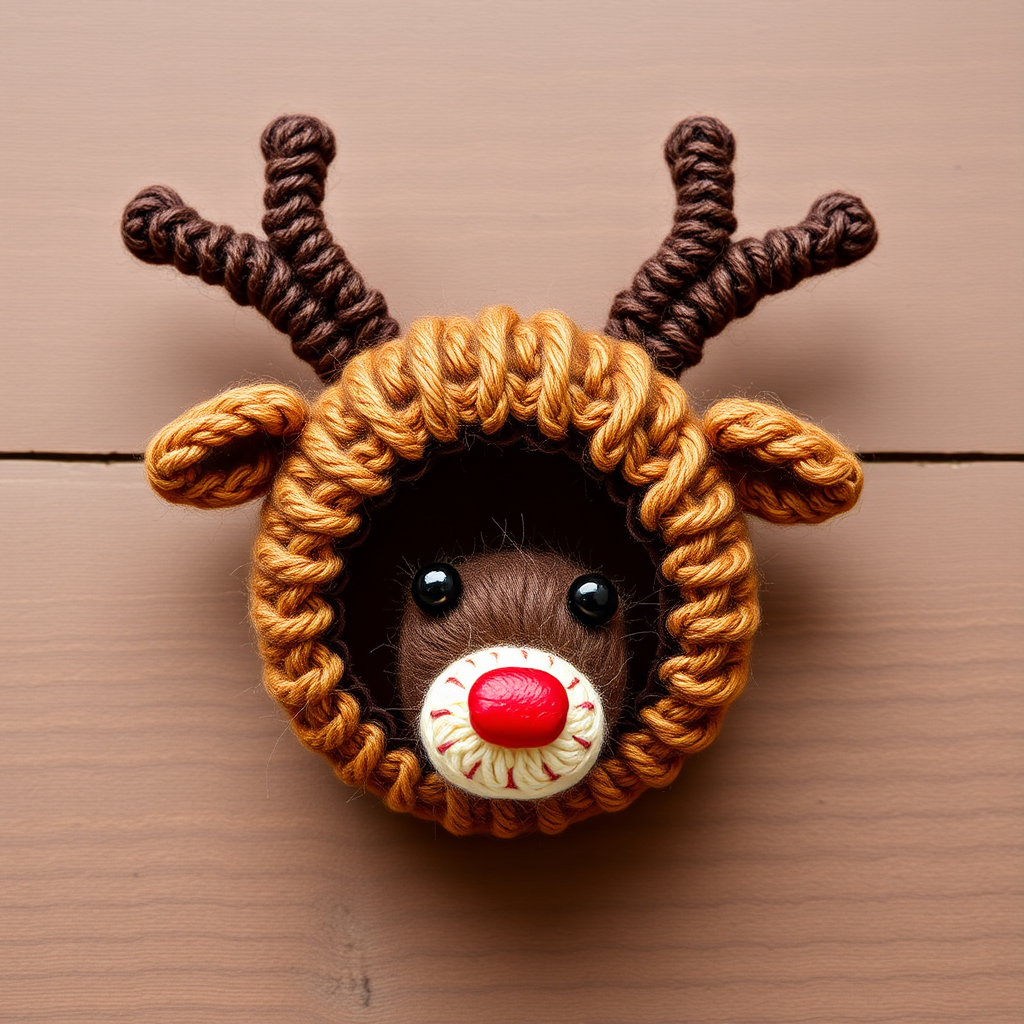
Velvet Antler Reindeer Brooch Free Pattern – Cozy Knit Holiday Pin
Add a touch of rustic woodland charm to your winter wardrobe with this adorable knitted reindeer brooch. Crafted from plush worsted weight yarn and featuring intricate cable-like antlers, this handmade pin is the perfect accessory for coats, scarves, and holiday sweaters. Whether you're a seasoned knitter or a beginner looking for a fun, quick project, this pattern blends traditional techniques with a modern, whimsical aesthetic. Let's get started on creating your very own cozy holiday companion!
Materials Needed
Before you begin, gather the following supplies. All yarn is worsted weight (medium/4 ply), and the project uses simple knit and purl stitches to create a beautifully textured piece.
- Yarn (Worsted Weight):
- Warm brown (Main Color, MC) – for the head and ears
- Cream (CC1) – for the muzzle
- Dark brown (CC2) – for the antlers
- Red (CC3) – for the nose (small amount)
- Black (for eyes, or use safety eyes) - Needles: US 4 (3.5 mm) knitting needles (straight or circular for flat knitting)
- Notions: Tapestry needle, polyester fiberfill (for stuffing), brooch pin backing, scissors
- Gauge: 22 stitches and 30 rows = 4 inches in stockinette stitch (not critical, but keep consistent)
Abbreviations
Familiarize yourself with these standard knitting abbreviations before starting:
- K – knit
- P – purl
- K2tog – knit two stitches together (decrease)
- Kfb – knit front and back (increase)
- St(s) – stitch(es)
- Rnd – round (not used here, but good to know)
Step-by-Step Instructions
Follow these detailed instructions carefully. The reindeer is worked in flat pieces and then seamed together, making it easy to control shaping and stuffing.
Head (Worked Flat, Then Seamed)
This creates a rounded, softly stuffed head. Work in stockinette stitch (knit on right side, purl on wrong side) unless otherwise noted.
- Cast on: With MC, cast on 12 stitches.
- Row 1 (RS): Kfb across – you will have 24 stitches.
- Row 2: Purl all stitches.
- Row 3: Kfb, K10, Kfb, K10, Kfb – you will have 27 stitches.
- Row 4: Purl all stitches.
- Row 5: Kfb, K11, Kfb, K11, Kfb – you will have 30 stitches.
- Rows 6-10: Work 5 rows in stockinette (K on RS, P on WS) – no increases.
- Row 11 (RS): K2tog, K11, K2tog, K11, K2tog – you will have 27 stitches.
- Row 12: Purl all stitches.
- Row 13: K2tog, K9, K2tog, K9, K2tog – you will have 24 stitches.
- Row 14: Purl all stitches.
- Row 15: K2tog across – you will have 12 stitches.
- Finish: Cut yarn, leaving a long tail (about 12 inches). Thread the tail through a tapestry needle, then pass it through the remaining 12 stitches on the needle. Pull tight to gather, and secure with a knot.
- Seaming: Use the same tail to sew the side edges together, forming a rounded head shape. Important: Before closing completely, stuff the head firmly with polyester fiberfill. Then finish the seam and weave in the end.
Muzzle (Worked Flat)
This small oval piece is attached to the front of the head.
- Cast on: With CC1 (cream), cast on 6 stitches.
- Row 1: Kfb across – you will have 12 stitches.
- Row 2: Purl all stitches.
- Row 3: Kfb, K10, Kfb – you will have 14 stitches.
- Rows 4-6: Work 3 rows in stockinette (K on RS, P on WS).
- Row 7: K2tog, K10, K2tog – you will have 12 stitches.
- Row 8: Purl all stitches.
- Row 9: K2tog across – you will have 6 stitches.
- Finish: Cut yarn, thread through remaining stitches, pull tight, and secure. Seam the edges to form a small oval shape. Do not overstuff – a light fill is fine. Attach the muzzle to the front center of the head using a whip stitch, leaving the top edge open for the nose placement.
Antlers (Make 2, Worked Flat)
These create the signature branched look with a subtle cable-like texture from the increases and decreases.
- Cast on: With CC2 (dark brown), cast on 4 stitches.
- Row 1: Kfb, K2, Kfb – you will have 6 stitches.
- Row 2: Purl all stitches.
- Row 3: Kfb, K4, Kfb – you will have 8 stitches.
- Rows 4-6: Work 3 rows in stockinette.
- Row 7: K2tog, K4, K2tog – you will have 6 stitches.
- Row 8: Purl all stitches.
- Row 9: K2tog, K2, K2tog – you will have 4 stitches.
- Row 10: Purl all stitches.
- Row 11: Kfb, K2, Kfb – you will have 6 stitches.
- Row 12: Purl all stitches.
- Row 13: Kfb, K4, Kfb – you will have 8 stitches.
- Rows 14-16: Work 3 rows in stockinette.
- Row 17: K2tog, K4, K2tog – you will have 6 stitches.
- Row 18: Purl all stitches.
- Row 19: K2tog, K2, K2tog – you will have 4 stitches.
- Row 20: Purl all stitches.
- Bind off: Bind off all stitches loosely. Fold the piece in half lengthwise (right sides together) and seam the edges, leaving the bottom open. Turn right side out – this creates a branched, dimensional antler. Attach to the top of the head, positioning them symmetrically.
Ears (Make 2)
These small triangles add character to your reindeer.
- Cast on: With MC, cast on 3 stitches.
- Row 1: Kfb, K1, Kfb – you will have 5 stitches.
- Row 2: Purl all stitches.
- Row 3: Kfb, K3, Kfb – you will have 7 stitches.
- Rows 4-5: Work 2 rows in stockinette.
- Row 6: K2tog, K3, K2tog – you will have 5 stitches.
- Row 7: Purl all stitches.
- Row 8: K2tog, K1, K2tog – you will have 3 stitches.
- Bind off: Bind off. Fold each ear in half and attach to the sides of the head, just below the antlers.
Nose and Eyes
- Nose: Using CC3 (red), embroider a small French knot or satin stitch at the tip of the muzzle. For a classic Rudolph look, make it slightly larger and shiny.
- Eyes: Using black yarn or safety eyes, place them above the muzzle, evenly spaced. If using yarn, make small French knots or duplicate stitches. If using safety eyes, insert them before stuffing the head (refer to manufacturer instructions).
Finishing Touches
- Attach Brooch Pin: Sew a brooch pin backing onto the back of the head using strong thread or yarn. Ensure it is centered and secure.
- Weave in Ends: Use a tapestry needle to weave in all loose yarn ends on the inside of the piece.
- Final Shaping: Gently shape the head, antlers, and ears to your liking. Fluff the yarn for a plush look.
Your Velvet Antler Reindeer Brooch is now complete! This charming pin measures approximately 3 inches tall and 2 inches wide, making it the perfect size for a coat lapel, scarf, or even a holiday gift tag. The combination of warm browns, creamy muzzle, and dark branched antlers creates a woodland-inspired accessory that's sure to spark joy all season long. Happy knitting!



