Whispering Pine Lace Table Centre Doily Free Pattern
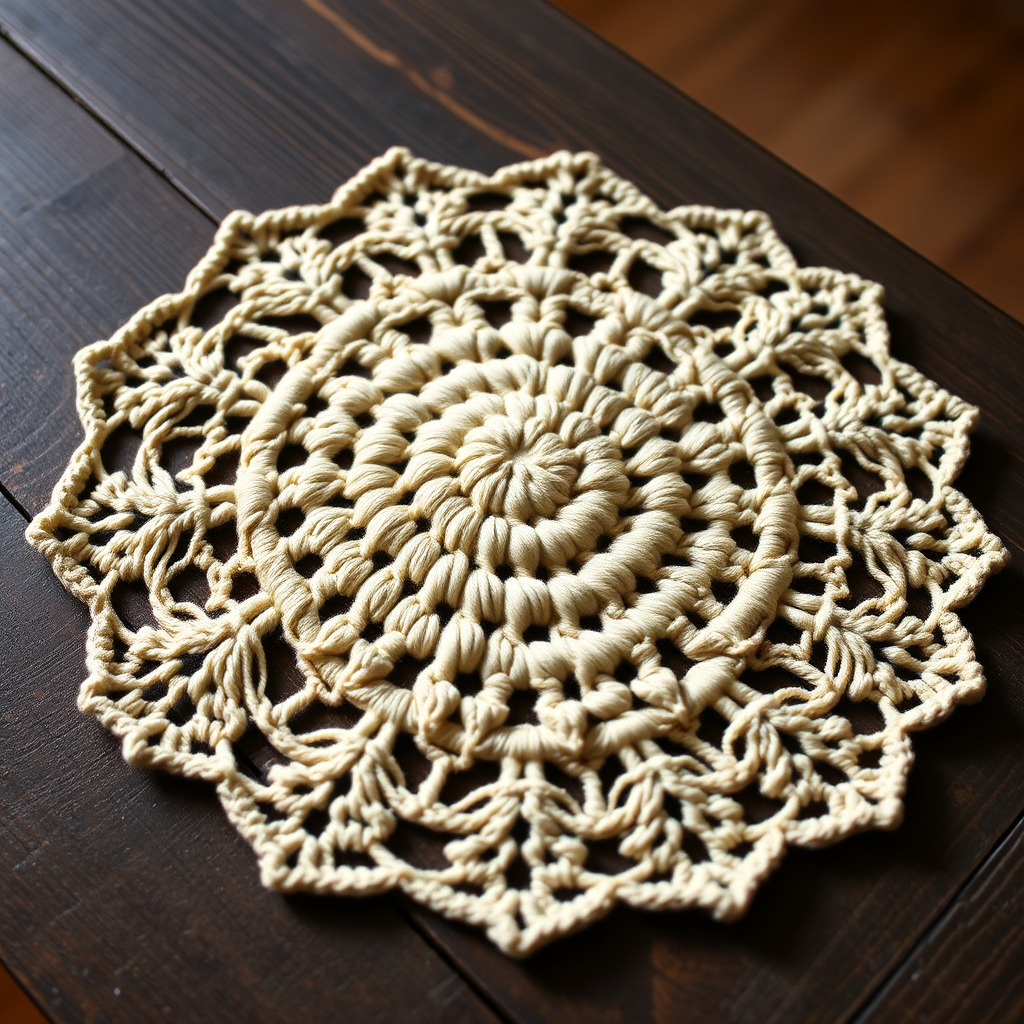
Whispering Pine Lace Table Centre Doily – Free Crochet Pattern
Bring the serene beauty of a pine forest to your dining table with this intricate crochet doily, featuring delicate pine needle motifs and a soft, earthy palette. This heirloom-quality centrepiece adds a touch of woodland charm to any room. The pattern creates a perfectly round, flat lace doily with eight distinct pine needle motifs radiating outward, finished with a delicate scalloped edge. Whether you're an experienced thread crocheter or looking for a rewarding challenge, this pattern is a joy to create and a stunning addition to your home decor.
Materials Needed
- Yarn: DMC Cebelia Crochet Thread Size 10 in Ecru (or any size 10 cotton thread) – approximately 250 yards
- Hook: Steel crochet hook size 7 (1.65 mm) or size needed to obtain gauge
- Gauge: First 5 rounds measure 2 inches (5 cm) in diameter
- Notions: Stitch markers, tapestry needle for weaving in ends, blocking mat and pins
Step-by-Step Instructions
Notes: Worked in continuous rounds unless otherwise stated. Use a stitch marker to track rounds. Ch-3 at beginning of rounds counts as a dc unless stated otherwise.
Round 1: Foundation
Make a magic ring. Ch 3 (counts as dc), 11 dc into ring. Pull ring tight. Join with sl st to top of ch-3. (12 dc)
Round 2: Increase
Ch 3, dc in same st. 2 dc in each st around. Join with sl st. (24 dc)
Round 3: First Lace Pattern
Ch 3, dc in next st, ch 1, skip next st. *Dc in next 2 sts, ch 1, skip next st.* Repeat from * around. Join with sl st. (16 dc, 8 ch-1 spaces)
Round 4: Building the Structure
Sl st into next dc. Ch 3, dc in same st, ch 2, skip ch-1 space. *2 dc in next dc (between the two dc of previous round), ch 2, skip ch-1 space.* Repeat from * around. Join with sl st. (16 dc pairs, 8 ch-2 spaces)
Round 5: Creating Corners
Sl st into next dc. Ch 3, 2 dc in same st (corner made), ch 3, skip ch-2 space. *3 dc in next dc pair (middle dc), ch 3, skip ch-2 space.* Repeat from * around. Join with sl st. (8 groups of 3 dc, 8 ch-3 spaces)
Round 6: Center Points
Sl st into next 2 dc. Ch 3, dc in same st (now at center dc of group), ch 4, skip ch-3 space. *Dc in center dc of next group, ch 4, skip ch-3 space.* Repeat from * around. Join with sl st. (8 dc, 8 ch-4 spaces)
Round 7: Expanding the Motifs
Ch 3, 2 dc in same st, ch 5, skip ch-4 space. *3 dc in next dc, ch 5, skip ch-4 space.* Repeat from * around. Join with sl st. (8 groups of 3 dc, 8 ch-5 spaces)
Round 8: Continuing the Pattern
Sl st into next 2 dc. Ch 3, dc in same st (center dc), ch 6, skip ch-5 space. *Dc in center dc of next group, ch 6, skip ch-5 space.* Repeat from * around. Join with sl st. (8 dc, 8 ch-6 spaces)
Round 9: Growing the Lace
Ch 3, 2 dc in same st, ch 7, skip ch-6 space. *3 dc in next dc, ch 7, skip ch-6 space.* Repeat from * around. Join with sl st. (8 groups of 3 dc, 8 ch-7 spaces)
Round 10: Maintaining Symmetry
Sl st into next 2 dc. Ch 3, dc in same st (center dc), ch 8, skip ch-7 space. *Dc in center dc of next group, ch 8, skip ch-7 space.* Repeat from * around. Join with sl st. (8 dc, 8 ch-8 spaces)
Round 11: Widening the Design
Ch 3, 2 dc in same st, ch 9, skip ch-8 space. *3 dc in next dc, ch 9, skip ch-8 space.* Repeat from * around. Join with sl st. (8 groups of 3 dc, 8 ch-9 spaces)
Round 12: Preparing for Motifs
Sl st into next 2 dc. Ch 3, dc in same st (center dc), ch 10, skip ch-9 space. *Dc in center dc of next group, ch 10, skip ch-9 space.* Repeat from * around. Join with sl st. (8 dc, 8 ch-10 spaces)
Round 13: Final Expansion
Ch 3, 2 dc in same st, ch 11, skip ch-10 space. *3 dc in next dc, ch 11, skip ch-10 space.* Repeat from * around. Join with sl st. (8 groups of 3 dc, 8 ch-11 spaces)
Round 14: Setting Up the Pine Needles
Sl st into next 2 dc. Ch 3, dc in same st (center dc), ch 12, skip ch-11 space. *Dc in center dc of next group, ch 12, skip ch-11 space.* Repeat from * around. Join with sl st. (8 dc, 8 ch-12 spaces)
Round 15: Pine Needle Motif
Sl st into next 2 dc. Ch 3, 4 dc in same st (center dc) – this forms the base of the pine needle. Ch 5, sl st in 5th ch from hook (picot made). Ch 5, sl st in 5th ch from hook (second picot). Ch 5, sl st in 5th ch from hook (third picot). Ch 3, sl st into same center dc. *Skip ch-12 space. In next center dc: 5 dc, ch 5, sl st in 5th ch, ch 5, sl st in 5th ch, ch 5, sl st in 5th ch, ch 3, sl st into same dc.* Repeat from * around. Join with sl st to top of first ch-3. (8 pine needle motifs)
Round 16: Connecting Motifs
Ch 1, sc in same st. Ch 5, sc in top of next pine needle (the center picot). Ch 5, sc in next dc (the first dc of next motif). *Ch 5, sc in top of next pine needle, ch 5, sc in next dc.* Repeat from * around. Join with sl st to first sc. (16 ch-5 spaces)
Round 17: Building the Outer Lace
Ch 1, sc in same st. *Ch 5, sc in next ch-5 space, ch 5, sc in next sc.* Repeat from * around, ending with ch 5, sc in last ch-5 space, ch 5. Join with sl st to first sc. (32 ch-5 spaces)
Round 18: Expanding the Spaces
Ch 1, sc in same st. *Ch 6, sc in next ch-5 space, ch 6, sc in next sc.* Repeat from * around, ending with ch 6, sc in last ch-5 space, ch 6. Join with sl st to first sc. (32 ch-6 spaces)
Round 19: Preparing the Edge
Ch 1, sc in same st. *Ch 7, sc in next ch-6 space, ch 7, sc in next sc.* Repeat from * around, ending with ch 7, sc in last ch-6 space, ch 7. Join with sl st to first sc. (32 ch-7 spaces)
Round 20: Final Scallop Edge
Ch 1, sc in same st. *In next ch-7 space: 5 dc, ch 3, sl st in 3rd ch from hook (picot), 5 dc. Sc in next sc.* Repeat from * around. Join with sl st to first sc. Fasten off and weave in ends.
Blocking Instructions
Pin doily to blocking mat, stretching gently to open up lace. Spray with water and allow to dry completely. This step is essential to achieve the beautiful, flat, openwork lace pattern and to showcase the pine needle motifs.
Your Whispering Pine Lace Table Centre Doily is now complete! Place it on your dining table, sideboard, or coffee table to bring a touch of woodland elegance to your home. The delicate ecru thread and intricate pine needle design create a timeless piece that will be treasured for generations.


