Art Deco Starfish Crochet Accent Free Pattern
Art Deco Starfish Crochet Accent: A Free Beginner Pattern
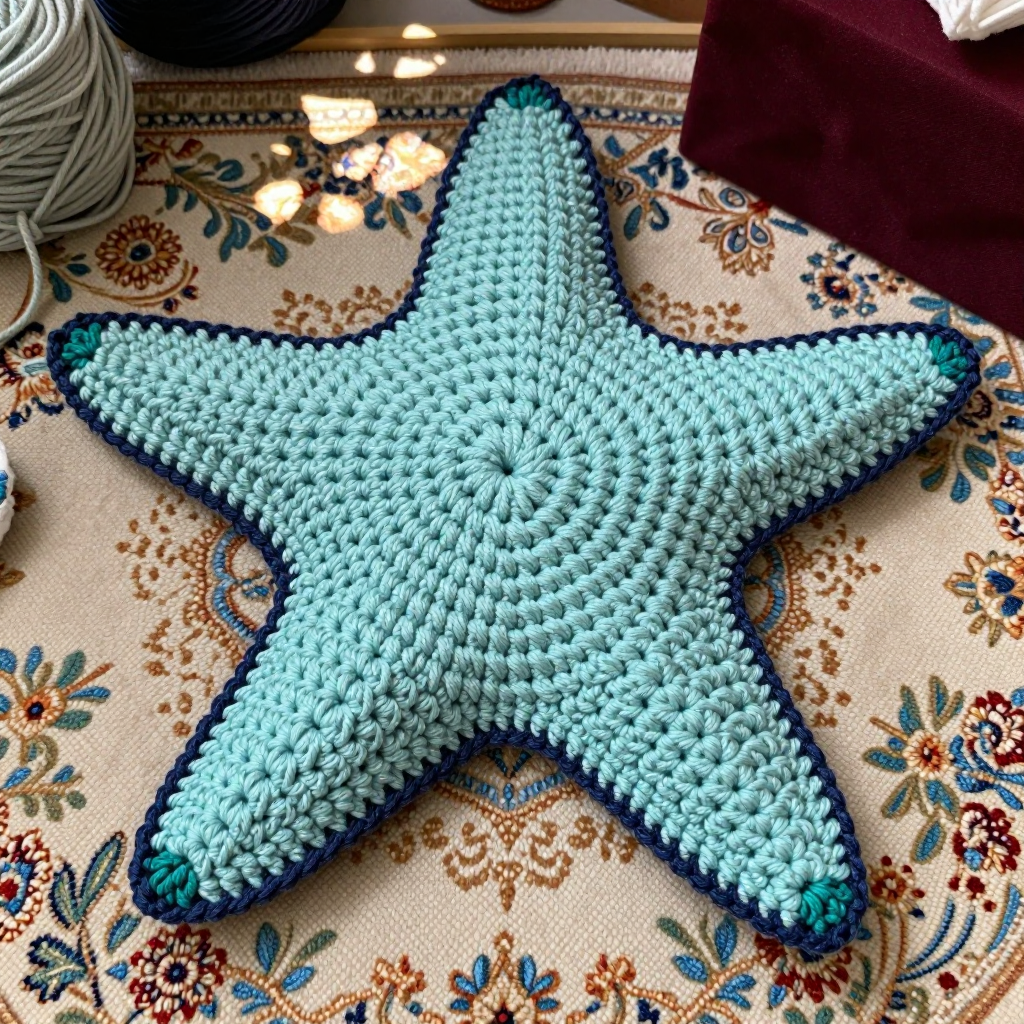
Welcome! This little starfish is one of the friendliest first projects you can make. It is perfect for total beginners because it is flat, small, and worked in one continuous pass — no complicated shaping, no sewing pieces together, and no scary techniques. The finished starfish is about 5 inches point to point, with a smooth round center and five crisp, geometric points that give it a clean Art Deco look. Worked in ocean blues and finished with a raised navy outline, it feels slightly stiff and sturdy in cotton — just right for a coaster, an ornament, or a scatter of table decorations. By the end, you will have practiced the single crochet, the magic ring, and a simple surface stitch, and you will have a finished piece you can actually use.
Materials Needed
- Yarn: Worsted weight (category 4) cotton or cotton-blend yarn. Per starfish you need approximately 25 yards of light aqua (Color A), 10 yards of teal (Color B), and 8 yards of navy (Color C). Cotton gives the crisp, flat look; a cotton blend is slightly softer.
- Crochet hook: Size G/6 (4.0 mm).
- Stitch marker: One removable marker (or a scrap of contrasting yarn) to mark your first stitch.
- Tapestry needle: A blunt-tipped needle with a large eye for weaving in ends.
- Scissors: Any small, sharp pair.
- Finished size: Approximately 5 inches (12.7 cm) from point to opposite point, with the center round measuring about 2.5 inches (6.4 cm) across.
Abbreviations and Beginner Glossary
Every abbreviation used in this pattern is listed below. Read through them once before you begin — you do not need to memorize them.
- ch – chain. Make a loop of yarn over the hook and pull it through the loop already on your hook. This creates a small link of "chain."
- sc – single crochet. Insert your hook into the stitch, wrap the yarn over the hook, pull up a loop (you now have 2 loops on the hook), wrap the yarn over again, and pull it through both loops. One single crochet made.
- sl st – slip stitch. Insert your hook into the stitch, wrap the yarn over, and pull it straight through both the stitch and the loop on your hook in one motion. It makes a nearly invisible joining stitch.
- sc2tog – single crochet 2 together (a decrease). Insert your hook into the first stitch, pull up a loop, insert your hook into the next stitch, pull up a loop (3 loops on hook), wrap yarn over, pull through all 3 loops. Two stitches become one.
- st / sts – stitch / stitches. One completed loop of yarn in your fabric.
- rnd – round. One complete circle of work around the center.
- sp – space. The gap between stitches.
- magic ring – an adjustable loop of yarn that you crochet into, then pull closed so there is no hole in the middle. If it feels tricky, you can instead ch 2 and work your first round into the first chain.
- surface slip stitch – a slip stitch worked on top of finished fabric. You insert the hook from front to back through the fabric, pull up a loop of the new color to the front, then continue inserting the hook and pulling loops through the loop on your hook. It creates a raised line, like a cord, on the surface.
- fasten off – cut the yarn a few inches from your work and pull the tail all the way through the last loop to lock it.
- turn – flip your work over so you can work back in the other direction.
- weave in ends – thread a yarn tail onto the tapestry needle and sew it back and forth through the fabric so it disappears.
Gauge
Gauge: 16 single crochet stitches x 18 rounds = 4 inches (10 cm).
Gauge means how big your stitches come out. It matters because it controls the finished size: if your stitches are bigger than the gauge, your starfish will be larger than 5 inches and the points may look floppy; if they are smaller, it will be tight and stiff. To check, crochet a small flat swatch of single crochet about 4 inches square, then lay a ruler across the middle and count how many stitches fit in 4 inches and how many rows fit in 4 inches. If you have more stitches than 16, try a larger hook; if you have fewer, try a smaller hook. For a small decorative piece like this, being close is good enough — just aim to match the stitch count.
Beginner Tips Before You Start
- Use your stitch marker. Place it in the very first stitch of each round. When you come back around, you will know exactly where the round began and where to join.
- Do not pull the yarn too tight. Keep an even, relaxed tension. Tight stitches make the hook hard to insert and make the starfish curl.
- Count out loud. Count your stitches at the end of every round and compare with the number in parentheses. Catching a mistake early is much easier than fixing it later.
- Work the points one at a time and turn after each row. Each point is a tiny flat triangle — you are simply working back and forth over a few stitches.
- Keep the navy border loose. Surface slip stitch should sit on top of the edge, not pull it in. If the starfish starts to cup, your border is too tight.
- Cotton has little stretch. That is a good thing here — it keeps the points crisp — but it means you should not yank the yarn.
Step-by-Step Instructions
Note: The starfish is worked in one continuous pass. First you make a flat round center, then you work the five points directly from the edge of that round without fastening off between points. The navy border is added afterward as surface slip stitch.
Center Round (with Color A – light aqua)
Rnd 1: Make a magic ring, ch 1, work 6 sc into the ring, pull the ring closed, join with sl st to the first sc. (6 sc)
Rnd 2: Ch 1, 2 sc in each st around, join with sl st to the first sc. (12 sc)
Rnd 3: Ch 1, [2 sc in next st, sc in next st] 6 times, join with sl st to the first sc. (18 sc)
Rnd 4: Ch 1, [2 sc in next st, sc in next 2 sts] 6 times, join with sl st to the first sc. (24 sc)
Rnd 5: Ch 1, [2 sc in next st, sc in next 3 sts] 6 times, join with sl st to the first sc. (30 sc)
Rnd 6: Ch 1, [2 sc in next st, sc in next 4 sts] 6 times, join with sl st to the first sc. (36 sc)
Rnd 7: Ch 1, sc in each st around, join with sl st to the first sc. (36 sc) Do not fasten off.
Tip: The brackets [ ] mean "repeat everything inside the brackets" the number of times stated after them. Each round adds 6 stitches, which is why the counts climb 6, 12, 18, 24, 30, 36.
Points (worked one at a time around the center edge)
Each point is worked over 7 stitches of the center round, with 1 stitch skipped between points. Work all five points evenly spaced around the edge, turning after every row.
Point 1, Row 1: With Color A, ch 1, sc in each of the next 7 sts along the center edge. Turn. (7 sc)
Row 2: Ch 1, sc2tog, sc in next 3 sts, sc2tog. Turn. (5 sc)
Row 3: Ch 1, sc2tog, sc in next st, sc2tog. Turn. (3 sc)
Row 4: Ch 1, sc2tog, sc in next st. Turn. (2 sc)
Row 5: Ch 1, sc2tog. Fasten off, leaving a 4-inch tail. (1 sc)
Points 2–5: Skip 1 st on the center round edge, join Color A with a sl st in the next st, and repeat Point 1, Rows 1–5 exactly as written. Work all five points, spacing them evenly around the center round. Weave in the tails.
Teal accents (Color B): With Color B, make a small sl st at the base of each point where it meets the center round — one short surface sl st per point, 5 total. Fasten off and weave in ends.
Navy Surface-Stitch Border (with Color C)
Hold Color C on the wrong side (the back) of the starfish. Insert the hook from front to back through the outer edge of the center round and the base of each point, then pull up a loop of Color C to the front. Work surface slip stitch along the entire outer edge of the starfish, following the contour of the center round and around each of the five points. Keep the surface stitches even and close together so the navy border reads as a crisp raised outline. When you reach your starting point, join with a sl st to the first surface stitch, fasten off, and weave in the ends.
Assembly and Finishing
There is no seaming in this project — the starfish is made in one piece, so "assembly" is just tidying up.
- Weaving in ends: Thread each yarn tail onto the tapestry needle. Sew it back and forth through the back of the fabric for about 1 inch, changing direction once or twice so it cannot work loose, then trim close to the fabric.
- Blocking: Lightly wet the starfish with cool water (spray it or dip and gently squeeze — do not wring). Lay it flat on a towel or blocking mat and pin each of the five points straight out with rust-proof pins. This opens the points and gives the clean Art Deco silhouette. Leave it to dry completely, then remove the pins.
- Final check: Gently tug the navy border to make sure it sits flat and does not pull the edge inward.
Pro Tips and Variations
- Change the colorway: Swap the aqua for coral and the navy for deep plum for a warm, sunset version, or use a single color with a contrasting border for a minimalist look.
- Make it bigger or smaller: Add one more increase round to the center (Rnd 8: [2 sc in next st, sc in next 5 sts] 6 times = 42 sc) and work each point over 8 stitches for a larger starfish — or stop at Rnd 5 and work points over 6 stitches for a smaller one.
- Substitute yarn: A cotton-blend or acrylic worsted works too; acrylic will feel softer and less stiff, so block it a little more firmly to keep the points sharp.
- Turn it into a set: Make a stack of starfish in alternating blues for coasters, or add a small loop of yarn at one point to hang it as an ornament.