Row Ribbing Mason Jar Cozy Set Free Pattern: Rustic Farmhouse Crochet
Row Ribbing Mason Jar Cozy Set: A Warm Welcome to Crochet
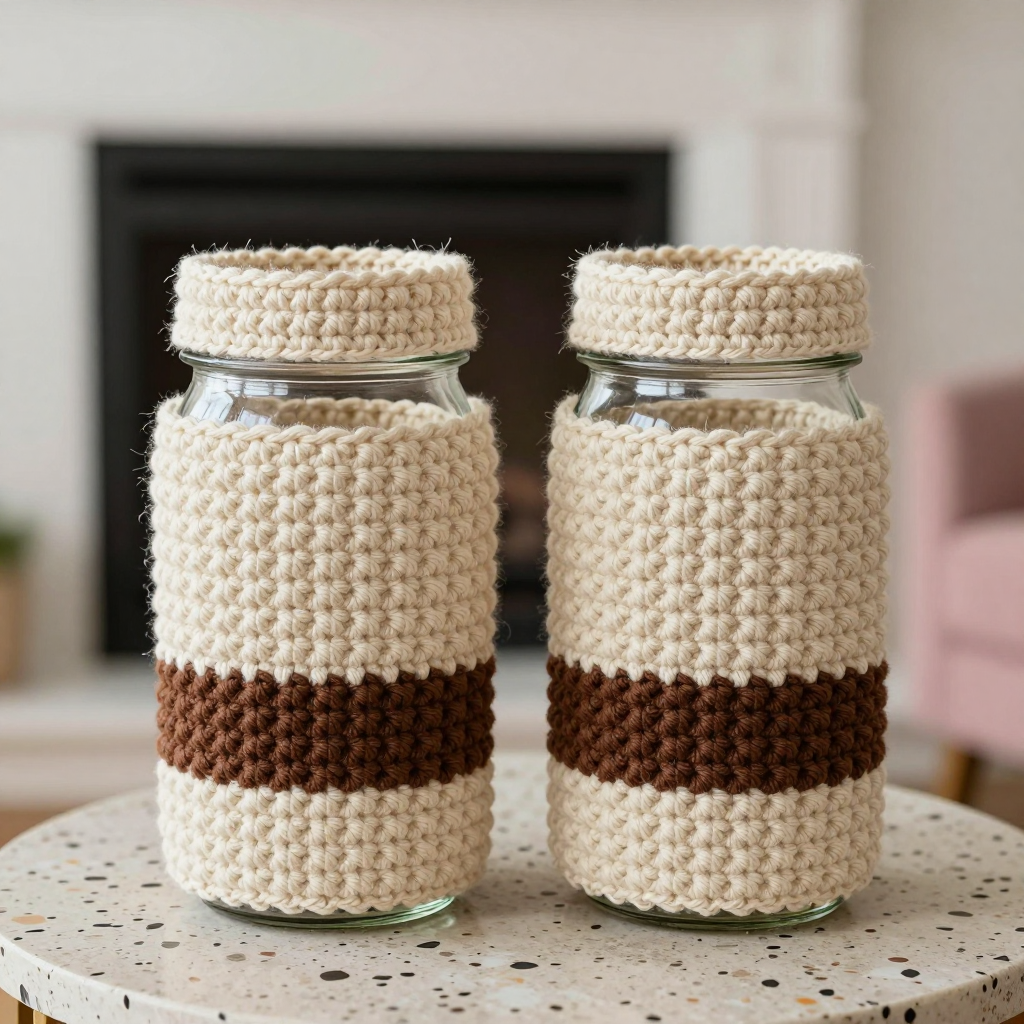
If you have never held a crochet hook before, this is the perfect first project to fall in love with. These rustic farmhouse mason jar cozies are small, useful, and forgiving — and they make your kitchen counter look like it stepped out of a country magazine. The finished cozy is a stretchy little sleeve that slips over a quart jar, hugging the glass with soft horizontal ridges and a single dark walnut "tally band" stripe near the bottom. It feels slightly firm at the base, gently ribbed in the middle, and smooth at the top edge. Best of all, you only need two simple stitches and one afternoon to make a matching pair.
Materials Needed
- Yarn: Worsted weight (CYC 4) cotton yarn. Approximately 90 yards total per cozy: about 75 yards of natural/cream (Color A) and 15 yards of dark walnut brown (Color B). The sample used Lion Brand 24/7 Cotton (100% mercerized cotton, 186 yds / 3.5 oz) in Ecru (A) and Cafe Au Lait (B).
- Crochet hook: US H-8 / 5.0 mm (or the size you need to match gauge).
- Stitch marker: 1 removable stitch marker (or a scrap of contrasting yarn) to mark the first stitch of each round.
- Tapestry needle: A blunt-tipped yarn needle for weaving in ends.
- Scissors: Any sharp pair for cutting yarn.
- Optional: A quart mason jar or a 3.5-inch cylinder for steam-blocking.
- Finished size: Each cozy measures 3.5 inches in diameter (11 inches circumference, unstretched) x 4 inches tall. It fits a standard quart (32 oz) mason jar with a 3.5-inch body diameter and stretches to fit jars up to 3.75 inches across.
Abbreviations and Beginner Glossary
Every abbreviation used in this pattern is listed below in plain English. Read through this list once before you begin — you will be surprised how quickly it all makes sense.
- ch – chain. Make a loop of yarn on your hook, wrap the yarn over the hook, and pull it through the loop. That is one chain stitch. A row of chains is your starting foundation.
- sl st – slip stitch. Insert your hook into the stitch, wrap the yarn over, and pull it straight through both the stitch and the loop on your hook at the same time. It makes a flat, nearly invisible join.
- hdc – half double crochet. Wrap the yarn over your hook, insert the hook into the stitch, wrap the yarn over again, pull up a loop (you now have 3 loops on your hook), wrap the yarn over once more, and pull through all 3 loops. This is your main stitch.
- hdc-flo – half double crochet in the front loop only. Work a normal hdc, but insert your hook only under the front loop (the loop closest to you) of the stitch below. This pushes the stitch forward and creates a ridge.
- hdc-blo – half double crochet in the back loop only. Work a normal hdc, but insert your hook only under the back loop (the loop farthest from you) of the stitch below. This pushes the stitch backward and creates the other half of the ridge.
- st(s) – stitch or stitches.
- rnd – round. One complete circle of stitches worked around the tube.
- A – Color A, the natural/cream yarn.
- B – Color B, the dark walnut brown yarn.
- Back bump – the little horizontal bump on the back of a starting chain. Working into it gives a clean, firm lower edge.
- Fasten off – cut the yarn a few inches from your work, then pull the tail all the way through the last loop to lock it.
Gauge
Gauge: 14 stitches x 14 rounds = 4 inches in alternating front-loop/back-loop half double crochet ribbing, worked in the round and slightly stretched.
Why gauge matters: Gauge is simply how big your stitches turn out. If your stitches are bigger than the pattern's, your cozy will be too loose and slide off the jar. If they are smaller, it will be too tight to slip on. Checking gauge first saves you from ripping out a finished piece.
How to make a gauge swatch: With Color A, chain 22. Work Rnd 1 as written below, then repeat Rnd 2 until your swatch is about 4 inches tall. Lay it flat (do not stretch it hard) and measure across the middle. Count how many stitches fit in 4 inches and how many rounds fit in 4 inches. If you have more than 14 stitches, try a larger hook. If you have fewer, try a smaller hook. Then begin the cozy.
Beginner Tips Before You Start
- Use a stitch marker. This cozy is worked in a continuous spiral with no joining, so the rounds blend together. Place a marker in the first stitch of each round and move it up as you go so you never lose your place.
- Do not pull your yarn too tight. New crocheters tend to choke the hook. Keep your tension relaxed and even — the ribbing needs a little give to stretch over the jar.
- Count your stitches at the end of every round. You should always have 38 stitches. If you are off by one, fix it now rather than later.
- Work into the back bump of the starting chain. It feels fiddly at first, but it gives a neat, firm bottom edge that sits flat against the jar.
- Keep your color changes tidy. When you switch from A to B, fasten off A completely and join B with a slip stitch in the next stitch. Weave the tails in later on the inside.
- Do not twist the ring. When you join your starting chain into a ring, make sure the chain lies flat and untwisted, or your cozy will have a permanent spiral kink.
Step-by-Step Instructions
Special technique — row ribbing in the round: This cozy is worked in a continuous spiral (no joining, no turning) so the ribbed texture forms horizontal ridges that read as rows. Each round alternates front-loop and back-loop hdc to create a stretchy horizontal rib. Place a stitch marker in the first stitch of each round and move it up as you go. Make 2 cozies.
Body
With Color A, ch 38. Being careful not to twist the chain, join with a sl st to the first ch to form a ring.
Rnd 1: Ch 1. Hdc in the back bump of each ch around. Do not join. (38 sts)
Rnd 2: Hdc-flo in first st, hdc-blo in next st. *Hdc-flo in next st, hdc-blo in next st; repeat from * around. (38 sts)
Rnds 3–4: Repeat Rnd 2 twice more. Fasten off Color A. (38 sts)
Join Color B.
Rnd 5: With B, repeat Rnd 2. (38 sts)
Rnd 6: Repeat Rnd 2. Fasten off Color B. (38 sts)
Join Color A.
Rnds 7–12: With A, repeat Rnd 2 six times. (38 sts)
Rnd 13 (top edge): Hdc in each st around, working through both loops. (38 sts)
Rnd 14 (edging): Sl st in each st around. Join with sl st to first sl st. Fasten off, leaving a 6-inch tail. (38 sts)
Optional Hanging Loop
With A, join yarn at any st on Rnd 13. Ch 8, sl st in same st. Fasten off and weave in ends.
Assembly and Finishing
Weaving in ends: Thread each yarn tail onto your tapestry needle. Turn the cozy inside out and weave the tail back and forth through the back of several stitches (about 1 inch), then trim close to the work. Never knot your ends — weaving hides them and keeps the cozy smooth.
Reinforcing the top edge (optional): Use the 6-inch tail from Rnd 14 to run a few small stitches along the inside of the top edge for extra firmness, then weave it in.
Blocking: Gently steam-block the cozy over a quart jar or a 3.5-inch diameter cylinder to set the ribbing. Hold a steam iron a few inches above the fabric (do not press the iron directly onto the cotton) and let the steam relax the stitches. Do not press flat — flattening will destroy the ribbed texture. Let it dry completely on the jar.
Finishing touch: Slip the cozy over the jar body. The ribbing will grip the glass snugly. Make the second cozy the same way for a matching pair.
Pro Tips and Variations
- Change the stripe color or position. Swap the dark walnut for sage green, mustard, or barn red. You can also move the tally band higher (work it on Rnds 8–9 instead of 5–6) for a different farmhouse look.
- Adjust the size. To fit a wider jar, add 2 chains to your starting chain (40 sts) and work the same number of rounds. To make a shorter cozy, stop after Rnd 10 and work the top edge and edging as written.
- Substitute the yarn. Any worsted weight (CYC 4) cotton works beautifully. Avoid acrylic if you want the cozy to grip glass — cotton has a slightly rougher, more absorbent texture that holds better and handles kitchen condensation.
- Add a hanging loop to every cozy. The optional loop on Rnd 13 makes the set easy to hang on a hook or tie to a gift bag — a lovely handmade present for a housewarming.