Aurora Borealis Fingerless Sock Gloves Free Pattern – Knit a Sky of Shifting Colors
Aurora Borealis Fingerless Sock Gloves Free Pattern – Knit a Sky of Shifting Colors
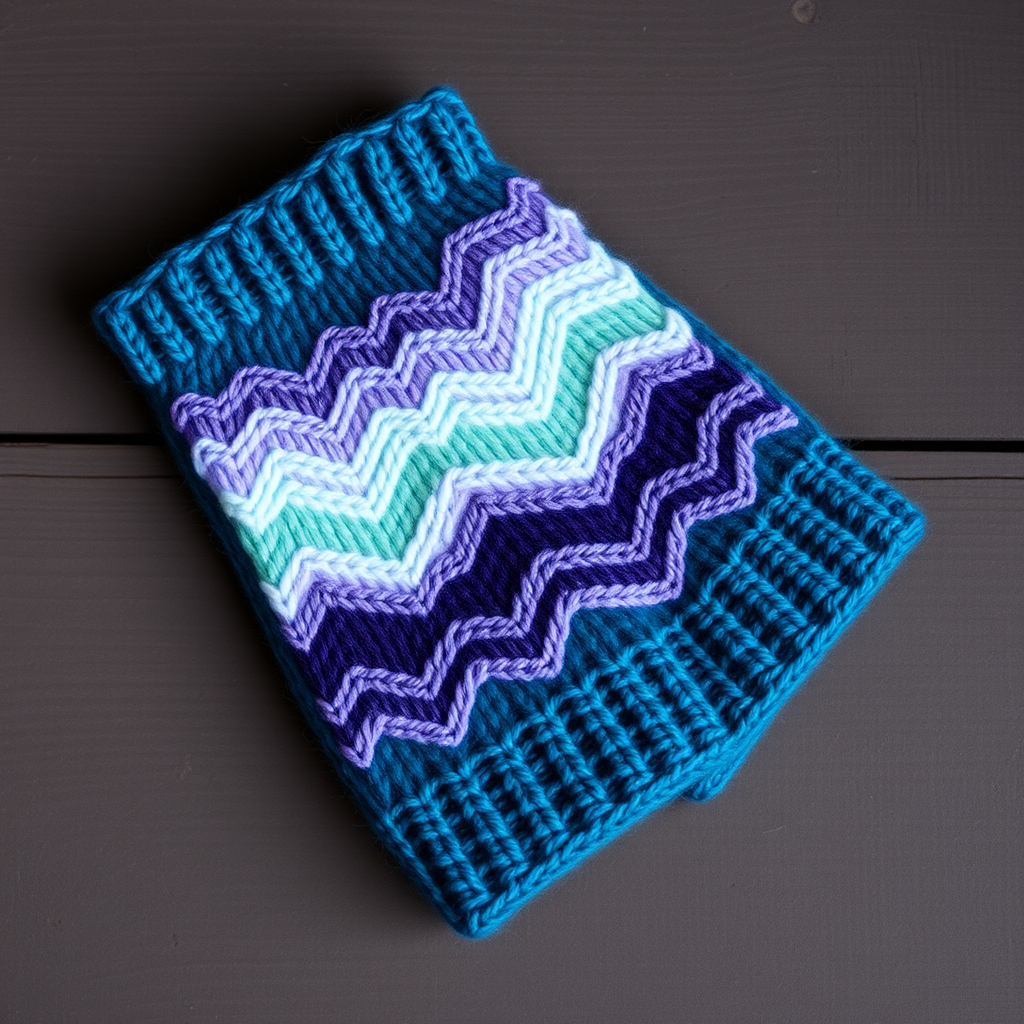
Wrap your hands in the ethereal dance of the northern lights with these uniquely textured fingerless gloves. The stranded colorwork and soft gradient yarn create a cozy, celestial accessory that feels like a warm embrace on a chilly evening. This pattern is perfect for knitters ready to explore colorwork while creating a stunning, wearable piece of art.
These gloves feature a smooth stockinette body with a ribbed cuff and top edge, while the back of the hand showcases a mesmerizing stranded pattern that mimics the flowing ribbons of the aurora borealis. The deep teal base is interwoven with soft lavender and pale mint bands, creating a harmonious blend that evokes the ethereal glow of northern lights against a night sky. The thumb gusset is seamlessly integrated, and the overall shape is snug and elegant, tapering gracefully at the fingers.
Materials Needed
Before you begin, gather the following supplies to ensure a smooth knitting experience:
- Yarn: Fingering weight yarn in 3 colors:
- Color A (deep teal) – approximately 150 yards
- Color B (soft lavender) – approximately 100 yards
- Color C (pale mint) – approximately 100 yards
- Needles: US 1.5 (2.5 mm) double-pointed needles (or circular for magic loop method)
- Notions: Stitch markers (at least 2), tapestry needle for weaving in ends, waste yarn or stitch holder for thumb stitches
- Gauge: 32 stitches and 40 rows = 4 inches in stockinette stitch, after blocking. Always check your gauge to ensure proper fit!
Step-by-Step Instructions
This pattern is worked from the cuff up, with a thumb gusset and a decorative colorwork pattern inspired by the flowing ribbons of the aurora borealis. The gloves are knit in the round on double-pointed needles. Make two identical gloves.
Abbreviations
- CO: cast on
- K: knit
- P: purl
- K2tog: knit two together (decrease)
- SSK: slip, slip, knit (decrease)
- M1L: make one left (increase) – pick up bar between stitches from front to back, knit through back loop
- M1R: make one right (increase) – pick up bar between stitches from back to front, knit through front loop
- St(s): stitch(es)
- PM: place marker
- SM: slip marker
- Rep: repeat
Cuff (make 2 alike)
- With Color A, CO 48 sts. Distribute evenly over 3 double-pointed needles (16 sts on each needle).
- Join in the round, being careful not to twist your stitches. Place a marker at the beginning of the round.
- Work in K2, P2 ribbing for 2 inches (approximately 20 rounds). Ensure your ribbing is neat and even.
Lower Hand
- Switch to stockinette (knit every round) and work 4 rounds in Color A.
- Begin the colorwork chart (worked over 48 sts). Carry the unused yarn loosely behind your work, being careful not to pull too tight. Here is the 14-round pattern:
- Round 1: *K2 in Color B, K2 in Color A* rep to end.
- Round 2: *K1 in Color B, K2 in Color A, K1 in Color B* rep to end.
- Round 3: *K4 in Color B, K4 in Color A* rep to end.
- Round 4: *K2 in Color B, K4 in Color A, K2 in Color B* rep to end.
- Round 5: *K6 in Color B, K2 in Color A* rep to end.
- Round 6: *K8 in Color B* rep to end (all Color B).
- Round 7: *K2 in Color C, K6 in Color B* rep to end.
- Round 8: *K4 in Color C, K4 in Color B* rep to end.
- Round 9: *K6 in Color C, K2 in Color B* rep to end.
- Round 10: *K8 in Color C* rep to end (all Color C).
- Round 11: *K2 in Color A, K6 in Color C* rep to end.
- Round 12: *K4 in Color A, K4 in Color C* rep to end.
- Round 13: *K6 in Color A, K2 in Color C* rep to end.
- Round 14: *K8 in Color A* rep to end (all Color A).
- Repeat Rounds 1-14 once more, then work Rounds 1-6 again. Your glove should now measure approximately 4 inches from the cast-on edge.
Thumb Gusset
- Continue in stockinette with Color A. Place a marker after the 24th stitch to mark the center of the palm. You now have two markers: the beginning-of-round marker and the center marker.
- Round 1 (increase round): K24, PM (center marker), M1R, K1, M1L, K23 (50 sts total).
- Round 2: K all (plain round).
- Round 3 (increase round): K24, SM, M1R, K3, M1L, K23 (52 sts total).
- Round 4: K all.
- Round 5 (increase round): K24, SM, M1R, K5, M1L, K23 (54 sts total).
- Round 6: K all.
- Continue in this manner, increasing 2 sts every other round (knit one plain round between increase rounds). Each increase round adds 2 stitches between the markers. The pattern for the increases is: K24, SM, M1R, K (odd number increasing by 2 each time), M1L, K23.
- Continue until you have 17 sts between the markers (total 64 sts on needles). This will take 8 increase rounds total. Your last increase round should be: K24, SM, M1R, K15, M1L, K23.
Separate Thumb
- Next round: K24, place the next 17 sts (between the markers) on a waste yarn holder, CO 1 st (for the underarm gap), K23 (48 sts total back on needles).
- Remove the center marker. Continue in stockinette with Color A for 1 inch (approximately 10 rounds).
Upper Hand Colorwork
- Work the same 14-round colorwork chart as before, but only once. Remember to keep your floats loose!
- Then work Rounds 1-6 again. Your glove should now reach the base of your fingers.
Top Ribbing
- Switch to Color A and work in K2, P2 ribbing for 1 inch (approximately 10 rounds).
- Bind off loosely in pattern. To bind off in pattern: K2, P2, then pass the first stitch over the second, continue in ribbing pattern as you bind off. This keeps the edge stretchy.
Thumb
- Transfer the 17 sts from waste yarn to double-pointed needles.
- With Color A, pick up 3 sts along the underarm gap (20 sts total). Distribute evenly over 3 needles.
- Knit in stockinette with Color A for 0.5 inch (approximately 5 rounds).
- Work in K2, P2 ribbing for 0.5 inch (approximately 5 rounds).
- Bind off loosely in pattern.
Finishing
- Weave in all ends using a tapestry needle. Be sure to weave in ends on the wrong side of the work, following the path of the yarn to keep them invisible.
- Block gently to shape. Wet block by soaking in lukewarm water with a drop of mild soap, then gently squeeze out excess water (do not wring). Lay flat on a towel, shaping to measurements. Stretch slightly to open up the colorwork and even out the stitches.
- Repeat all steps for the second glove.
Tips for Success
- Colorwork tension: The most important aspect of stranded knitting is maintaining even tension. Spread your stitches out on the right needle before switching colors, and keep your floats loose to prevent puckering.
- Yarn management: Use separate balls of yarn for each color. You can hold one color in each hand if you're comfortable with continental and English styles, or simply drop and pick up yarns as needed.
- Try it on: As you work, periodically try the glove on to check the fit. The thumb gusset should sit comfortably at the base of your thumb.
- Customization: If you have larger or smaller hands, adjust the number of stitches in the cuff (in multiples of 4 for the ribbing) or the number of increase rounds in the thumb gusset.
These Aurora Borealis fingerless gloves are a joy to knit and even more delightful to wear. The rhythmic color changes and the satisfying texture of the stranded work make this a meditative project, while the finished result is a stunning accessory that will draw compliments wherever you go. Whether you're knitting for yourself or as a gift for a loved one, these gloves are sure to become a treasured favorite. Happy knitting!