Blush Flamingo Jar Sleeve Free Crochet Pattern
Blush Flamingo Jar Sleeve: A Free Beginner-Friendly Crochet Pattern
Introduction
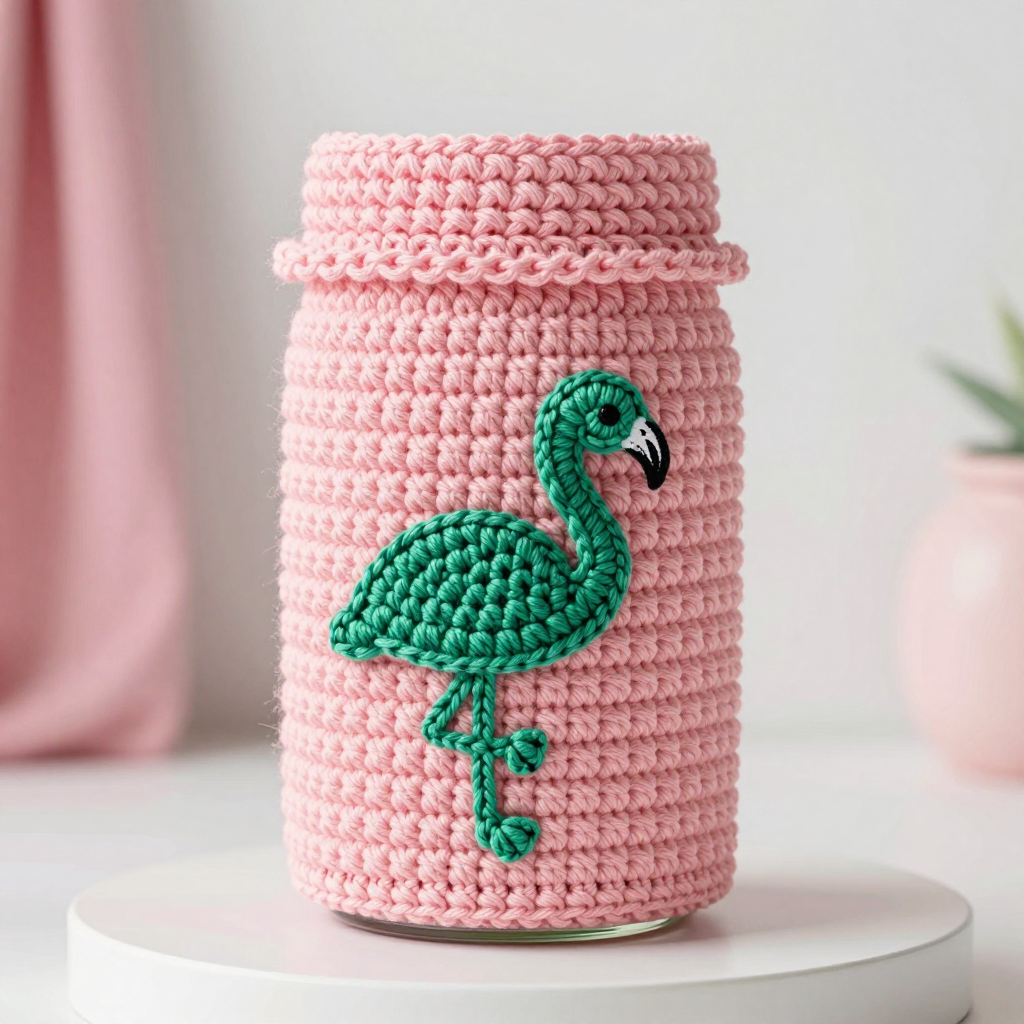
Welcome! If you have never held a crochet hook before, you are in exactly the right place. This Blush Flamingo Jar Sleeve is a soft blush-pink cylinder that slips snugly over a standard pint mason jar, finished with one little emerald-green flamingo appliqué sewn on the front. It is the perfect first "real" project because the sleeve is just simple rounds of one easy stitch, and the flamingo is a tiny flat shape you can practice on without any pressure. The finished cozy feels soft and matte in your hands, hugs the glass with a neat single-crochet trim at the top, and turns an ordinary jar into a cheerful tropical gift, pencil holder, or vase. Let's make one together — slowly, one stitch at a time.
Materials Needed
- Yarn: Worsted weight (category 4) acrylic or cotton-blend yarn. About 90 yards of blush pink for the sleeve and about 15 yards of emerald green for the flamingo appliqué.
- Hook for the sleeve: US G/6 — that is 4.0 mm.
- Hook for the appliqué: US E/4 — that is 3.5 mm.
- Stitch marker (one is enough; a safety pin or scrap of yarn works too).
- Tapestry needle (a blunt, large-eyed needle for sewing and hiding yarn ends).
- Scissors.
- Finished size: Fits a standard 16 oz (pint) mason jar, about 3 inches (7.5 cm) in diameter. The sleeve measures about 9.5 inches (24 cm) in circumference and 3.5 inches (9 cm) tall. The appliqué measures about 3.5 inches (9 cm) wide at the body and 3 inches (7.5 cm) tall from tail to head.
Abbreviations and Beginner Glossary
Every pattern is written in shorthand. Here is every abbreviation used in this pattern, explained as if you have never crocheted before. All terms are US crochet terms.
- ch — chain. Make a loop with the yarn on your hook, wrap the yarn over the hook, and pull it through the loop. That is one chain. A row of chains is the foundation you build on.
- sl st — slip stitch. Insert your hook into the stitch, wrap the yarn over the hook, and pull it through both the stitch and the loop on your hook in one motion. It makes an almost invisible join.
- sc — single crochet. Insert hook into the stitch, wrap yarn over hook and pull up a loop (2 loops on hook), wrap yarn over again and pull through both loops. One loop remains. This is the shortest, tightest basic stitch.
- hdc — half double crochet. Wrap yarn over hook before inserting it, insert hook into the stitch, wrap yarn over and pull up a loop (3 loops on hook), wrap yarn over once more and pull through all 3 loops at once. It is taller than sc and softer, giving the sleeve its gentle texture.
- sc2tog — single crochet 2 together. This is a decrease: it turns 2 stitches into 1. Insert hook into the first stitch, pull up a loop (2 loops on hook), insert hook into the next stitch, pull up a loop (3 loops on hook), wrap yarn over and pull through all 3 loops. One stitch remains.
- st / sts — stitch / stitches.
- rnd — round. A round is like a row, but you work in a circle and join the end to the beginning instead of turning your work.
- ch-2 sp — chain-2 space (a small gap made by two chains; not used in this particular pattern, but listed so you recognise it in other patterns).
- join with sl st — finish a round by making a slip stitch into the very first stitch of that round, closing the circle.
- fasten off — cut the yarn a few inches from your work, then pull the tail all the way through the last loop to lock it.
- turn — flip your work over so you can crochet back along the row you just made (used for flat pieces like the flamingo).
Gauge
Sleeve gauge: 14 hdc x 10 rounds = 4 inches (10 cm) with the 4.0 mm hook.
Appliqué gauge: 18 sc x 20 rows = 4 inches (10 cm) with the 3.5 mm hook.
Why gauge matters: Gauge is simply how big your stitches turn out. If your stitches are bigger than the pattern's, the sleeve will be too loose and slide off the jar; if they are smaller, it will not fit over the glass at all. How to check: With the 4.0 mm hook and blush yarn, chain 20, then work hdc into each chain and work about 12 rows of hdc. Lay the swatch flat and measure a 4-inch section in the middle with a ruler — count how many stitches across and how many rounds tall fit in those 4 inches. If you have more than 14 stitches, your tension is tight: try a larger hook. If you have fewer, try a smaller hook. It takes ten minutes and saves you a whole re-do.
Beginner Tips Before You Start
- Count your first ring twice. When you join the starting chain into a ring, make sure the chain is not twisted — a twist cannot be fixed later and will make the sleeve spiral.
- Use your stitch marker. Place it in the first hdc of each round so you always know where to join. Move it up every round.
- Do not pull the yarn too tight. Beginners often choke the hook. Keep an even, relaxed tension so the hdc stitches stay soft and the sleeve stretches over the jar.
- The ch 1 at the start of each round does not count as a stitch. Do not work into it, and do not count it in your stitch totals.
- Try the sleeve on the jar as you go. After round 5, slip it over the jar to check the fit — it should be snug but slide on easily.
- Block the appliqué before sewing. A quick steam or water block flattens the little flamingo so it lies neatly against the sleeve.
Step-by-Step Instructions
Sleeve (blush pink, 4.0 mm hook, worked in the round)
The sleeve is a closed cylinder worked from the bottom up, then finished with a simple trim at the top.
Set-up: Ch 34. Being careful not to twist the chain, join with sl st to the first ch to form a ring. (34 ch)
Rnd 1: Ch 1 (does not count as a st), hdc in the same ch as the join and in each ch around; join with sl st to the first hdc. (34 hdc)
Rnd 2: Ch 1, hdc in each st around; join with sl st to the first hdc. (34 hdc)
Rnds 3–9: Repeat Rnd 2. (34 hdc each rnd; piece measures about 3 in / 7.5 cm tall)
Rnd 10 (top trim): Ch 1, sc in each st around; join with sl st to the first sc. (34 sc)
Fasten off and weave in the ends. Turn the sleeve right side out. The cylinder should measure about 9.5 in (24 cm) around and 3.5 in (9 cm) tall, fitting snugly over a pint mason jar.
Flamingo Appliqué (emerald green, 3.5 mm hook, worked flat in rows)
Worked flat in rows, beginning at the tail and building the body, then the neck and head. The piece is a simple silhouette: a rounded body with a long neck and a small head.
Row 1: Ch 2, 3 sc in the second ch from hook. Turn. (3 sc)
Row 2: Ch 1, 2 sc in first st, sc in next st, 2 sc in last st. Turn. (5 sc)
Row 3: Ch 1, sc in each st across. Turn. (5 sc)
Row 4: Ch 1, 2 sc in first st, sc in each of next 3 sts, 2 sc in last st. Turn. (7 sc)
Rows 5–6: Ch 1, sc in each st across. Turn. (7 sc each row)
Row 7: Ch 1, sc2tog, sc in each of next 3 sts, sc2tog. Turn. (5 sc)
Row 8: Ch 1, sc in each st across. Turn. (5 sc)
Row 9 (neck begins): Ch 1, sc in first 2 sts; leave the remaining 3 sts unworked. Turn. (2 sc)
Rows 10–16: Ch 1, sc in each st across. Turn. (2 sc each row; neck measures about 1.5 in / 4 cm long)
Row 17 (head): Ch 1, 2 sc in first st, 2 sc in next st. Turn. (4 sc)
Row 18: Ch 1, sc in each st across. Turn. (4 sc)
Row 19: Ch 1, sc2tog twice. Turn. (2 sc)
Row 20: Ch 1, sc2tog. (1 sc)
Fasten off, leaving a 12-inch (30 cm) tail for sewing. Weave in the starting end.
Shape check: the finished appliqué should measure about 3.5 in (9 cm) wide at the body and 3 in (7.5 cm) tall from tail to head, with the neck rising from one side of the body. Gently block the appliqué flat with steam or water, pin it to shape, and let it dry completely.
Assembly and Finishing
- Set up your form. Place the sleeve on the jar (or a jar-sized form) so the front is smooth and the trim sits at the top.
- Position the flamingo. Center the appliqué on the front of the sleeve, body low and neck rising toward the top edge. Pin it in place with sewing pins or small safety pins.
- Sew it down. Thread the reserved emerald tail onto the tapestry needle (or use the 3.5 mm hook to pull the yarn through). Sew the appliqué to the sleeve with small, even stitches along the body and neck edges, catching only the surface of the sleeve so the inside stays neat. Fasten off and weave in the ends on the inside.
- Weave in all ends. Thread each loose tail onto the tapestry needle, run it back and forth through the back of a few stitches (about 1 inch), then trim close to the work. Never knot your ends — weaving hides them invisibly.
- Final block. Remove the jar, gently steam the sewn appliqué so it lies flat, and let it dry completely.
Care: Hand wash cold, reshape, and lay flat to dry.
Pro Tips and Variations
- Change the colors: Swap the blush pink for any worsted yarn you love, and try a different appliqué color — coral, teal, or mustard all look tropical. Keep the two-color contrast so the flamingo stands out.
- Adjust the size: For a wider jar, add chains in multiples of 2 to the starting ring (for example, ch 38 instead of 34) and work the same number of rounds; for a taller jar, simply repeat Rnd 2 more times before the trim. Always check the fit on the jar as you go.
- Substitute yarn: Cotton-blend yarn gives a crisper, washable sleeve; acrylic is softer and slightly stretchier. Match the worsted weight (category 4) and re-check your gauge swatch, since different fibers behave differently.
- Make a set: Crochet two or three sleeves in different colors and sew a flamingo on each — they make lovely handmade gifts filled with candy, pens, or a small plant.