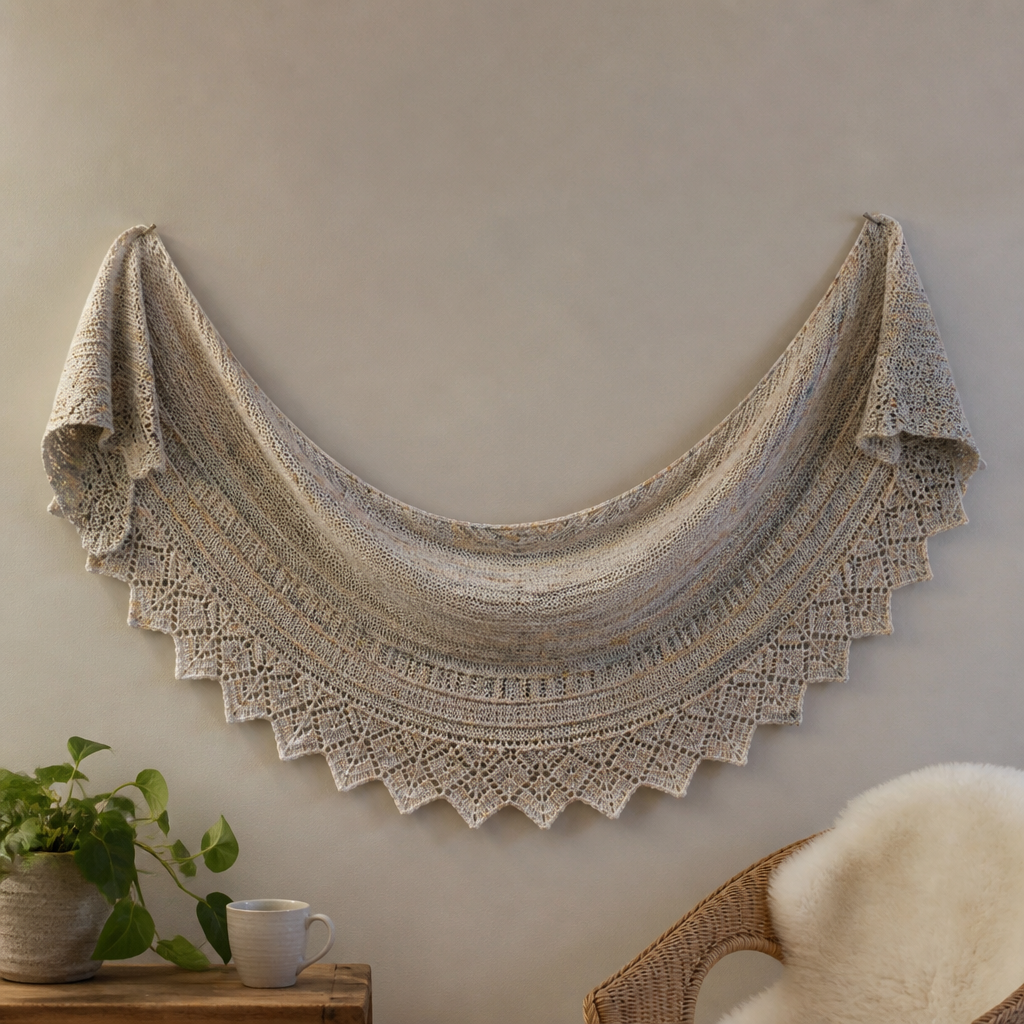
Bracken Ridge Easy Elegant Triangle Shawl Free Knitting Pattern

Bracken Ridge Easy Elegant Triangle Shawl: A Free Knitting Pattern for Cozy, Forest-Inspired Style
Wrap yourself in the serene beauty of a misty forest with the Bracken Ridge Triangle Shawl. This easy, elegant knitting pattern is perfect for beginners and experienced knitters alike, featuring a textured knit that drapes gracefully over your shoulders. With its rich mossy green and soft heather color combination, this shawl evokes the quiet calm of woodland trails and cozy autumn evenings. Best of all, it's a free pattern that uses simple knit, purl, and yarn over techniques to create a sophisticated, openwork design. Whether you're new to shawl knitting or looking for a relaxing weekend project, this pattern will guide you step-by-step to a stunning, handmade accessory you'll treasure for years.
Materials Needed
Before you begin, gather the following materials to ensure a smooth and enjoyable knitting experience:
- Yarn: Worsted weight yarn in two colors:
- Color A (Mossy Green): 400 yards
- Color B (Soft Heather): 300 yards
- Needle: US 9 (5.5 mm) 32-inch circular knitting needle (the long cable is essential to accommodate the growing number of stitches)
- Gauge: 16 stitches and 24 rows = 4 inches in stockinette stitch (blocked). Gauge is important for achieving the correct drape and size, but this pattern is forgiving—a slightly looser or tighter gauge will still produce a beautiful shawl.
- Other tools: Stitch markers (optional but helpful), tapestry needle for weaving in ends, blocking pins and mat (for finishing).
Step-by-Step Instructions
This shawl is knit from the top center down, with increases at the edges and center to form a triangle. The pattern uses a simple combination of knit, purl, and yarn over increases to create a beautiful textured pattern. Follow along carefully, and you'll have a gorgeous shawl in no time.
Abbreviations
- k = knit
- p = purl
- yo = yarn over (bring yarn to front, then over needle to back, creating a new stitch)
- k2tog = knit two stitches together (decrease)
- ssk = slip, slip, knit (decrease—slip two stitches knitwise, then knit them together through the back loop)
- sl1 = slip one stitch purlwise (insert needle as if to purl, slip stitch to right needle without knitting)
- st(s) = stitch(es)
- RS = right side (the side that will face outward)
- WS = wrong side (the inside of the shawl)
Setup Rows
With Color A (Mossy Green), cast on 5 stitches using your preferred method (long-tail cast on works well).
Row 1 (RS): k2, yo, k1, yo, k2 — you now have 7 stitches.
Row 2 (WS): k2, p3, k2 — 7 stitches.
Row 3 (RS): k2, yo, k1, yo, k1, yo, k1, yo, k2 — you now have 11 stitches.
Row 4 (WS): k2, p7, k2 — 11 stitches.
Begin Main Pattern
Now you'll start the textured pattern that gives the shawl its beautiful, forest-floor appearance. The pattern increases 4 stitches on every RS row: 2 at each edge and 2 at the center.
Row 5 (RS): k2, yo, k1, yo, *k1, p1, k1, yo, k1, yo, k1, p1, k1, yo, k1, yo*; repeat from * to * until 3 stitches remain, k1, yo, k2.
Row 6 (WS): k2, purl to the last 2 stitches, k2. (Purl all stitches between the edge stitches.)
Row 7 (RS): k2, yo, k1, yo, *k2, p1, k1, yo, k1, yo, k1, p1, k2*; repeat from * to * until 3 stitches remain, k1, yo, k2.
Row 8 (WS): k2, purl to the last 2 stitches, k2.
Row 9 (RS): k2, yo, k1, yo, *k3, p1, k1, yo, k1, yo, k1, p1, k3*; repeat from * to * until 3 stitches remain, k1, yo, k2.
Row 10 (WS): k2, purl to the last 2 stitches, k2.
Row 11 (RS): k2, yo, k1, yo, *k4, p1, k1, yo, k1, yo, k1, p1, k4*; repeat from * to * until 3 stitches remain, k1, yo, k2.
Row 12 (WS): k2, purl to the last 2 stitches, k2.
Row 13 (RS): k2, yo, k1, yo, *k5, p1, k1, yo, k1, yo, k1, p1, k5*; repeat from * to * until 3 stitches remain, k1, yo, k2.
Row 14 (WS): k2, purl to the last 2 stitches, k2.
Row 15 (RS): k2, yo, k1, yo, *k6, p1, k1, yo, k1, yo, k1, p1, k6*; repeat from * to * until 3 stitches remain, k1, yo, k2.
Row 16 (WS): k2, purl to the last 2 stitches, k2.
Continue the Pattern
Continue in this manner, increasing the number of knit stitches at the beginning and end of the repeat by 1 on each RS row. The pattern repeat is: *k(n), p1, k1, yo, k1, yo, k1, p1, k(n)* where n increases by 1 on each RS row. So on Row 17, you'll knit 7 stitches before the p1, on Row 19 you'll knit 8, and so on.
Work until the shawl measures approximately 24 inches from the cast-on edge, ending with a WS row. This will take some time, but the rhythmic pattern is meditative and rewarding.
Switch to Color B (Soft Heather)
Now you'll add the beautiful contrast color that runs down the center of the shawl.
Work 4 rows in stockinette stitch (knit on RS, purl on WS) with Color B, maintaining the edge stitches (k2 at the beginning and end of every row) and continuing the increases as established (yo, k1, yo at the center and edges). This means:
- RS rows: k2, yo, k1, yo, knit to the center, yo, k1, yo, knit to the last 3 stitches, k1, yo, k2.
- WS rows: k2, purl to the last 2 stitches, k2.
This creates a smooth, elegant band of soft heather down the middle of the shawl.
Switch Back to Color A (Mossy Green)
Now you'll finish with a cozy garter stitch border.
Work 6 rows in garter stitch (knit all stitches on both RS and WS), continuing the increases as established. This means every row is: k2, yo, k1, yo, knit to the center, yo, k1, yo, knit to the last 3 stitches, k1, yo, k2. The garter stitch creates a lovely, bumpy texture that frames the shawl beautifully.
Bind Off
Bind off on the WS (wrong side) using a stretchy bind-off to ensure the edge remains elastic:
Knit 2, *k2tog, pass the first stitch over the second stitch*; repeat from * to * until 1 stitch remains. Cut the yarn, leaving a 6-inch tail, and pull it through the last stitch to secure.
Finishing
Weave in all ends using a tapestry needle, being careful to hide them within the stitches so they're invisible from the right side.
Block the shawl gently to shape. Soak it in lukewarm water with a mild wool wash for 15-20 minutes, then gently squeeze out excess water (never wring). Lay it flat on a blocking mat and pin the edges to open up the lace pattern and create the beautiful triangle shape. Pay special attention to the points and the center column. Allow it to dry completely before unpinning.
Tips for Success
- Use stitch markers to mark the center stitch and the edge sections. This will help you keep track of your increases and the pattern repeat.
- Count your stitches after each RS row to ensure you've made the correct number of increases (4 per RS row).
- Be patient with the long rows—as the shawl grows, each row takes longer, but the result is worth it!
- Blocking is essential to open up the yarn over patterns and give the shawl its beautiful drape. Don't skip this step!
Your Bracken Ridge Triangle Shawl is now complete! This elegant, textured accessory is perfect for cozy evenings, outdoor adventures, or as a thoughtful handmade gift. The combination of mossy green and soft heather creates a subtle, nature-inspired contrast that pairs beautifully with any outfit. Enjoy wearing your handcrafted creation, and remember—every stitch is a reflection of your creativity and care. Happy knitting!