Cherry Meadow Motif Skirt Free Pattern: Irish Lace Crochet Skirt in Tweed Wool
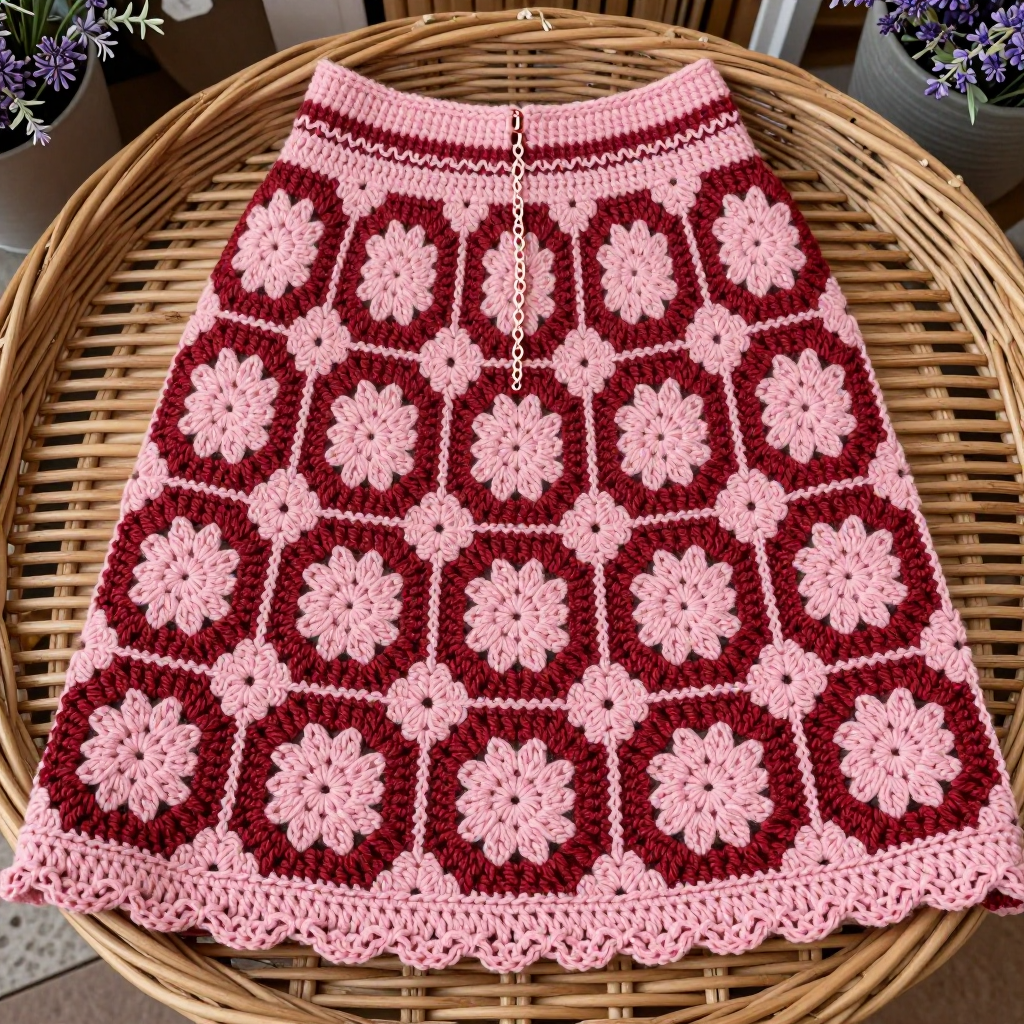
Cherry Meadow Motif Skirt: A Free Irish Lace Crochet Pattern
Introduction
If you have ever looked at a lacy, flower-covered skirt and thought "I could never make that," this pattern is for you. The Cherry Meadow Motif Skirt is built from just one simple flower shape, repeated 20 times and joined into a panel, so you only ever have to learn a single motif before the whole skirt comes together. It is perfect for a confident beginner who has crocheted a little before and wants a real, wearable project with a big payoff. The finished skirt is a soft A-line in worsted tweed wool, with a checkerboard of cherry red and blush pink flowers, a gently gathered crocheted waistband, and a sweet picot edge at the hem. It feels rustic and farmhouse-cozy, looks handmade in the best way, and is sized for a teen with a 26 in / 66 cm waist.
Materials Needed
- Yarn: Worsted-weight tweed wool (approx. 180 yd / 165 m per 100 g skein) with visible flecks. You need 3 skeins cherry red (Color A) and 2 skeins blush pink (Color B). Total about 5 skeins.
- Crochet hook: 5.0 mm (US H-8), or the size you need to match gauge.
- Stitch markers: at least 8, to mark corners and the start of rounds.
- Tapestry needle: a blunt yarn needle for weaving in ends and joining.
- Scissors for cutting yarn.
- Tape measure for checking motif size and the finished skirt.
- Blocking supplies: a mat, rust-proof pins, and a spray bottle of water.
- Finished size: Teen size. Waist 26 in / 66 cm, hip 34 in / 86 cm, length 18 in / 46 cm. The skirt is a straight A-line, slightly wider at the hem than at the waist.
Abbreviations and Beginner Glossary
Read this list once before you begin. Every term used in the pattern is explained here in plain English.
- ch – chain. Wrap the yarn over your hook and pull it through the loop on your hook. This makes a small link.
- sc – single crochet. Insert your hook into the stitch, yarn over, pull up a loop (2 loops on hook), yarn over again, pull through both loops. One loop remains.
- hdc – half double crochet. Yarn over, insert hook into stitch, yarn over, pull up a loop (3 loops on hook), yarn over, pull through all 3 loops at once.
- dc – double crochet. Yarn over, insert hook into stitch, yarn over, pull up a loop (3 loops on hook), yarn over, pull through 2 loops, yarn over, pull through the last 2 loops.
- sl st – slip stitch. Insert hook into stitch, yarn over, pull the loop straight through the loop on your hook. This joins without adding height.
- st / sts – stitch / stitches. One completed crochet stitch.
- magic ring – an adjustable loop. Make a loop of yarn, work your stitches into it, then pull the tail to close the hole tight. (If you prefer, ch 4 and join with sl st to form a ring instead.)
- yarn over – wrap the working yarn over your hook from back to front.
- join with sl st – finish a round by working a slip stitch into the first stitch of that round so the round closes into a circle.
- fasten off – cut the yarn leaving a tail, then pull the tail through the last loop to secure it.
- ch-2 space – the small gap made by two chain stitches in the round below. You work your next stitches into that gap, not into a stitch.
- picot – a tiny bump made by ch 3, then slip stitching back into the last sc you made.
- right side / wrong side – the right side is the pretty front face of the fabric; the wrong side is the back.
Gauge
Gauge: one finished flower motif = 4 in / 10 cm across after blocking. Four motifs joined in a square = 8 in / 20 cm. The motif is worked in the round in sc and dc.
Why gauge matters: Gauge is how big your stitches come out. If your motif is bigger than 4 in, the whole skirt will be too large; if smaller, it will be too tight. Because this skirt is made of motifs, gauge is easy to check: just make one flower and measure it.
How to check: Crochet one complete motif following the pattern below. Pin it to your blocking mat, spray it lightly with water, and let it dry fully. Measure straight across the widest point. If it is larger than 4 in, switch to a smaller hook (4.5 mm); if smaller, switch to a larger hook (5.5 mm). Always block before measuring, because wool relaxes when wet.
Beginner Tips Before You Start
- Make one practice motif first. Crochet a single flower, block it, and measure it before you commit to all 20. This confirms your gauge and teaches you the shape.
- Use stitch markers. Place a marker in the first stitch of every round so you always know where the round began and where to join.
- Do not pull your yarn too tight. Tension that is too tight makes the petals curl and the motifs too small. Keep your loops relaxed and even.
- Count your petals. Every motif must have exactly 8 petals and 8 ch-2 spaces. If you have 7 or 9, the squaring round will not line up when you join.
- Block every motif before joining. Blocking turns a slightly wobbly flower into a neat 4 in square, which makes joining much easier.
- Keep your color plan visible. Lay the finished motifs out in the checkerboard before you join anything, so you never sew the wrong colors side by side.
Step-by-Step Instructions
Planning the Motif Math
Each flower motif measures 4 in / 10 cm across. The panel is 4 motifs wide (16 in / 40.6 cm flat, which wraps into a 32 in / 81 cm tube before the waistband draws it in) and 5 motif rows tall (20 in / 50.8 cm, giving a finished length of about 18 in / 46 cm after the waistband). Total motifs: 20 (4 across x 5 rows). Use 12 cherry red (A) and 8 blush pink (B) in an alternating checkerboard.
The Flower Motif (make 20: 12 in A, 8 in B)
Round 1: With your chosen color, make a magic ring. Ch 1, work 8 sc into the ring, join with sl st to the first sc. (8 sc)
Round 2: Ch 3 (this counts as the first dc), dc in the same stitch, then 2 dc in each sc around, join with sl st to the top of the ch-3. (16 dc)
Round 3: Ch 1, sc in the same stitch, ch 2, skip the next dc, *sc in the next dc, ch 2, skip the next dc; repeat from * around, join with sl st to the first sc. (8 sc, 8 ch-2 spaces)
Round 4 (petal round): Ch 1, *(sc, hdc, 2 dc, hdc, sc) in the next ch-2 space; repeat from * around, join with sl st to the first sc. (8 petals)
Round 5 (squaring round): Ch 1, sc in each of the next 3 sts, *ch 2, sc in the next 3 sts; repeat from * around, join with sl st to the first sc. Fasten off, leaving a 6 in / 15 cm tail for joining. (24 sc, 8 ch-2 spaces) Block each motif to a 4 in / 10 cm square and let it dry completely.
Joining the Panel
Arrange the 20 motifs in 5 rows of 4, alternating A and B in a checkerboard so no two same-color motifs touch side by side. Join the motifs with slip stitch through the ch-2 corner spaces and the sc edges: hold two motifs wrong sides together and sl st through matching stitches along one edge, working 1 sl st in each sc and 2 sl st in each corner ch-2 space. Join all motifs into the flat 4 x 5 panel. Weave in the ends as you go.
Seaming Into a Tube
Fold the panel in half with right sides together so the 5-row height becomes the skirt length. Join the two short side edges with sl st through matching stitches to form a tube, leaving the top edge open. Turn the skirt right side out.
Waistband
Round 1: With A, join yarn at the top edge of the tube. Ch 1, work 1 sc in each stitch and 1 sc in each joining seam around the top edge, join with sl st to the first sc. (approx. 80 sc)
Round 2: Ch 1, sc in each sc around, join with sl st to the first sc. (80 sc)
Round 3 (draw-in round): Ch 1, sc in each sc around, join with sl st to the first sc. Do not fasten off. (80 sc)
Waist chain: Ch 60, then sl st back along the chain to create a firm cord. Sl st to the waistband at the starting point, and weave the cord through Round 2 of the waistband as a drawstring. Fasten off and weave in the ends. The chain gathers the waist softly without elastic.
Hem Edging
Round 1: Join B at the bottom edge. Ch 1, work 1 sc in each stitch around the hem, join with sl st to the first sc. (approx. 80 sc)
Round 2 (picot edge): Ch 1, *sc in the next 3 sts, ch 3, sl st in the last sc made; repeat from * around, join with sl st to the first sc. Fasten off and weave in the ends.
Assembly and Finishing
Seams: Your side seam was joined with slip stitch in the tube step. Run your finger along it to check it lies flat and has no gaps; if you see a gap, work a few extra sl st through the matching stitches to close it.
Weaving in ends: Thread each tail onto the tapestry needle and run it through the back of several stitches (about 1 in / 2.5 cm), then back the other way for a few stitches to lock it. Trim close to the fabric. Never knot your ends, as knots create hard bumps.
Blocking: Lay the finished skirt flat on a blocking mat. Pin the hem and waist gently to shape, mist lightly with water, and let it dry fully, away from direct heat. This settles the motifs, evens the hem, and softens the tweed. Do not wring or hang the wet skirt, as it will stretch out of shape.
Pro Tips and Variations
- Change the colors: Swap cherry red and blush pink for any two shades you love. Keep the checkerboard so the pattern still reads clearly, and use your darker color for the waistband to frame the skirt.
- Adjust the size: To make the skirt wider, add one more motif column (5 across instead of 4). To make it longer or shorter, add or remove a motif row. Each motif adds about 4 in / 10 cm to the width or length.
- Substitute the yarn: Any worsted-weight wool or wool-blend works well. Always crochet one test motif and block it to confirm you still get 4 in / 10 cm before making the full set.
- Add elastic for a firmer waist: If you prefer a snugger fit, thread a piece of 1 in / 2.5 cm soft elastic through the waistband behind the chain cord, then overlap and stitch the ends closed.


