Frosted Fir Garland Free Pattern
Bring the Magic of a Snowy Forest Indoors with the Frosted Fir Garland
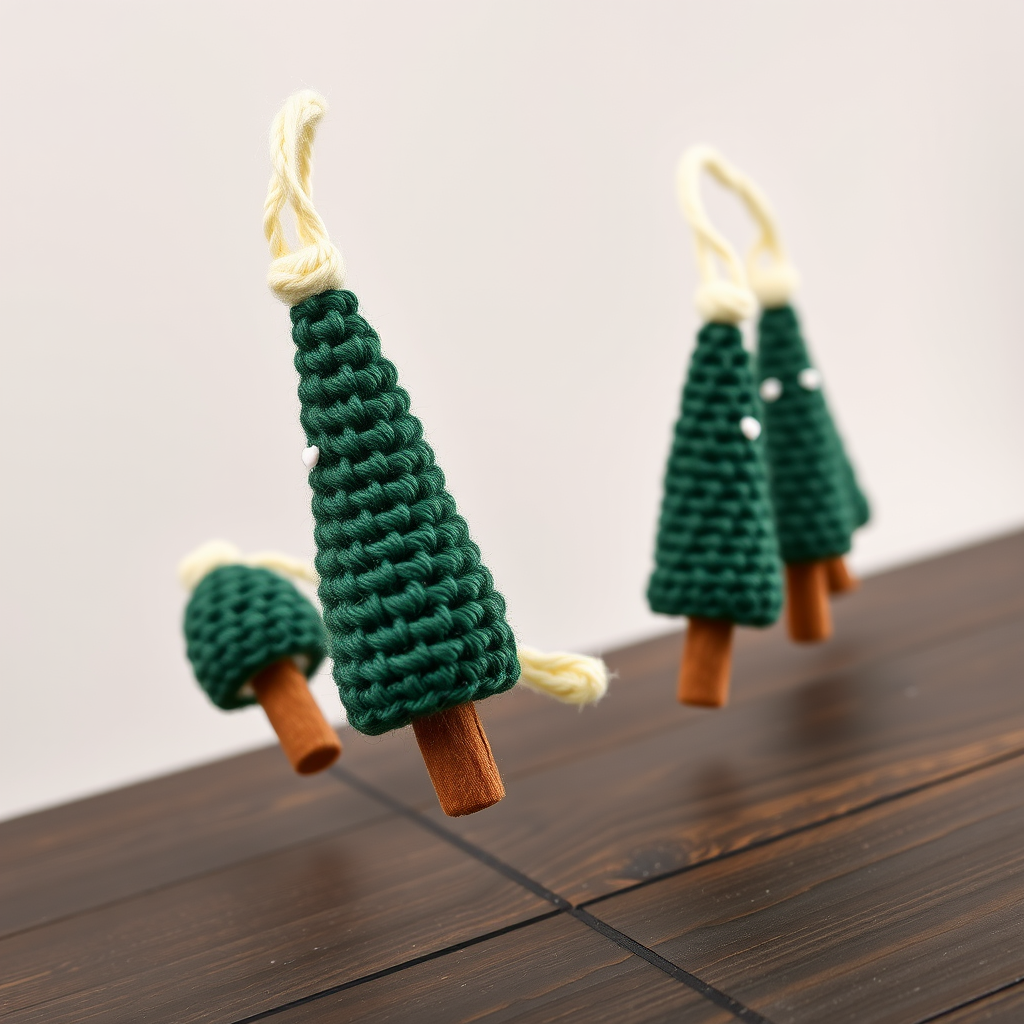
There is a certain quiet magic in a forest after a fresh snowfall—the way the white powder rests gently on the deep green boughs, creating a serene and cozy atmosphere. With this Frosted Fir Garland Free Pattern, you can capture that exact feeling and bring it into your home. This charming crochet garland features a series of textured, conical evergreen trees, each topped with a whimsical cream "snow cap" and attached to a rustic brown trunk.
This project is perfect for crafters of all levels, especially beginners looking to expand their skills beyond flat squares. Because the trees are worked in continuous spiral rounds, you will practice increasing and decreasing stitches to create a three-dimensional shape. The result is a dense, cozy fabric that holds its form beautifully. Whether draped across a mantel, hung in a doorway, or used as a festive table centerpiece, this garland adds a handmade, rustic touch to your holiday or winter decor. Plus, it makes a wonderful, heartfelt gift for friends and family.
Let’s gather our supplies and start creating this delightful winter wonderland garland.
Materials Needed
Before you begin, ensure you have all the necessary supplies on hand. This project uses small amounts of yarn, making it a great stash-buster.
- Yarn: Worsted weight yarn in three colors:
- Forest Green: Main color for the trees (approx. 30-40 yards per tree).
- Cream: For the snow caps and the string to hold the garland together (approx. 15-20 yards).
- Brown: For the tree trunks (approx. 5 yards per trunk).
- Crochet Hook: 4 mm (G/6) crochet hook.
- Tapestry Needle: For weaving in ends and sewing pieces together.
- Scissors: For cutting yarn.
- Stuffing (Optional): A small amount of polyester fiberfill to lightly stuff the trees and trunks for extra shape.
- Stitch Marker (Optional): Helpful for keeping track of your rounds, though not strictly necessary.
Gauge: Gauge is not critical for this project. However, aim for a tight, firm tension to ensure the trees hold their cone shape and the stuffing doesn't show through.
Step-by-Step Instructions
This garland is constructed by making individual crocheted trees and trunks, which are then sewn together and strung onto a cord. Each tree is worked in a continuous spiral, meaning you will not join at the end of each round. Instead, you will work continuously, which creates a seamless, smooth cone shape. Use a stitch marker to mark the first stitch of each round to help you keep count.
Crochet the Tree (Make 8-10)
Note: Work in continuous rounds (spiral). Do not slip stitch or chain at the end of rounds unless specified.
Round 1: With forest green yarn, make a magic ring. Work 6 single crochet (sc) into the ring. Pull the tail to close the ring tightly. (6 stitches)
Round 2: Work 2 sc into each stitch around. (12 stitches)
Round 3: *Sc in the next stitch, 2 sc in the next stitch*; repeat from * to * around. (18 stitches)
Round 4: *Sc in the next 2 stitches, 2 sc in the next stitch*; repeat from * to * around. (24 stitches)
Round 5: *Sc in the next 3 stitches, 2 sc in the next stitch*; repeat from * to * around. (30 stitches)
Rounds 6-10: Sc in each stitch around for 5 rounds. (30 stitches)
Round 11 (Decrease): *Sc in the next 3 stitches, single crochet 2 together (sc2tog)*; repeat from * to * around. (24 stitches)
Rounds 12-14: Sc in each stitch around for 3 rounds. (24 stitches)
Round 15 (Decrease): *Sc in the next 2 stitches, sc2tog*; repeat from * to * around. (18 stitches)
Rounds 16-18: Sc in each stitch around for 3 rounds. (18 stitches)
Round 19 (Decrease): *Sc in the next stitch, sc2tog*; repeat from * to * around. (12 stitches)
Rounds 20-22: Sc in each stitch around for 3 rounds. (12 stitches)
Round 23 (Decrease): Sc2tog around. (6 stitches)
Fasten off, leaving a long tail (approx. 12 inches). Thread the tail onto a tapestry needle. Insert the needle through the front loops of the remaining 6 stitches and pull tight to cinch the top of the tree closed. Weave in the end securely.
Crochet the Tree Trunk (Make 8-10)
Round 1: With brown yarn, make a magic ring. Work 6 sc into the ring. Pull to close. (6 stitches)
Rounds 2-4: Sc in each stitch around for 3 rounds. (6 stitches)
Fasten off, leaving a long tail for sewing. Lightly stuff the trunk with a tiny bit of fiberfill if desired. Sew the trunk to the bottom opening of the tree. Before completely closing the seam, stuff the tree body lightly with fiberfill to help it maintain its cone shape. Finish sewing the trunk securely to the tree.
Create the Snow Cap (Optional, for a Frosted Look)
Round 1: With cream yarn, make a magic ring. Work 6 sc into the ring. Pull to close. (6 stitches)
Round 2: Work 2 sc in each stitch around. (12 stitches)
Fasten off, leaving a long tail. Position the small cream circle on the top of the tree, angling it slightly to one side for a whimsical, natural "drifting snow" look. Sew it in place using the tail, stitching through the edge of the cap and the tree. Weave in the ends.
Assembling the Garland
Once all your trees, trunks, and snow caps are complete, it's time to string them together.
- Cut a long strand of cream yarn—long enough to span your desired area, plus extra for hanging loops. A good rule of thumb is to measure your mantel or doorway and add 24 inches.
- Thread the cream yarn onto a tapestry needle.
- Starting with the first tree, push the needle through the top of the tree (through the center of the snow cap if you added one). Pull the yarn through, leaving a 6-inch tail at the beginning for tying.
- Slide the tree down the yarn to your desired position. Tie a small, tight knot in the cream yarn just below the tree to prevent it from sliding.
- Repeat this process, spacing your trees evenly along the strand. A spacing of 4-6 inches between trees generally looks balanced, but feel free to adjust based on your preference.
- For added charm, you can thread small cream yarn pom-poms or wooden beads between the trees before tying the next knot.
- Once all trees are attached, tie a loop at each end of the garland for easy hanging.
- Hang your garland and gently shape the trees, fluffing them so they point downward nicely.
Your Frosted Fir Garland is now complete! Stand back and admire your handiwork. The combination of the deep green, rustic brown, and snowy cream creates a beautiful, tactile piece that brings warmth and holiday cheer to any room. Happy crocheting!