Lilac Moss Stitch Bookmark Duo: Free Beginner Crochet Pattern
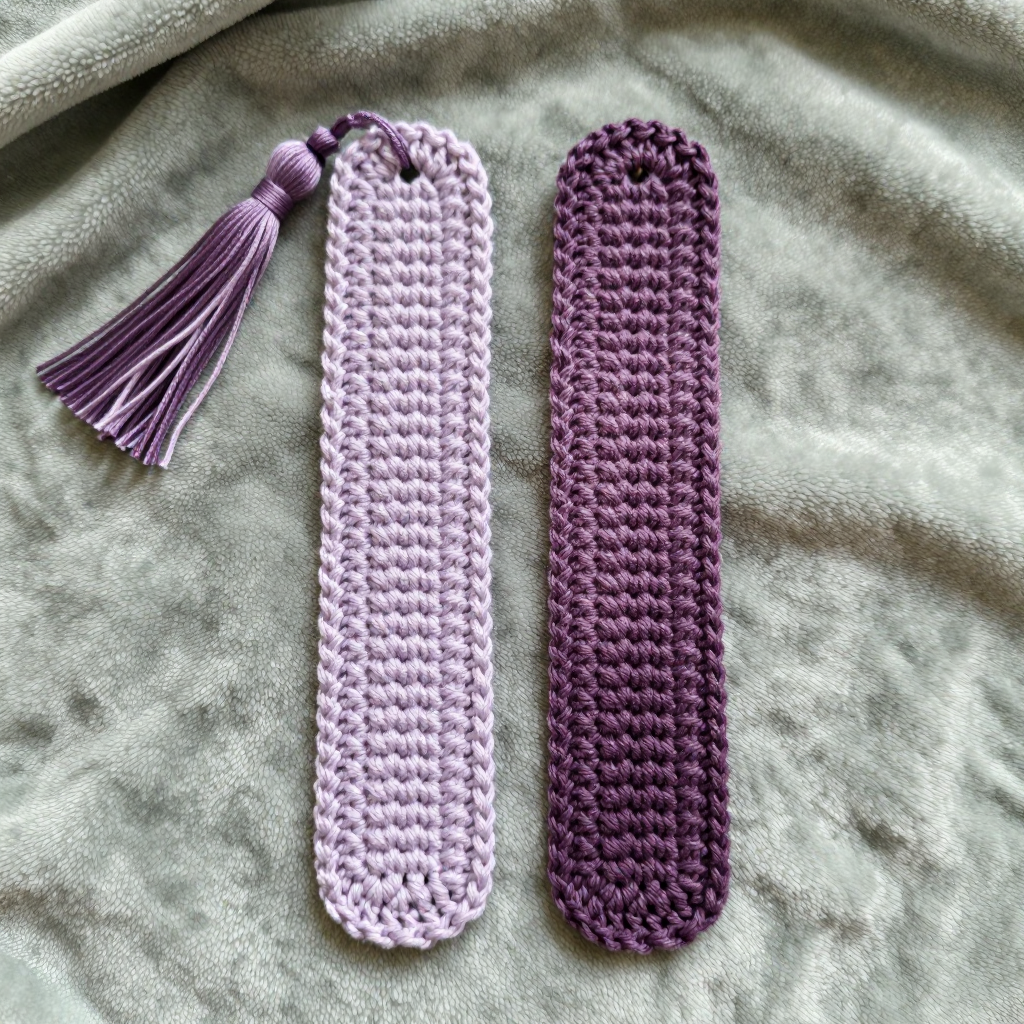
Lilac Moss Stitch Bookmark Duo: Free Beginner Crochet Pattern
Introduction
If you have never held a crochet hook before, this is the perfect first project for you. The Lilac Moss Stitch Bookmark Duo makes two slender, romantic page markers in soft lilac shades, each one finished with a tiny fringed tassel. The moss stitch creates a dense, slightly pebbled fabric that looks woven and feels wonderfully smooth between your fingers, and because each bookmark is only about one inch wide, you will finish your very first one in a single cozy sitting. These little bookmarks make lovely gifts tucked inside a favorite novel, and they are a gentle, forgiving way to practice your very first stitches.
Materials Needed
- Yarn: Fine (fingering / size 1) cotton yarn in three lilac shades: Lilac Mist (light), Mauve Shadow (medium), and Heather Deep (dark). You will need approximately 15–20 yd (14–18 m) per bookmark.
- Crochet hook: 2.75 mm (US C-2)
- Stitch markers: 2–4 (helpful for marking the first stitch of a row)
- Tapestry needle: a blunt needle with a large eye for weaving in ends
- Scissors: small, sharp scissors for trimming yarn and tassels
Finished measurements (each bookmark): Width about 1 in (2.5 cm); crocheted body about 6 in (15 cm); tassel about 1 in (2.5 cm); total length including tassel about 7 in (18 cm).
Abbreviations and Beginner Glossary
- ch – chain. Make a loop with the yarn, wrap the yarn over the hook, and pull it through the loop on your hook. That is one chain.
- sc – single crochet. Insert your hook into the stitch or space, wrap the yarn over the hook, pull up a loop (you now have 2 loops on the hook), wrap the yarn over again, and pull through both loops. One single crochet made.
- st(s) – stitch(es). A "stitch" is one completed unit of crochet work.
- sp – space. The small gap created by a chain; you will work into these gaps rather than into the tops of stitches.
- ch-1 sp – chain-one space. The little hole made by a single chain in the previous row.
- turning ch – the chain (or chains) made at the start of a row so you can turn your work and begin the next row at the right height.
- Moss stitch (also called granite or linen stitch): worked as (sc in next ch-1 sp, ch 1), placing your single crochets into the chain-1 spaces of the previous row instead of into the tops of stitches. This creates the pebbled, woven texture.
- Fasten off – cut the yarn, pull the tail all the way through the last loop, and tighten to secure.
- Weave in ends – thread a yarn tail onto a tapestry needle and run it back and forth through the fabric so it disappears.
Gauge
22 sts and 24 rows = 4 in (10 cm) in moss stitch (sc, ch 1 pattern).
Gauge is not critical for a bookmark, but a firm, even fabric is desired. Gauge simply means how big your stitches come out. If your stitches are much larger than this, your bookmark will be wider and floppier; if much smaller, it will be narrower and stiff. To check, crochet a small square about 4 in (10 cm) wide in moss stitch, lay it flat, and measure across the middle with a ruler. If you have far more stitches than 22 in 4 inches, try a larger hook; if far fewer, try a smaller hook. For a bookmark, close is perfectly fine.
Beginner Tips Before You Start
- Count your stitches every row. You should always have 3 single crochets and 2 chain-1 spaces. Counting keeps your edges straight.
- Use a stitch marker. Place one in the first stitch of each row so you always know where the row begins and ends.
- Do not pull the yarn too tight. Keep a relaxed, even tension so the fabric stays soft and the chain spaces stay open enough to work into.
- Work into the spaces, not the stitch tops. In moss stitch, your single crochet goes into the little chain-1 gaps. This is the heart of the pattern.
- Change color neatly. Finish the last yarn-over of the final sc of a row with the new color, then continue. For a tidy finish, cut and rejoin at the color change rather than carrying the yarn.
- Keep your turning chain small. A single chain at the start of each row keeps the edges neat and straight.
Step-by-Step Instructions
Bookmark A (Lilac Mist to Mauve Shadow)
Row 1: With Lilac Mist, ch 6. Sc in 2nd ch from hook, ch 1, skip next ch, sc in next ch, ch 1, skip next ch, sc in last ch. (3 sc, 2 ch-1 sps)
Row 2: Ch 1, turn. Sc in first ch-1 sp, ch 1, sc in next ch-1 sp, ch 1, sc in turning ch-1 sp. (3 sc, 2 ch-1 sps)
Rows 3–30: Repeat Row 2 in Lilac Mist. (3 sc, 2 ch-1 sps)
Change to Mauve Shadow.
Rows 31–60: Repeat Row 2 in Mauve Shadow. (3 sc, 2 ch-1 sps)
Fasten off, leaving a 6 in (15 cm) tail.
Bookmark B (Mauve Shadow to Heather Deep)
Row 1: With Mauve Shadow, ch 6. Sc in 2nd ch from hook, ch 1, skip next ch, sc in next ch, ch 1, skip next ch, sc in last ch. (3 sc, 2 ch-1 sps)
Row 2: Ch 1, turn. Sc in first ch-1 sp, ch 1, sc in next ch-1 sp, ch 1, sc in turning ch-1 sp. (3 sc, 2 ch-1 sps)
Rows 3–30: Repeat Row 2 in Mauve Shadow. (3 sc, 2 ch-1 sps)
Change to Heather Deep.
Rows 31–60: Repeat Row 2 in Heather Deep. (3 sc, 2 ch-1 sps)
Fasten off, leaving a 6 in (15 cm) tail.
Assembly
There is no seaming in this project. Each bookmark is worked as a single flat strip from start to finish. Simply proceed to the finishing steps below.
Assembly and Finishing
Step 1 – Weave in ends. Thread each yarn tail (except the two 6 in / 15 cm tails at the cast-on and fasten-off ends of each bookmark) onto your tapestry needle. Run the needle back and forth through the back of the fabric for about an inch, then trim close to the fabric.
Step 2 – Make the tassels. For each bookmark, cut 6 strands of yarn about 3 in (7.5 cm) long in the darker shade of that bookmark (Mauve Shadow for Bookmark A, Heather Deep for Bookmark B).
Step 3 – Attach the tassel. Fold the strands in half. Using the crochet hook, pull the folded loop through the end of the bookmark, then pull the strand ends through the loop and tighten to secure. Repeat at the other end if desired, or make a single tassel at one end only.
Step 4 – Trim. Trim tassel ends evenly to about 1 in (2.5 cm).
Step 5 – Block. Gently steam or block the bookmarks flat, being careful not to flatten the tassels. Lay them on a towel, mist lightly with water or hold a steam iron just above (never touching) the fabric, and let them dry completely flat.
Pro Tips and Variations
- Color changes: Swap in any two shades you love for a custom gradient. Try a soft pink-to-cream fade or a sage-to-forest green pair.
- Wider bookmark: Begin with ch 8 or ch 10, keeping an odd number of chains, and adjust your stitch count accordingly.
- Longer bookmark: Add repeats of Row 2 in either color section to lengthen the strip.
- Yarn substitution: Use a 3.0 mm hook for a slightly looser fabric if your tension is tight, or switch to a smooth cotton thread for an even finer, more delicate bookmark.


