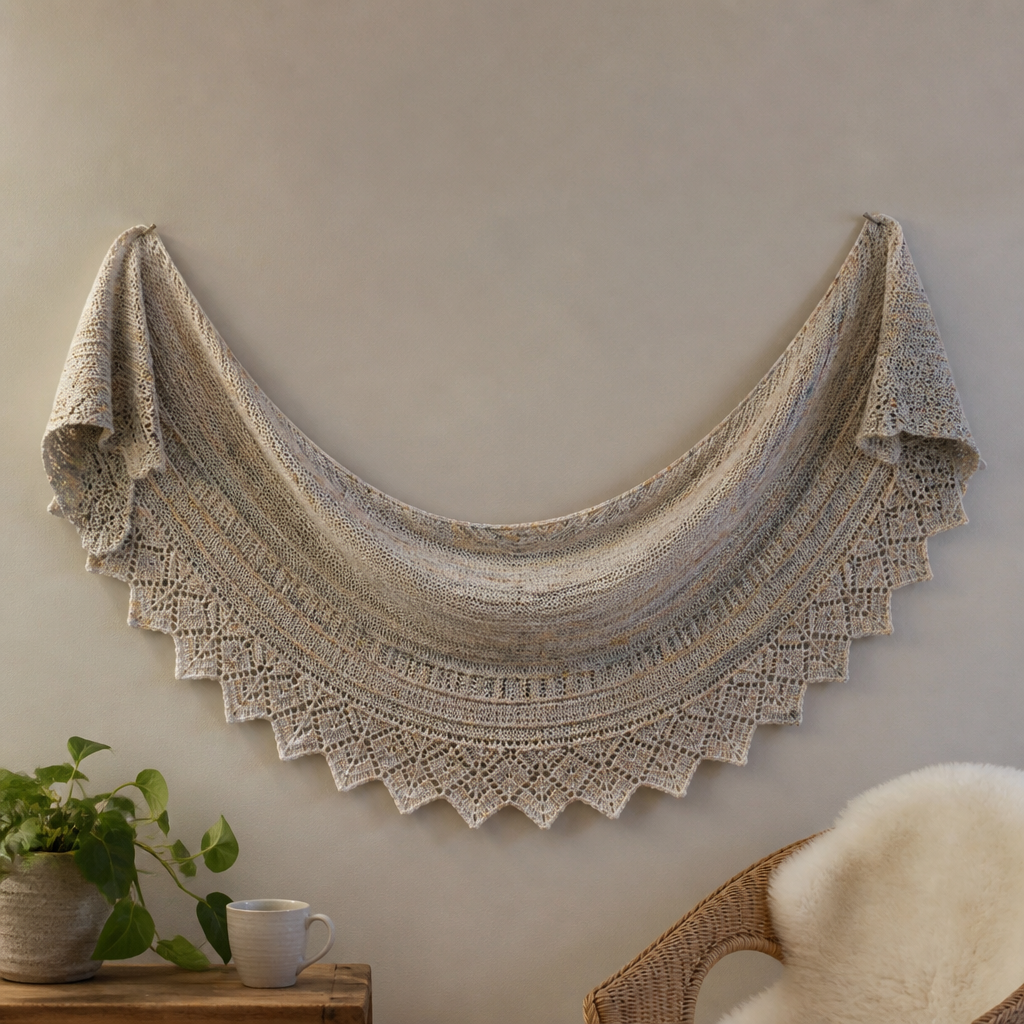
Midnight Fern Lace Shawl Free Pattern – Knit a Moonlit Forest Wrap

Midnight Fern Lace Shawl Free Pattern – Knit a Moonlit Forest Wrap
Wrap yourself in the quiet mystery of a moonlit forest with this crescent-shaped lace shawl, where cascading fern motifs are knitted in deep twilight blues and silver. This pattern offers a meditative knit with a breathtaking, organic drape that feels like a secret woodland treasure. Whether you're a seasoned lace knitter or a brave beginner ready for a beautiful challenge, this shawl will become a cherished piece in your wardrobe and a joy to create.
The Midnight Fern Lace Shawl is designed to be knitted from the top center down, with increases at the edges and center that naturally form a graceful crescent shape. The repeating fern lace pattern, combined with a stunning color gradient, creates a textured, organic surface that evokes the quiet beauty of a forest at night. The finished shawl measures approximately 60 inches across the top edge, making it a generous and versatile wrap.
Materials Needed
Before you begin, gather the following materials to ensure a smooth and enjoyable knitting experience:
- Yarn: Fingering weight yarn in 3 colors:
- Color A (deep midnight blue): 400 yards
- Color B (silver-grey): 300 yards
- Color C (soft twilight purple): 300 yards
- Needle: US 6 (4.0 mm) circular knitting needle, 32-inch or longer (to accommodate the growing number of stitches)
- Notions: Stitch markers (at least 2), tapestry needle for weaving in ends, blocking pins and mats
- Optional: Lifeline thread or waste yarn for safety
Gauge: 20 stitches and 28 rows = 4 inches in stockinette stitch (blocked). Gauge is important for achieving the correct size and drape, so take a moment to knit a swatch and block it before starting.
Step-by-Step Instructions
This shawl is knitted from the top center down, increasing at the edges and center to form a crescent shape. The lace pattern is a repeating fern motif with yarn overs and decreases. Follow these detailed instructions carefully, and you'll create a stunning heirloom piece.
Abbreviations
- k = knit
- p = purl
- yo = yarn over
- k2tog = knit two together (right-leaning decrease)
- ssk = slip, slip, knit (left-leaning decrease)
- kfb = knit front and back (increase)
- pm = place marker
- sm = slip marker
- rep = repeat
Setup Section
Cast on 3 stitches with Color A.
- Row 1 (WS): kfb, k1, kfb (5 stitches)
- Row 2 (RS): kfb, k1, yo, k1, yo, k1, kfb (9 stitches)
- Row 3 (WS): k2, p to last 2 stitches, k2
- Row 4 (RS): kfb, k to last stitch, kfb (11 stitches)
- Row 5 (WS): k2, p to last 2 stitches, k2
Begin Increases
Now we'll establish the marker placement that will guide the crescent shaping.
- Row 6 (RS): kfb, k1, pm, k to last 2 stitches, pm, k1, kfb (13 stitches)
- Row 7 (WS): k2, p to last 2 stitches, k2
- Row 8 (RS): kfb, k to marker, yo, sm, k to next marker, yo, sm, k to last stitch, kfb (16 stitches)
- Row 9 (WS): k2, p to last 2 stitches, k2
Repeat Rows 8-9 until you have 45 stitches total (about 20 repeats). At this point, you will have 22 stitches on each side section and 1 center stitch between the markers. The yarn overs at the markers create the center increases that form the crescent shape.
Begin Lace Pattern (with Increases)
Now we'll introduce the beautiful fern lace pattern while continuing the increases. The center section will grow by 2 stitches every RS row as the yarn overs at the markers add increases.
- Row 1 (RS): kfb, k to marker, yo, sm, work Fern Lace Chart over center 1 stitch (see below), sm, yo, k to last stitch, kfb
- Row 2 (WS): k2, p to last 2 stitches, k2
- Row 3 (RS): kfb, k to marker, yo, sm, work Fern Lace Chart over center 3 stitches, sm, yo, k to last stitch, kfb
- Row 4 (WS): k2, p to last 2 stitches, k2
Continue in this manner, increasing the center section by 2 stitches every RS row (the yarn overs at the markers add the increases). Work the Fern Lace Chart over the center stitches as they grow. The side sections remain in stockinette stitch (knit on RS, purl on WS).
Fern Lace Chart (Multiple of 6 + 1)
This 8-row repeat creates the cascading fern motif. Work these rows over the center section between the markers.
- Row 1 (RS): k1, *yo, ssk, k1, k2tog, yo, k1; rep from * to end
- Row 2 (WS): p all
- Row 3 (RS): k2, *yo, ssk, k1, k2tog, yo, k1; rep from * to last 3 stitches, yo, ssk, k1
- Row 4 (WS): p all
- Row 5 (RS): k1, *k2tog, yo, k1, yo, ssk, k1; rep from * to end
- Row 6 (WS): p all
- Row 7 (RS): k2, *k2tog, yo, k1, yo, ssk, k1; rep from * to last 3 stitches, k2tog, yo, k1
- Row 8 (WS): p all
Repeat these 8 rows for the fern lace pattern. As the center section grows, you'll be able to work more repeats of the pattern across the row. The pattern is a multiple of 6 + 1, so ensure your center stitch count fits this formula (e.g., 7, 13, 19, 25, etc.).
Color Transitions
The color changes create the beautiful gradient effect that makes this shawl so special.
- Work the first 10 repeats of the lace pattern with Color A (deep midnight blue).
- Then switch to Color B (silver-grey) for the next 10 repeats.
- Then switch to Color C (soft twilight purple) for the final 10 repeats.
- If using a gradient yarn, simply continue until you've used all yarn or reached your desired size.
To change colors, simply start knitting with the new color at the beginning of a RS row. Weave in ends later or carry the yarn up the side if you prefer (though weaving in is recommended for a cleaner finish).
Shaping the Crescent
The increases at the edges and center will naturally create a crescent shape. Continue working the lace pattern with increases until the shawl measures approximately 60 inches across the top edge (or your desired width), ending with a WS row. The crescent shape will be evident as the center section grows longer than the side sections.
Edging
Switch to Color C (if not already using it) for a cohesive finish.
- Row 1 (RS): kfb, *yo, k2tog; rep from * to last 2 stitches, k1, kfb
- Row 2 (WS): k2, p to last 2 stitches, k2
- Row 3 (RS): kfb, *yo, k2tog; rep from * to last 2 stitches, k1, kfb
Bind off loosely on the next RS row: k1, *k2tog, pass first stitch over; rep from * to end. This creates a picot-like edge that adds a subtle scalloped detail to the shawl.
Finishing
Weave in all ends carefully with a tapestry needle, making sure to secure them well so they don't show through the lace. Block the shawl gently to open up the lace pattern and achieve the correct dimensions. Pin out the points of the fern motifs and the crescent shape, stretching gently to reveal the intricate stitch work. Allow to dry completely before removing pins.
Tips for Success
- Use lifelines: Thread a lifeline through the stitches every few repeats to easily rip back if you make a mistake. This is especially helpful when working with lace patterns.
- Count your stitches: After each RS row, verify your stitch count to ensure the increases are correct. The pattern should grow by 4 stitches every RS row (2 at the edges and 2 at the center markers).
- Wearing the shawl: The shawl is designed to be worn with the center back at the nape of the neck and the wings wrapping around the shoulders. The crescent shape drapes beautifully and stays in place without pins.
- Blocking is essential: Don't skip blocking! This is what transforms the lace from a crumpled mass into the beautiful, open fern pattern. Be generous with water and pin carefully.
As you knit this shawl, you'll find yourself falling into a peaceful rhythm, watching the ferns emerge stitch by stitch. The gradient colors will remind you of the transition from deep night to the soft light of dawn. When you wrap yourself in the finished Midnight Fern Lace Shawl, you'll carry a piece of that moonlit forest magic with you wherever you go.
Happy knitting, and may your needles always be full of moonlight!