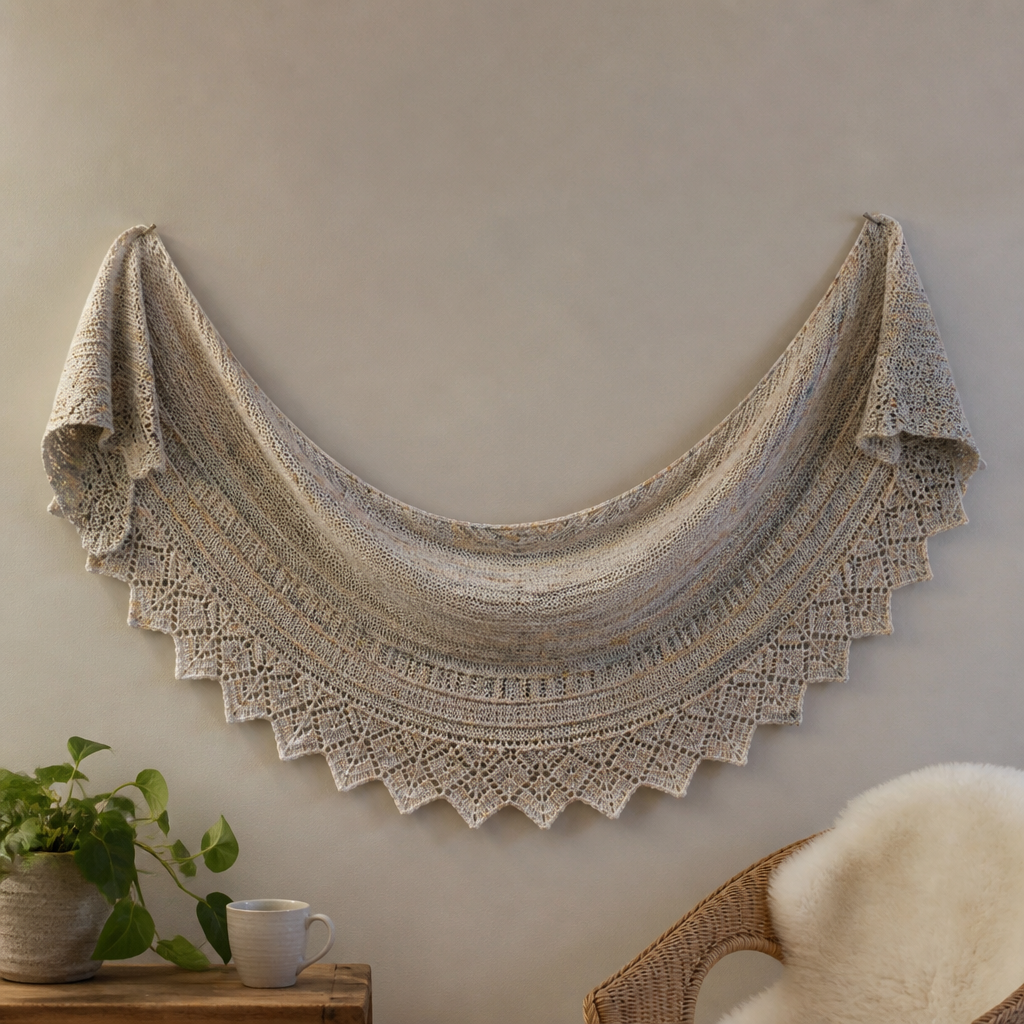
Misty Harbor Driftwood Wrap Free Pattern

Misty Harbor Driftwood Wrap: A Free Beginner-Friendly Knitting Pattern
Imagine wrapping yourself in the serene beauty of a foggy coastline—the soft whisper of sea mist, the weathered texture of driftwood, and the gentle rhythm of waves. That's exactly the feeling you'll capture with the Misty Harbor Driftwood Wrap. This free knitting pattern combines delicate lace panels with raised slipped-stitch ridges to create a textured, cozy shawl that's perfect for cool evenings, whether you're by the sea or simply dreaming of it.
Designed with beginners in mind, this wrap is worked from the top center down in a simple triangular shape. You'll master a few basic techniques—yarn overs, decreases, and slipped stitches—while creating a stunning, drapey accessory that looks far more complex than it actually is. The pattern uses two muted, coastal-inspired colors: a pale seafoam green and a warm, weathered gray-brown, which alternate in soft horizontal bands to mimic the organic layers of driftwood and sea foam.
Best of all, this is a free knitting pattern that's completely achievable for a first-time shawl knitter. With clear instructions, generous sizing, and a relaxing rhythm, you'll find yourself lost in the meditative flow of the stitches. Let's dive in and create something beautiful together.
Materials Needed
Before you begin, gather these simple supplies. The beauty of this pattern is that it requires minimal materials—just yarn, a needle, and a bit of patience.
Yarn
- DK weight yarn (light worsted weight) in two colors:
- Color A (Sea Glass): A pale seafoam green—2 skeins
- Color B (Driftwood): A warm, weathered gray-brown—2 skeins
- Recommended yarn: Wool and the Gang "Feeling Good" in "Sea Glass" and "Driftwood," or any soft wool blend in DK weight. A wool blend will block beautifully and show off the stitch definition.
Needle
- US 6 (4.0 mm) circular knitting needle, 32 inches (80 cm) or longer. The circular needle is essential to accommodate the growing number of stitches as the wrap expands.
Other Supplies
- Stitch markers (optional, but helpful for tracking sections)
- Tapestry needle for weaving in ends
- Blocking mats and pins (for the final finishing step)
- Gentle wool wash (like Eucalan or Soak)
Gauge
- 20 stitches and 28 rows = 4 inches (10 cm) in stockinette stitch, after blocking.
- Note: Gauge is important for achieving the correct size and drape. If your gauge is off, adjust your needle size accordingly. A looser gauge will create a drapier wrap; a tighter gauge will be more structured.
Finished Size
- One size fits most: Approximately 60 inches wide x 30 inches deep after blocking. The wrap is designed to drape beautifully over the shoulders.
Step-by-Step Instructions
This pattern is worked from the top center down, increasing at the edges and center to form a triangle. Don't worry if the stitch count grows quickly—that's the magic of the shawl shape! Follow along carefully, and you'll have a gorgeous wrap in no time.
Abbreviations
- k = knit
- p = purl
- yo = yarn over (creates an eyelet and an increase)
- k2tog = knit two together (right-leaning decrease)
- ssk = slip, slip, knit (left-leaning decrease)
- sl1 = slip one stitch purlwise with yarn in back
- rep = repeat
Pattern Notes
- The wrap is worked from the top center down, increasing at the edges and center to form a triangle.
- Use a circular needle to accommodate the growing number of stitches.
- Blocking is essential to open up the lace and define the ridges. Don't skip this step!
- Read through the entire pattern before starting to familiarize yourself with the structure.
Cast On
With Color A (Sea Glass), cast on 3 stitches using your preferred method (long-tail cast on works well).
Foundation Rows
These first rows establish the center spine and the beginning of your increases.
Row 1 (RS): k1, yo, k1, yo, k1 — you now have 5 stitches.
Row 2 (WS): k2, p1, k2 — the purl stitch in the center marks your spine.
Row 3: k1, yo, k1, yo, k1, yo, k1, yo, k1 — you now have 9 stitches.
Row 4: k2, p5, k2 — purl the center 5 stitches, keeping the garter edge.
Begin Pattern: Slipped-Stitch Ridge Section
This section creates the beautiful, textured ridges that mimic driftwood grain. You'll be working increases at the edges and center while slipping stitches to create the raised texture.
Row 5 (RS): k1, yo, k1, yo, k2, sl1, k2, yo, k1, yo, k1 — you now have 13 stitches.
Row 6 (WS): k2, p9, k2 — purl the center 9 stitches.
Row 7: k1, yo, k1, yo, k4, sl1, k4, yo, k1, yo, k1 — you now have 17 stitches.
Row 8: k2, p13, k2 — purl the center 13 stitches.
Row 9: k1, yo, k1, yo, k1, k2tog, yo, k1, sl1, k1, yo, ssk, k1, yo, k1, yo, k1 — you now have 21 stitches.
Row 10: k2, p17, k2 — purl the center 17 stitches.
Repeat Rows 7-10 until the wrap measures approximately 20 inches from the cast-on edge, ending with a wrong-side row. You'll see a beautiful series of slipped-stitch ridges and eyelet increases forming. The stitch count will grow steadily—this is normal and expected.
Pro tip: Place a stitch marker at the center spine stitch to help you keep track of your increases. The center stitch is always the one between the two yo increases in the middle of the row.
Switch to Lace Panel
Now we'll transition to a delicate lace section that evokes sea foam. This is a simple two-row repeat that's easy to memorize.
Next Row (RS): k1, yo, k1, yo, *k2tog, yo* rep from * to * until 4 stitches remain, k2, yo, k1, yo, k1.
Next Row (WS): k2, purl to last 2 stitches, k2.
Repeat these 2 rows for 6 inches, maintaining the edge increases (k1, yo, k1, yo at the beginning of RS rows and yo, k1, yo, k1 at the end). The lace pattern will create a lovely, airy mesh that contrasts beautifully with the solid ridges.
Note: The edge increases are always the same: at the beginning of a right-side row, you'll work k1, yo, k1, yo; at the end, you'll work yo, k1, yo, k1. This keeps the triangle shape consistent.
Switch to Ridge Section
Now we'll add another band of the textured ridges for visual interest and warmth.
Next Row (RS): k1, yo, k1, yo, *sl1, k3* rep from * to * until 4 stitches remain, sl1, yo, k1, yo, k1.
Next Row (WS): k2, *p1, k3* rep from * to * until 2 stitches remain, k2.
Repeat these 2 rows for 4 inches. The slipped stitches will create vertical ridges that add wonderful texture and depth to the wrap.
Final Lace Border
We'll finish with another lace section to bookend the design and create a soft, airy edge.
Row 1 (RS): k1, yo, k1, yo, *k2tog, yo* rep from * to * until 4 stitches remain, k2, yo, k1, yo, k1.
Row 2 (WS): k2, purl to last 2 stitches, k2.
Repeat these 2 rows until the wrap measures 30 inches from the cast-on edge, ending with a wrong-side row. The lace border will frame the wrap beautifully and add a delicate, feminine touch.
Bind Off
On a right-side row, loosely bind off all stitches knitwise. It's important to bind off loosely so the edge doesn't pull or pucker. If you tend to bind off tightly, consider going up a needle size for this step.
Cut the yarn, leaving a 6-inch tail, and weave in all ends with your tapestry needle. Take your time with this step—neat ends make for a professional finish.
Blocking: The Final Magic
Blocking is what transforms your knitting from a crumpled mass of stitches into a beautiful, drapey wrap. This step is non-negotiable for lace patterns—it opens up the eyelets and smooths the ridges.
- Fill a sink or basin with lukewarm water and add a gentle wool wash (like Eucalan or Soak).
- Submerge the wrap and let it soak for 20 minutes. Do not agitate or wring—this can felt the wool.
- Gently squeeze out excess water. You can roll the wrap in a clean towel to remove more moisture.
- Lay the wrap flat on blocking mats. Pin out the edges to the desired dimensions (approximately 60 inches wide x 30 inches deep).
- Shape the points and edges carefully, pinning the lace points to open them up.
- Allow to dry completely—this can take 24-48 hours depending on humidity.
Once dry, unpin and enjoy your stunning Misty Harbor Driftwood Wrap! The blocking will have transformed the fabric, making it soft, drapey, and beautifully defined.
Tips for Success
- Count your stitches after each pattern repeat, especially in the beginning. It's much easier to fix a mistake early than to rip back rows later.
- Use lifelines—thread a piece of waste yarn through your stitches after completing a pattern repeat. If you make a mistake, you can easily rip back to the lifeline without losing your work.
- Take breaks and stretch your hands. Knitting a large wrap takes time, and your hands will thank you.
- Trust the process. The wrap may look small and scrunched up before blocking, but it will bloom into its full size and beauty with proper blocking.
This free knitting pattern is perfect for a cozy weekend project or a mindful, meditative knit. The combination of textures—smooth stockinette, raised ridges, and delicate lace—creates a wrap that's both visually stunning and wonderfully warm. Whether you keep it for yourself or gift it to a loved one, the Misty Harbor Driftwood Wrap is sure to become a cherished handmade treasure.
Happy knitting, and may your stitches always be even and your yarn never tangle!