Savanna Burst Hexagon Bib Free Crochet Pattern: Burgundy & Gold Giraffe Motif
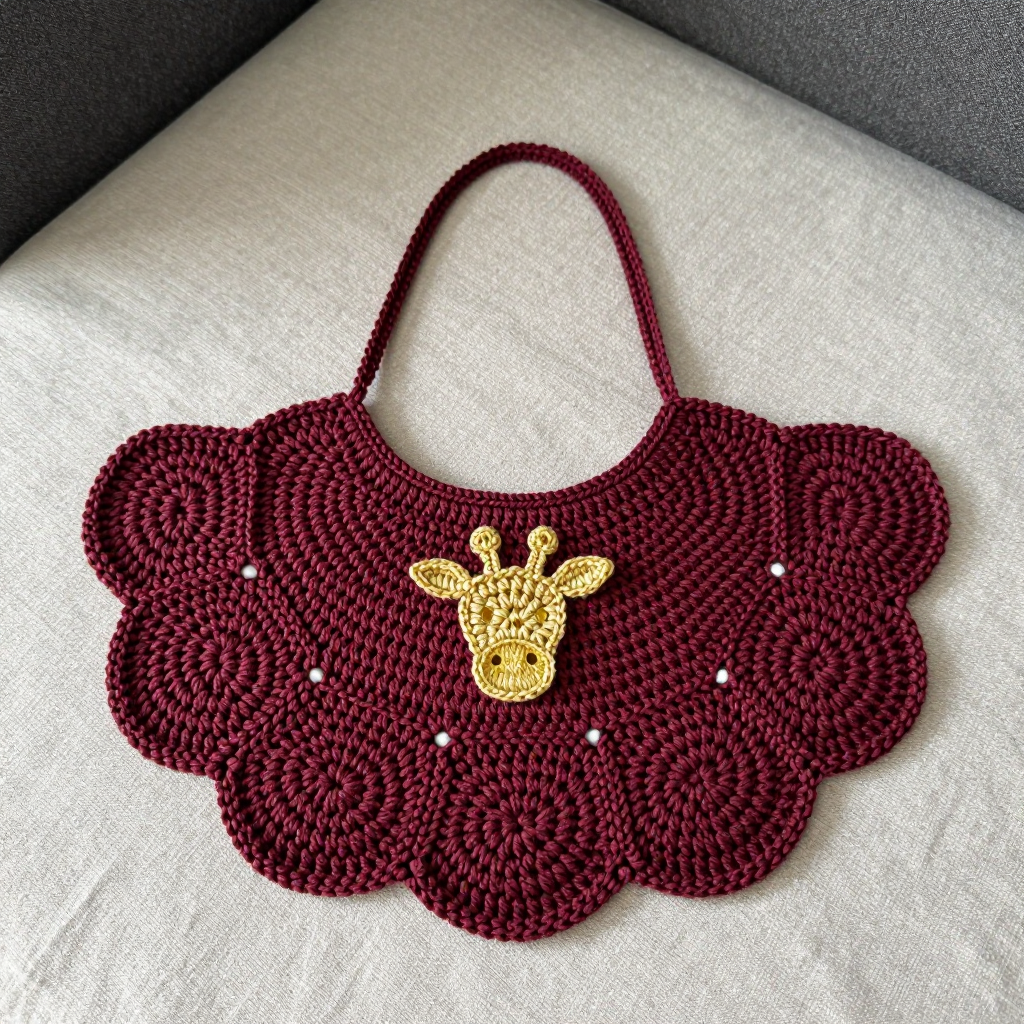
Savanna Burst Hexagon Bib: A Free Beginner-Friendly Crochet Pattern
Introduction
Welcome to your very first hexagon adventure! The Savanna Burst Hexagon Bib is a sweet, bohemian baby bib made from seven little burgundy hexagon motifs arranged in a fan shape, finished with an adorable gold giraffe head appliqué and two simple crocheted tie closures. This project is perfect for a complete beginner who has just learned a few basic stitches and wants to make something truly gift-worthy — it uses only single crochet and double crochet, and each small motif gives you a satisfying finish line before you move on to the next. The finished bib is soft, lightweight, and single-layer, with a gentle bamboo-cotton sheen that feels cool and smooth against a baby's skin. When it's done, you'll have a handmade heirloom that looks far more complicated than it actually is — and you'll have learned motif-making, joining, and appliqué along the way.
Materials Needed
- Yarn (Main Color, MC): Bamboo cotton DK weight (approx. 50% bamboo viscose / 50% cotton; 125 yd / 115 m per 50 g skein) in burgundy. You will need approx. 45 g / 110 yd.
- Yarn (Contrast Color, CC): Same yarn in gold. You will need approx. 10 g / 25 yd.
- Crochet hook: 3.5 mm (US E/4) for the motifs, joining, and border.
- Crochet hook: 2.75 mm (US C/2) for the giraffe appliqué and the ties.
- Stitch markers (at least 8) — small clips or safety pins that mark a stitch so you don't lose your place.
- Tapestry needle — a large, blunt-tipped needle with an eye big enough for yarn, used for sewing pieces together and hiding yarn ends.
- Scissors for cutting yarn.
- Blocking supplies — a towel or blocking mat and rust-proof pins (used to shape the finished pieces flat).
Finished size: Width across the top edge approx. 8 in / 20 cm. Depth from top edge to lower point approx. 5.5 in / 14 cm. Neck opening approx. 10 in / 25 cm between tie points. Fits 0–6 months.
Abbreviations and Beginner Glossary
- ch – chain. Make a loop of yarn over your hook and pull it through the loop already on your hook. This creates a small "V" of yarn. Chains are the foundation of most crochet.
- sl st – slip stitch. Insert your hook into the stitch, yarn over, and pull the loop straight through both the stitch and the loop on your hook. It makes an almost invisible joining stitch.
- sc – single crochet. Insert hook into stitch, yarn over, pull up a loop (2 loops on hook), yarn over again, pull through both loops. One loop remains.
- dc – double crochet. Yarn over first, insert hook into stitch, yarn over, pull up a loop (3 loops on hook), yarn over, pull through 2 loops, yarn over, pull through last 2 loops. One loop remains.
- hdc – half double crochet. Yarn over, insert hook into stitch, yarn over, pull up a loop (3 loops on hook), yarn over, pull through all 3 loops at once.
- st / sts – stitch / stitches. One completed unit of crochet work.
- sp / sps – space / spaces. The gap created by a chain (for example, a "ch-2 sp" is the little hole made by two chains).
- rnd – round. A circle of stitches worked continuously around a center point.
- row – a straight line of stitches worked back and forth.
- rep – repeat. Do the instruction again the stated number of times.
- tog – together.
- yo – yarn over. Wrap the yarn from back to front over your hook.
- magic ring – an adjustable loop of yarn that you crochet into, then pull tight to close the center hole. If you prefer, chain 4 and join with a sl st into a ring instead.
- fasten off – cut the yarn leaving a tail, then pull the tail all the way through the last loop to lock it.
- right side (RS) – the "good" side of the fabric that faces outward on the finished item.
- whipstitch – a simple sewing stitch: bring the needle up through both layers, over the edge, and back down, repeating evenly around.
- blocking – dampening a finished piece and pinning it to its final measurements so it dries flat and even.
Gauge
Gauge: One finished hexagon motif = 2 in / 5 cm across flat-to-flat after blocking. Within the fabric, 4 dc = 1 in / 2.5 cm and 2 dc rows = 1 in / 2.5 cm.
Why gauge matters: Gauge is simply how big your stitches turn out. If your stitches are bigger than the pattern expects, your bib will come out larger than 8 inches wide; if smaller, it will be too small. Gauge is not critical for fit here (a bib is forgiving!), but it does affect the final size.
How to check it: Crochet one complete hexagon motif exactly as written. Block it lightly, let it dry, and measure it flat-to-flat across the middle. If it measures 2 in / 5 cm, you're perfect. If it's bigger, try a hook one size smaller; if smaller, try a hook one size larger. You can use this test motif as one of your seven!
Beginner Tips Before You Start
- Use a stitch marker to mark the first stitch of every round. Rounds spiral around, and it is very easy to lose track of where one round ends and the next begins. Move the marker up each round.
- Don't pull your yarn too tight. Beginners often tug each stitch snug, which makes the fabric stiff and the motifs too small. Keep your tension relaxed and even — the hook should glide, not fight.
- Count your stitches at the end of every round. The stitch counts in parentheses are your safety net. If a count is off, fix it before moving on — it's much easier now than later.
- Make all seven motifs first, then block them all at once. Blocking to the same 2 in / 5 cm size makes joining neat and even.
- Keep your tails long. Leave the 6 in / 15 cm tails as instructed — you'll use them for joining and weaving in later.
- Work in good light and take breaks. Small motifs with fine yarn are tiring on the eyes and hands. Ten minutes at a time is plenty.
Step-by-Step Instructions
Part 1: Hexagon Motif (make 7 in MC)
Using the 3.5 mm (E/4) hook and MC, make a magic ring.
Rnd 1: Ch 3 (this counts as your first dc), then work 11 dc into the ring. Join with a sl st to the top of the ch-3. (12 dc)
Rnd 2: Ch 3, dc in the same stitch, then 2 dc in each stitch around. Join with a sl st to the top of the ch-3. (24 dc)
Rnd 3: Ch 1, sc in the same stitch, [ch 2, skip 1 stitch, sc in the next stitch] 11 times, ch 2, join with a sl st to the first sc. (12 ch-2 sps)
Rnd 4: Sl st into the first ch-2 sp, ch 3, then work (2 dc, ch 2, 3 dc) in the same space — this makes a corner. *3 dc in the next ch-2 sp, 3 dc in the next ch-2 sp, (3 dc, ch 2, 3 dc) in the next ch-2 sp; rep from * around, ending with 3 dc in the last two ch-2 sps, join with a sl st to the top of the ch-3. Fasten off, leaving a 6 in / 15 cm tail. (Six sides of 3 dc each, six ch-2 corner spaces.)
Weave in the starting tail. Block each motif to 2 in / 5 cm flat-to-flat and let dry.
Part 2: Half-Hexagon (make 2 in MC)
Using the 3.5 mm (E/4) hook and MC, make a magic ring.
Row 1: Ch 3, 5 dc into the ring, turn. (6 dc)
Row 2: Ch 3, dc in the same stitch, 2 dc in each stitch across, turn. (12 dc)
Row 3: Ch 1, sc in the same stitch, [ch 2, skip 1 stitch, sc in the next stitch] 5 times, ch 2, sc in the last stitch, turn. (6 ch-2 sps)
Row 4: Ch 3, (2 dc, ch 2, 3 dc) in the first ch-2 sp, *3 dc in the next ch-2 sp, 3 dc in the next ch-2 sp, (3 dc, ch 2, 3 dc) in the next ch-2 sp; rep from * once more, then 3 dc in the last ch-2 sp. Fasten off, leaving a 6 in / 15 cm tail. Block to match the full motifs.
Part 3: Layout and Joining
Arrange all motifs right side up on a flat surface:
- Top row: half-hexagon, hexagon, hexagon, hexagon, half-hexagon — the flat edges of the half-hexagons form the straight top edge.
- Middle row: 2 hexagons centered beneath the gaps of the top row.
- Bottom row: 1 hexagon centered beneath the middle row.
The lower edges should form a smooth semicircular fan. Join with MC using the flat slip-stitch join: hold two motifs wrong sides together, insert your hook through both corner ch-2 spaces, and work sl st through both layers along each shared edge, placing 1 sl st in each dc and 2 sl st in each corner space. Join all shared edges, then work a single sl st seam along the outer fan edge to smooth it. Fasten off and weave in ends.
Part 4: Border
With the right side facing and the 3.5 mm (E/4) hook, join MC with a sl st at the right top corner.
Rnd 1: Ch 1, sc evenly around the entire outer edge of the fan, working 1 sc in each dc, 2 sc in each corner space, and 1 sc in each stitch along the straight top edge. Join with a sl st to the first sc.
Rnd 2: Ch 1, sc in each sc around, join with a sl st. Fasten off and weave in ends. Block the finished bib lightly.
Part 5: Giraffe Head Appliqué (make 1 in CC)
Using the 2.75 mm (C/2) hook and CC, make a magic ring.
Rnd 1: Ch 1, 6 sc into the ring, join with a sl st to the first sc. (6 sc)
Rnd 2: Ch 1, 2 sc in each stitch around, join. (12 sc)
Rnd 3: Ch 1, [sc in the next stitch, 2 sc in the next stitch] 6 times, join. (18 sc)
Rnd 4: Ch 1, sc in each stitch around, join. (18 sc)
Rnd 5: Ch 1, [sc in the next 2 stitches, 2 sc in the next stitch] 6 times, join. (24 sc)
Rnd 6: Ch 1, sc in each stitch around, join. Do not fasten off.
Shape the muzzle: Ch 6, sc in the 2nd ch from the hook and in each ch across (5 sc), then sl st into the next stitch of the head. Fasten off, leaving a 10 in / 25 cm tail.
Ears (make 2): With CC, ch 5, sc in the 2nd ch from the hook, hdc in the next ch, dc in the next ch, hdc in the last ch. Fasten off, leaving 6 in / 15 cm tails.
Ossicones (make 2): With CC, ch 4, sc in the 2nd ch from the hook and in each ch across. Fasten off, leaving 6 in / 15 cm tails.
Part 6: Tie Closure
With the 2.75 mm (C/2) hook and MC, join yarn at the right top corner of the bib. Ch 45 (approx. 9 in / 23 cm), then sl st in the 2nd ch from the hook and in each ch back to the corner, sl st into the corner, and fasten off. Repeat at the left top corner for the second tie. Weave in ends and steam-block the ties lightly so they lie flat.
Assembly and Finishing
Attaching the giraffe: Pin the head centered on the bib, approx. 1.25 in / 3 cm below the top edge, with the muzzle pointing down. Using the 10 in tail and your tapestry needle, whipstitch around the head edge with small, even stitches — bring the needle up through both layers, over the edge, and back down, repeating all the way around. Sew the ears at the upper sides of the head and the ossicones at the top center. With the remaining CC yarn, embroider two small straight-stitch eyes and two nostril dots on the muzzle (a straight stitch is simply one short stitch worked back and forth in place).
Weaving in ends: Thread each tail onto the tapestry needle and run it through the back of several stitches, changing direction once so it can't work loose. Trim close to the fabric.
Blocking: Dampen the bib lightly with water (a spray bottle works well), lay it flat, and pin it to the measurements above, checking that the fan lies flat and the top edge is straight. Let it dry completely before removing the pins. Steam-block the ties lightly so they lie flat.
To wear: Tie the two ties in a bow at the back of the neck; they should meet with approx. 1 in / 2.5 cm of ease for a 0–6 month neck.
Pro Tips and Variations
- Change the colors: Swap the burgundy for dusty rose, sage, or mustard, and the gold giraffe for cream or charcoal. Any two colors that contrast will make the motif pop.
- Adjust the size: For a larger bib (6–12 months), add one more hexagon to the middle row and one to the bottom row, then extend the border rounds; for a smaller newborn size, use a 3 mm hook and stop after the top row plus one middle hexagon.
- Substitute the yarn: Any DK-weight cotton or cotton blend works beautifully. Avoid fuzzy or slippery yarns for your first attempt — smooth cotton shows your stitches clearly and blocks crisply.
- Make it a matching set: Work a third half-hexagon and a few extra motifs to create a matching washcloth or burp cloth, using the same join and border for a coordinated baby-shower gift.


