Sunset Horizon Striped Market Tote Free Pattern
Sunset Horizon Striped Market Tote — Free Crochet Pattern for Confident Beginners
Introduction
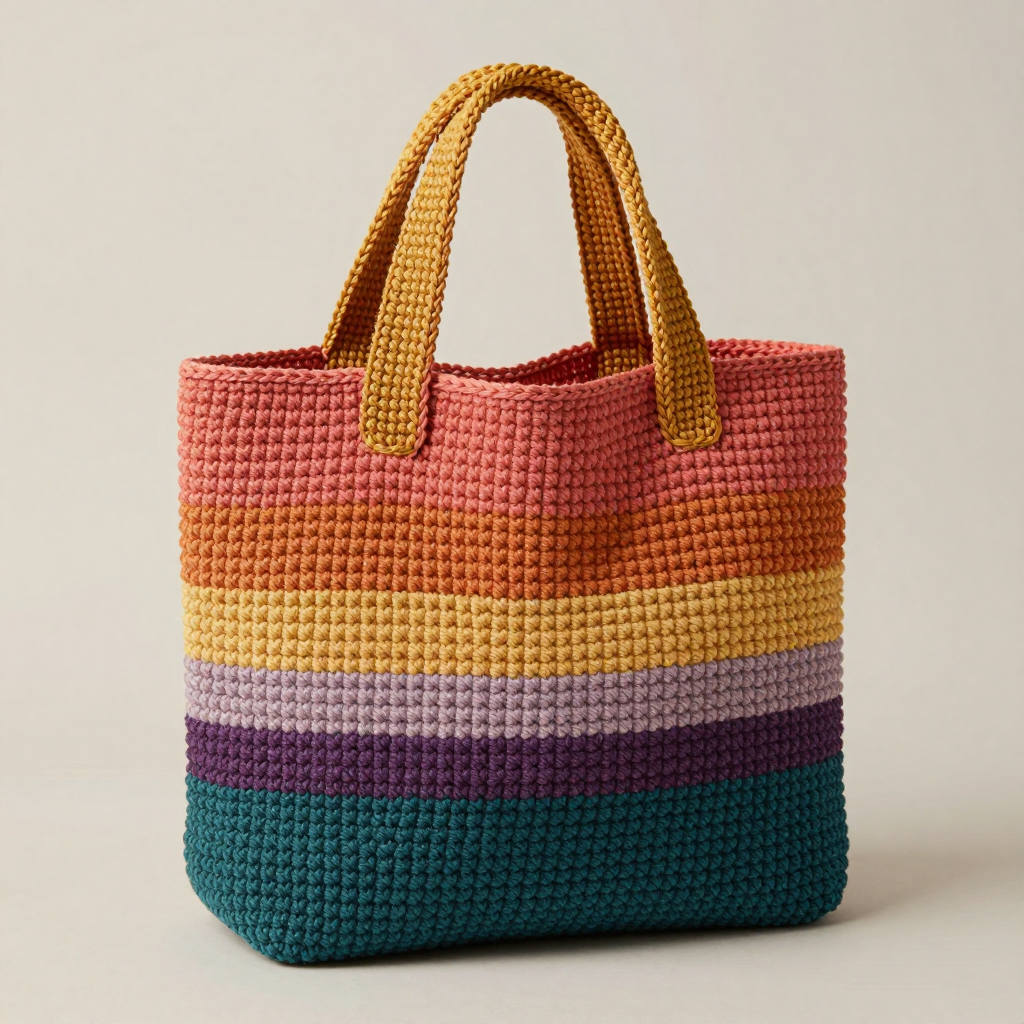
Carry a warm evening sky wherever you go with this striped crochet market tote, a project designed for anyone who has just learned the single crochet stitch and is ready to make something they will actually use every day. The bag is worked in simple turned rows and joined rounds of single crochet, so there are no complicated stitch combinations to memorize — just one friendly stitch repeated in five gorgeous sunset colors. It has a sturdy flat base that lets it stand up on the counter, a roomy open top that swallows a week of groceries or a whole beach day's worth of supplies, and two thick crocheted handles that feel comfortable in your hand. The finished tote measures about 12 inches wide, 4 inches deep, and 13 inches tall (not counting the handles), and the worsted-weight cotton gives it a soft matte finish with beautiful, even stitch definition. If you can make a single crochet, you can make this bag — and you will be so proud to carry it.
Materials Needed
- Yarn: Worsted weight (category 4) cotton or cotton-blend yarn, approximately 350–400 yards total. Suggested colorway: 1 skein each in Dusty Coral, Warm Apricot, Golden Mustard, Soft Plum, and Deep Teal (or any five-color sunset gradient). Cotton is recommended because it is strong, washable, and does not stretch out of shape like acrylic can.
- Crochet hook: Size I/9 (5.5 mm). If you tend to crochet tightly, have a J/10 (6.0 mm) hook nearby as a backup.
- Stitch markers: At least 4. These are small plastic clips or safety pins you place in a stitch so you can find it again later. You will use them to mark your corners and the first stitch of each round.
- Tapestry needle: A large, blunt-tipped sewing needle with an eye big enough for yarn. You will use it to sew the handles on and to weave in ends.
- Scissors: Any sharp pair for cutting yarn.
- Measuring tape or ruler: For checking your gauge and the finished dimensions.
Finished size: Approximately 12 inches (30 cm) wide × 4 inches (10 cm) deep × 13 inches (33 cm) tall, not including the handles. Handles add roughly 6 inches (15 cm) of drop.
Abbreviations and Beginner Glossary
Every abbreviation used in this pattern is listed below with a plain-English explanation. If you have never crocheted before, read this section twice before you pick up your hook.
- ch — chain: Make a loop of yarn on your hook (a slip knot), then wrap the yarn over the hook and pull it through the loop already on the hook. That is one chain. Chains look like a row of little V's or braids.
- sc — single crochet: Insert your hook into the next stitch, wrap the yarn over the hook (yarn over), pull the hook back through the stitch so you have 2 loops on your hook, yarn over again, and pull through both loops at once. One loop remains on your hook. That is one single crochet.
- sl st — slip stitch: Insert your hook into the next stitch, yarn over, and pull that loop straight through both the stitch and the loop on your hook in one motion. It makes a nearly invisible joining stitch and adds almost no height.
- st / sts — stitch / stitches: One completed single crochet (or chain) is one stitch. "Sts" is simply the plural.
- turn: Flip your work over so the back side faces you, ready to work the next row back in the other direction.
- join with sl st: After working all the way around a round, insert your hook into the very first stitch of that round and make a slip stitch. This closes the circle so the round becomes a complete ring.
- fasten off: Cut the yarn leaving a tail of several inches, then pull the tail all the way through the last loop on your hook and tug gently to secure it. The stitch will not unravel.
- join yarn: Attach a new color by making a slip knot on your hook, inserting the hook into the stitch where you want to begin, and pulling a loop through, then continuing as instructed.
- corner st — corner stitch: The stitch at the very corner of the base where you will work 3 single crochets into one stitch to turn the corner smoothly.
- whipstitch: A simple sewing stitch made by passing the needle over the edge of both pieces and back through, over and over, like a spiral binding. Used here to attach the handles.
- weave in ends: Thread a yarn tail onto your tapestry needle and run it back and forth through the back of several stitches so it is hidden and secure.
- block / blocking: Dampening the finished piece and pinning it into shape while it dries so the stitches even out and the bag holds its form.
Gauge
Gauge: 14 single crochet stitches × 16 rows = 4 inches (10 cm) in single crochet.
Why gauge matters: Gauge is simply how big your stitches turn out. If your stitches are larger than the pattern assumes, your bag will come out bigger than 12 inches wide; if they are smaller, the bag will be too small and the handles may not fit your hand comfortably. Checking gauge first saves you from disappointment at the very end.
How to make a gauge swatch: With your 5.5 mm hook and any one of your yarn colors, chain 22. Single crochet in the second chain from the hook and in each chain across (21 stitches). Work 18 rows of single crochet, chaining 1 and turning at the start of each row. Lay the swatch flat, place your ruler across the middle, and count how many stitches fit in 4 inches. Then count how many rows fit in 4 inches. If you have more stitches than 14, your tension is tight — try the larger J/10 hook. If you have fewer than 14, your tension is loose — try a smaller H/8 (5.0 mm) hook. Change hooks until your swatch matches, then begin the bag.
Beginner Tips Before You Start
- Mark your corners and your first stitch. Place a stitch marker in each of the four corner stitches of the base, and one in the first stitch of every round. When you come back around, you will always know exactly where to work your 3 corner stitches and where to join.
- Do not pull your yarn tight. Beginners often tug each stitch snug, which makes the bag stiff and small. Let the yarn flow smoothly off your fingers and keep your stitches relaxed and even — the cotton will firm up on its own.
- Count every round. The stitch count in parentheses at the end of each round is your safety net. If you do not have 96 stitches, stop and find where you lost or added one before moving on.
- Carry your colors loosely, or fasten off. This pattern tells you to fasten off at each color change, which is the easiest method for a beginner. If you prefer to carry the unused colors up the side, keep the carried strand loose so the bag does not pucker.
- Remember the ch 1 does not count as a stitch. At the start of each row and round, the chain 1 is just a little "lifter" to give your work height. Your first single crochet goes into the very first stitch, not into the chain.
- Work in good light and take breaks. Single crochet in the round is repetitive, and tired hands make mistakes. Ten minutes of rest every half hour keeps your tension even and your counts accurate.
Step-by-Step Instructions
NOTES: The bag is worked in turned rows in single crochet (sc) throughout, with color changes at the end of rows. Carry unused colors loosely up the side, or fasten off and rejoin if preferred. Ch 1 at the beginning of each row does not count as a stitch.
Base (worked in Deep Teal)
Row 1: Ch 31. Sc in the 2nd ch from hook and in each ch across. (30 sc)
Row 2: Ch 1, turn. Sc in each st across. (30 sc)
Row 3: Ch 1, turn. Sc in each st across. (30 sc)
Row 4: Ch 1, turn. Sc in each st across. (30 sc)
Row 5: Ch 1, turn. Sc in each st across. (30 sc)
Row 6: Ch 1, turn. Sc in each st across. (30 sc)
Row 7: Ch 1, turn. Sc in each st across. (30 sc)
Row 8: Ch 1, turn. Sc in each st across. (30 sc) Fasten off Deep Teal.
You now have a flat rectangle 30 stitches long and 8 rows tall — this is the bottom of your bag.
Body (worked around the base perimeter)
Round 1: Join Dusty Coral with a sc in the corner of the base. Work 30 sc along the long edge, 3 sc in the corner, 8 sc along the short edge, 3 sc in the corner, 30 sc along the opposite long edge, 3 sc in the corner, 8 sc along the remaining short edge, 3 sc in the final corner. Join with sl st to first sc. (88 sc)
Round 2: Ch 1, sc in each st around, working 3 sc in each corner st. Join with sl st to first sc. (96 sc)
Round 3: Ch 1, sc in each st around. Join with sl st to first sc. (96 sc) Fasten off Dusty Coral.
Stripes
Rounds 4–7 (Warm Apricot): Join Warm Apricot. Ch 1, sc in each st around. Join with sl st to first sc. (96 sc) Fasten off.
Rounds 8–11 (Golden Mustard): Join Golden Mustard. Ch 1, sc in each st around. Join with sl st to first sc. (96 sc) Fasten off.
Rounds 12–15 (Soft Plum): Join Soft Plum. Ch 1, sc in each st around. Join with sl st to first sc. (96 sc) Fasten off.
Rounds 16–19 (Deep Teal): Join Deep Teal. Ch 1, sc in each st around. Join with sl st to first sc. (96 sc) Fasten off.
Rounds 20–23 (Dusty Coral): Join Dusty Coral. Ch 1, sc in each st around. Join with sl st to first sc. (96 sc) Fasten off.
Rounds 24–27 (Warm Apricot): Join Warm Apricot. Ch 1, sc in each st around. Join with sl st to first sc. (96 sc) Fasten off.
Top Border
Round 28: Join Golden Mustard. Ch 1, sc in each st around. Join with sl st to first sc. (96 sc)
Round 29: Ch 1, sc in each st around. Join with sl st to first sc. (96 sc) Do not fasten off.
Handles (make 2)
Row 1: With Golden Mustard, count 18 sts from the side seam and join yarn. Ch 1, sc in next 12 sts. (12 sc)
Row 2: Ch 1, turn. Sc in each st across. (12 sc)
Row 3: Ch 1, turn. Sc in each st across. (12 sc)
Row 4: Ch 1, turn. Sc in each st across. (12 sc)
Row 5: Ch 1, turn. Sc in each st across. (12 sc)
Row 6: Ch 1, turn. Sc in each st across. (12 sc)
Row 7: Ch 1, turn. Sc in each st across. (12 sc)
Row 8: Ch 1, turn. Sc in each st across. (12 sc)
Row 9: Ch 1, turn. Sc in each st across. (12 sc)
Row 10: Ch 1, turn. Sc in each st across. (12 sc)
Row 11: Ch 1, turn. Sc in each st across. (12 sc)
Row 12: Ch 1, turn. Sc in each st across. (12 sc)
Row 13: Ch 1, turn. Sc in each st across. (12 sc)
Row 14: Ch 1, turn. Sc in each st across. (12 sc)
Row 15: Ch 1, turn. Sc in each st across. (12 sc)
Row 16: Ch 1, turn. Sc in each st across. (12 sc)
Row 17: Ch 1, turn. Sc in each st across. (12 sc)
Row 18: Ch 1, turn. Sc in each st across. (12 sc) Fasten off, leaving a 12-inch tail.
Second handle: Repeat Rows 1–18 exactly as above, positioning it 12 sts away from the first handle on the opposite side of the bag opening.
Assembly and Finishing
Attaching the handles: Fold each handle end to the inside of the bag so the end lies flat against the top border. Thread the 12-inch tail onto your tapestry needle. Working through both the handle end and the top border, whipstitch all the way across the handle end, passing the needle over the edge and back through in small, even stitches about 1/4 inch apart. Go back across a second time for extra strength, since handles take the most wear. Fasten the tail securely on the inside and trim.
Weaving in ends: Thread each remaining yarn tail onto the tapestry needle. Run the needle back and forth through the back loops of 6–8 nearby stitches, changing direction once or twice so the tail cannot work loose. Trim the yarn close to the fabric. Never tie a knot — woven ends are more secure and invisible.
Blocking: Fill a sink with cool water and a drop of gentle soap. Submerge the bag for 10 minutes, then squeeze (do not wring) out the excess water and roll it in a towel to remove more. Shape the bag over a small box or a stack of folded towels so the base stays flat and the sides stand straight, and smooth the stripes with your hands. Let it dry completely, away from direct heat, for 24 hours. Blocking evens out your stitches and gives the bag a crisp, professional finish.
Pro Tips and Variations
- Change the color story: Swap the five sunset shades for ocean blues, autumn rusts, or a single solid color with a contrasting border and handles. Keep the same stripe rhythm — four rounds per color — so the finished proportions stay the same.
- Make it bigger or smaller: To widen the bag, add chains to the base in multiples of 2 (for example, chain 41 instead of 31) and add the same number of stitches to each long edge in Round 1. To make it taller, simply work more four-round stripes before the top border.
- Try a different yarn: Cotton and cotton blends give the sturdiest, most washable bag. A linen blend gives a lovely rustic texture, while a cotton-acrylic blend is softer and lighter. Always re-check your gauge when you change yarn.
- Add a lining or a pocket: Sew a simple fabric lining into the top opening for extra structure and privacy, or crochet a small flat rectangle and whipstitch it inside as a phone pocket. Both are easy add-ons once the bag is finished.