Terracotta Netting Bottle Sling Free Pattern: A 1970s Crochet Shoulder Carrier
Terracotta Netting Bottle Sling: A 1970s Crochet Shoulder Carrier
Introduction
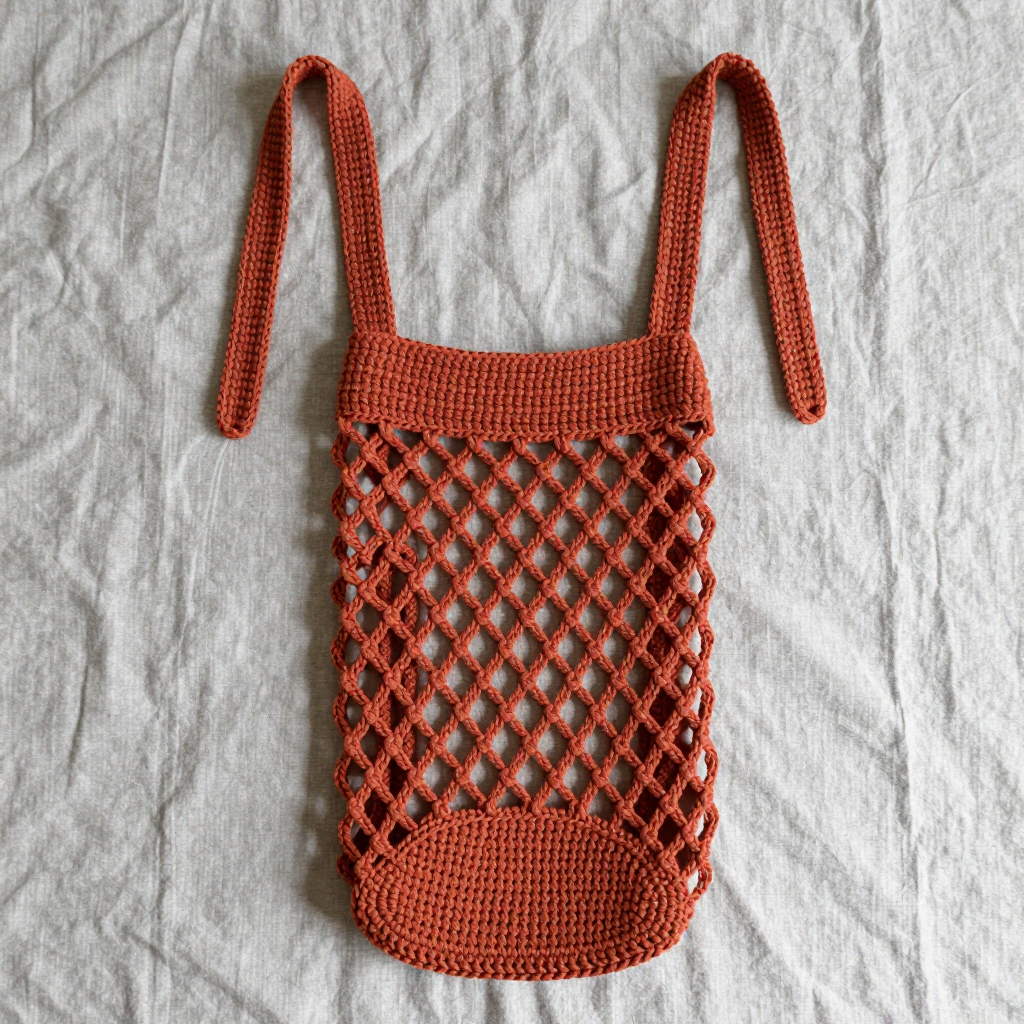
If you have never held a crochet hook before, this is the perfect first project to fall in love with. The Terracotta Netting Bottle Sling is a warm, earthy, seventies-inspired carrier that hugs a standard water bottle in an open fishnet tube and hangs from a long, narrow shoulder strap—so your hands stay free while you walk, hike, or wander a market. It looks like something straight out of a 1970s craft magazine: soft terracotta cotton, diamond-shaped netting, and a simple strap that drapes comfortably across your body. The solid single crochet base cradles the bottle from underneath, while the stretchy netting grips it gently on the sides. When it is finished, it feels light, breezy, and surprisingly sturdy—and you will be amazed that you made it yourself.
Materials Needed
- Yarn: Worsted weight (category 4) cotton or cotton-blend yarn, approximately 120–140 yards of terracotta. Cotton is recommended because it is strong, washable, and does not stretch out of shape like acrylic.
- Crochet hook: US I/9 (5.5 mm). (US I/9 and 5.5 mm are the same hook—just two ways of naming it.)
- Stitch marker: 1, to mark the beginning of each round.
- Tapestry needle (yarn needle): a large-eyed, blunt-tipped needle for sewing the strap on and weaving in ends.
- Scissors for cutting yarn.
- Measuring tape (helpful for checking gauge and length).
Finished measurements: Bottle tube approximately 3.5 inches wide (flat) x 8 inches tall, stretching to fit a standard 750 ml bottle (about 3 inches in diameter). Strap approximately 40 inches long x 1 inch wide.
Abbreviations and Beginner Glossary
Every term used in this pattern is explained below in plain English. Read through this list once before you begin—you do not need to memorize it.
- ch – chain: Yarn over (wrap the yarn around your hook) and pull it through the loop already on your hook. That makes one chain stitch. A row of chains looks like a tiny braid.
- sc – single crochet: Insert your hook into the stitch, yarn over, pull up a loop (2 loops on hook), yarn over again, and pull through both loops. One loop remains. This is the shortest, most basic crochet stitch.
- dc – double crochet: Yarn over first, insert hook into the stitch, yarn over, pull up a loop (3 loops on hook), yarn over and pull through 2 loops, yarn over and pull through the last 2 loops. (Listed here for reference—this pattern does not use it.)
- sl st – slip stitch: Insert hook into the stitch, yarn over, and pull the yarn through both the stitch and the loop on your hook in one motion. It creates almost no height and is used to join rounds.
- sp – space: The open gap created by a chain (for example, a "ch-5 space" is the hole under a group of 5 chains).
- st / sts – stitch / stitches: One completed stitch, or several.
- rnd – round: One complete circle of stitches worked in the round (as opposed to a flat row).
- magic ring: An adjustable loop of yarn you crochet into, then pull tight so the center closes with no hole. If it feels tricky, you can instead chain 4 and join with a slip stitch to form a ring, then work Round 1 into that ring.
- [ ] – brackets: Everything inside the brackets is repeated as many times as stated after the bracket.
- * to * – asterisks: Repeat the instructions between the asterisks as many times as stated.
- join with sl st to first sc: After working all the way around, slip stitch into the very first single crochet of that round to close the circle.
- fasten off: Cut the yarn a few inches from your work, then pull the tail all the way through the last loop to lock it.
- turn: Flip your work over so you can work back in the other direction (used for flat rows like the strap).
- weave in ends: Thread a yarn tail onto the tapestry needle and sew it back and forth through the fabric so it disappears.
Gauge
Gauge: 4 pattern repeats (ch-5 loops) = 4 inches; 4 rounds = 4 inches in the netting pattern.
Why gauge matters: Gauge is simply how big your stitches turn out. If your stitches are looser or tighter than the pattern expects, your finished sling will be bigger or smaller than planned—and a bottle might not fit. For this project gauge is not critical for fit (the netting stretches), but it does affect the final size, so it is worth a quick check.
How to make a gauge swatch: With your 5.5 mm hook and chosen yarn, chain 26. Work the netting pattern (ch 5, skip 2 sts, sc in next st) across for about 4 inches' worth of rounds. Lay the swatch flat and measure 4 inches across the loops and 4 inches up the rounds. If you have more loops than 4 in 4 inches, your tension is tight—try a larger hook. If you have fewer, your tension is loose—try a smaller hook.
Beginner Tips Before You Start
- Use a stitch marker. Place it in the first stitch of each round so you always know where the round begins and ends. Without it, it is very easy to lose your place in the netting.
- Do not pull the yarn too tight. Beginners often grip the yarn hard, which makes tiny, stiff stitches. Keep a relaxed, even tension—your loops should slide easily on the hook.
- Count your loops every round. The netting should always have 12 ch-5 loops. If you get 11 or 13, you skipped or added a stitch—just undo back to the marker and try again.
- Keep the base flat. While working Rounds 1–6, lay the circle on a table after each round. If it ruffles, your stitches are too tight; if it cups upward, they are too loose.
- Chain loosely. The ch-5 loops are what make the netting stretch. If your chains are tight, the bottle will not slide in easily.
- Practice the magic ring on scrap yarn first. It is the only slightly fiddly part of this whole pattern—and once you have it, you have it forever.
Step-by-Step Instructions
Note: The bottle tube is worked in the round from the bottom up. The base is a solid circle, then the sides open into a diamond netting pattern. The strap is worked separately in rows and attached at two points on the tube.
Part 1: Bottle Tube — Base (Solid Circle)
Rnd 1: Make a magic ring, ch 1, work 6 sc into the ring, join with sl st to first sc. (6 sc)
Rnd 2: Ch 1, 2 sc in each st around, join with sl st to first sc. (12 sc)
Rnd 3: Ch 1, [2 sc in next st, sc in next st] around, join with sl st to first sc. (18 sc)
Rnd 4: Ch 1, [2 sc in next st, sc in next 2 sts] around, join with sl st to first sc. (24 sc)
Rnd 5: Ch 1, [2 sc in next st, sc in next 3 sts] around, join with sl st to first sc. (30 sc)
Rnd 6: Ch 1, [2 sc in next st, sc in next 4 sts] around, join with sl st to first sc. (36 sc)
The base should now measure approximately 3.5 inches across. Do not fasten off.
Part 2: Bottle Tube — Netting Sides
Rnd 7 (set-up round): Ch 1, sc in same st as join, *ch 5, skip 2 sts, sc in next st; repeat from * around, ending with ch 5, join with sl st to first sc. (12 ch-5 loops)
Rnd 8: Ch 1, sc in same st, *ch 5, sc in next ch-5 sp; repeat from * around, ending with ch 5, join with sl st to first sc. (12 ch-5 loops)
Rnds 9–16: Repeat Rnd 8 eight more times, or until the tube measures approximately 8 inches from the base. (12 ch-5 loops each round) Place a stitch marker at the beginning of the round to track progress. Do not fasten off. Proceed to the top edging.
Part 3: Bottle Tube — Top Edging
Rnd 17: Ch 1, sc in same st, *2 sc in next ch-5 sp, sc in next sc; repeat from * around, join with sl st to first sc. (36 sc)
Rnd 18: Ch 1, sc in each st around, join with sl st to first sc. (36 sc)
Fasten off and weave in ends.
Part 4: Strap (Worked in Rows)
Row 1: Ch 3, sc in second ch from hook, sc in last ch. (2 sc)
Row 2: Ch 1, turn, 2 sc in first st, sc in last st. (3 sc)
Row 3: Ch 1, turn, sc in each st across. (3 sc)
Rows 4–80: Repeat Row 3 until the strap measures approximately 40 inches. (3 sc each row)
Fasten off, leaving a 12-inch tail for attaching.
Part 5: Attaching the Strap
Step 1: Fold the bottle tube flat to find the side points. Mark two opposite stitches on Rnd 18, approximately 1.75 inches apart on each side.
Step 2: With the right side facing you, use the yarn tail and yarn needle to sew one end of the strap securely to the marked stitch on one side of the tube. Sew through the strap end and the edging several times for strength.
Step 3: Sew the other end of the strap to the opposite marked stitch on the other side of the tube.
Step 4: Weave in all ends.
Assembly and Finishing
Seaming the strap: Thread the 12-inch tail onto your tapestry needle. Push the needle through the strap end and the top edging of the tube, then back through again, making several passes in a small X or square shape. Pull each stitch snug but not tight enough to pucker the edging. Repeat on the opposite side. Give the strap a gentle tug—it should feel firmly anchored.
Weaving in ends: Turn the work to the inside. Thread each yarn tail onto the needle and sew it back and forth through the back of several stitches (about 1 inch), changing direction once so it cannot work loose. Trim the yarn close to the fabric.
Blocking: Lightly mist the finished sling with water (or soak it for 10 minutes and gently squeeze out the excess—do not wring). Lay it flat, shape the netting into even diamonds, and let it dry completely away from direct heat. Cotton blocks beautifully and will hold its shape.
Final check: Slip a standard 750 ml bottle into the tube and adjust the strap over your shoulder. The solid base supports the bottom and the netting stretches to grip the bottle.
Pro Tips and Variations
- Change colors: Work the base in terracotta, then switch to cream or mustard for the netting sides, and back to terracotta for the top edging. Change colors at the join of a round for a clean line.
- Adjust the size: For a wider bottle, add one more increase round to the base (Rnd 7: [2 sc in next st, sc in next 5 sts] around = 42 sc) and work the set-up round with ch 5, skip 2 sts to create 14 loops. For a shorter sling, work fewer netting rounds (Rnds 9–13 instead of 9–16).
- Substitute yarn: Any worsted weight (category 4) yarn works—acrylic is fine but will stretch more over time; linen or a cotton-linen blend gives an even crisper, more vintage look. Just check your gauge again if you switch.
- Make the strap longer or shorter: Add or remove repeats of Row 3. Each row adds roughly half an inch, so 10 extra rows gives about 5 more inches for cross-body wear.