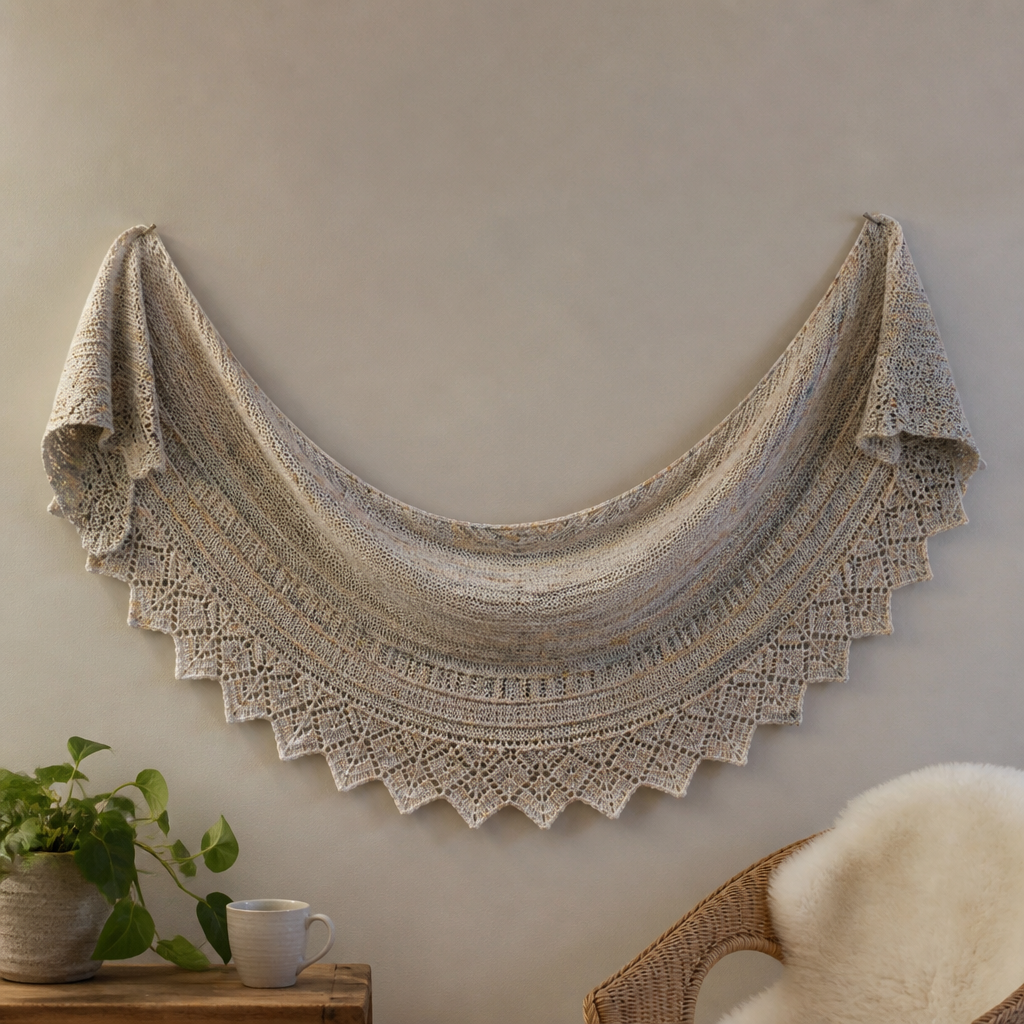
The Ember Dune Shawl Free Pattern – Knit a Sunset-Inspired Textured Wrap

The Ember Dune Shawl Free Pattern – Knit a Sunset-Inspired Textured Wrap
Wrap yourself in the warm, shifting hues of a desert sunset with this uniquely textured knit shawl. The Ember Dune Shawl combines garter ridges, eyelet drips, and a soft crescent shape for a modern, cozy accessory. Whether you're a seasoned knitter looking for a quick, satisfying project or a beginner ready to tackle your first shawl, this pattern is designed to be accessible, forgiving, and absolutely stunning. The gradient of burnt orange, golden yellow, and deep terracotta creates a wearable piece of art that drapes beautifully over any outfit.
This free knitting pattern is perfect for those who love textured, handmade wraps. The construction is simple—worked from the top center down with increases at the edges and center—making it a relaxing, meditative knit. Let's dive into the materials and steps to create your very own Ember Dune Shawl.
Materials Needed
Before you begin, gather the following supplies. This list is based on the technical specifications to ensure your shawl matches the intended size and drape.
- Yarn: Worsted weight yarn in 3 colors:
- Color A (burnt orange) – approx. 133g
- Color B (golden yellow) – approx. 133g
- Color C (deep terracotta) – approx. 133g
- Needle: US 8 (5mm) circular knitting needle, 32-inch or longer. The long cord is essential to hold the increasing number of stitches.
- Notions: Stitch markers (at least 2), tapestry needle for weaving in ends, scissors.
- Gauge: 18 stitches and 24 rows = 4 inches in garter stitch (blocked). Gauge is important for size, but this shawl is forgiving—a slightly different gauge will just change the final dimensions.
Step-by-Step Instructions
This pattern is worked from the top center down, increasing at the edges and center to form a crescent shape. Use a stitch marker to mark the center stitch. All rows are knit (garter stitch) unless otherwise noted. The instructions are broken down into clear sections for easy following.
Abbreviations
- k = knit
- yo = yarn over (creates an increase and a small hole)
- k2tog = knit two together (decrease)
- pm = place marker
- sm = slip marker
- RS = right side
- WS = wrong side
Setup Section
This section creates the top edge of the shawl and establishes the increase pattern.
- With Color A, cast on 5 stitches.
- Row 1 (RS): k2, yo, k1, yo, k2 (7 stitches). You've created two yarn overs, increasing your stitch count by 2.
- Row 2 (WS): Knit all stitches.
- Row 3: k2, yo, k to last 2 stitches, yo, k2 (9 stitches). This increases 2 stitches, one at each edge.
- Row 4: Knit all stitches.
- Repeat Rows 3-4 until you have 25 stitches on the needle, ending with a WS row. You should have completed 10 repeats of Rows 3-4 after the initial setup.
Body Section
Now we'll add the center increase to form the crescent shape. Place a marker on the center stitch (the 13th stitch) before starting.
- Row 1 (RS): k2, yo, k to center marker, yo, sm, k1, yo, k to last 2 stitches, yo, k2 (increase 4 stitches). You're increasing at both edges and on both sides of the center stitch.
- Row 2 (WS): Knit all stitches.
- Row 3 (RS): k2, yo, k to center marker, yo, sm, k1, yo, k to last 2 stitches, yo, k2 (increase 4 stitches).
- Row 4 (WS): Knit all stitches.
- Repeat Rows 1-4 until the shawl measures approximately 20 inches from the cast-on edge, ending with a WS row. This will take some time, but the rhythm is simple and meditative.
Eyelet Drip Section
Switch to Color B. This section adds the delicate eyelet pattern that mimics dripping sand or light.
- Row 1 (RS): k2, yo, *k2tog, yo* repeat from * to * until 2 stitches before center marker, yo, sm, k1, yo, *yo, k2tog* repeat from * to * until 2 stitches before end, yo, k2 (increase 4 stitches). Note the pattern is slightly different on each side of the center to keep the eyelets consistent.
- Row 2 (WS): Knit all stitches.
- Row 3 (RS): k2, yo, *k2tog, yo* repeat from * to * until 2 stitches before center marker, yo, sm, k1, yo, *yo, k2tog* repeat from * to * until 2 stitches before end, yo, k2 (increase 4 stitches).
- Row 4 (WS): Knit all stitches.
- Repeat Rows 1-4 for 10 rows total (or until Color B section is about 4 inches deep), ending with a WS row. This creates a beautiful, airy band of eyelets.
Final Ridge Section
Switch to Color C. This section adds solid texture to ground the shawl.
- Repeat the Body increase pattern (Rows 1-4) for 12 rows, ending with a WS row. This brings back the solid garter stitch ridges.
Edging
This creates a decorative, slightly ruffled edge to finish the shawl.
- Row 1 (RS): k2, yo, *k2tog, yo* repeat from * to * until 2 stitches before center marker, yo, sm, k1, yo, *yo, k2tog* repeat from * to * until 2 stitches before end, yo, k2 (increase 4 stitches).
- Row 2 (WS): Knit all stitches.
- Repeat these 2 rows once more. This adds a final eyelet border that will open up beautifully when blocked.
Bind Off (Loosely)
A stretchy bind-off is crucial for a shawl edge that lies flat and drapes well.
- Knit 2 stitches.
- *Insert left needle into the two stitches on right needle and knit them together (k2tog through the back loop), knit 1 stitch* repeat from * to * until all stitches are bound off. This creates a decorative, elastic edge.
- Weave in all ends with a tapestry needle. Be sure to weave in securely but loosely enough to not pucker the fabric.
Blocking
Blocking is essential to open up the eyelets and shape the crescent. It transforms your knitting from good to professional.
- Soak the shawl in lukewarm water with a drop of wool wash for 20 minutes. Do not agitate; let it soak.
- Gently squeeze out excess water (do not wring). Roll it in a clean towel to remove more moisture.
- Lay flat on a dry towel or blocking mat. Shape into a crescent, pinning the edges to open up the eyelet drips and define the shape.
- Allow to dry completely, usually 24-48 hours. Remove pins and enjoy your beautiful Ember Dune Shawl!
Your Ember Dune Shawl is now complete! The combination of garter ridges, eyelet drips, and the warm sunset gradient makes this a truly special piece. Whether you wear it draped over your shoulders on a cool evening or gift it to a loved one, this shawl is sure to be treasured. Happy knitting!