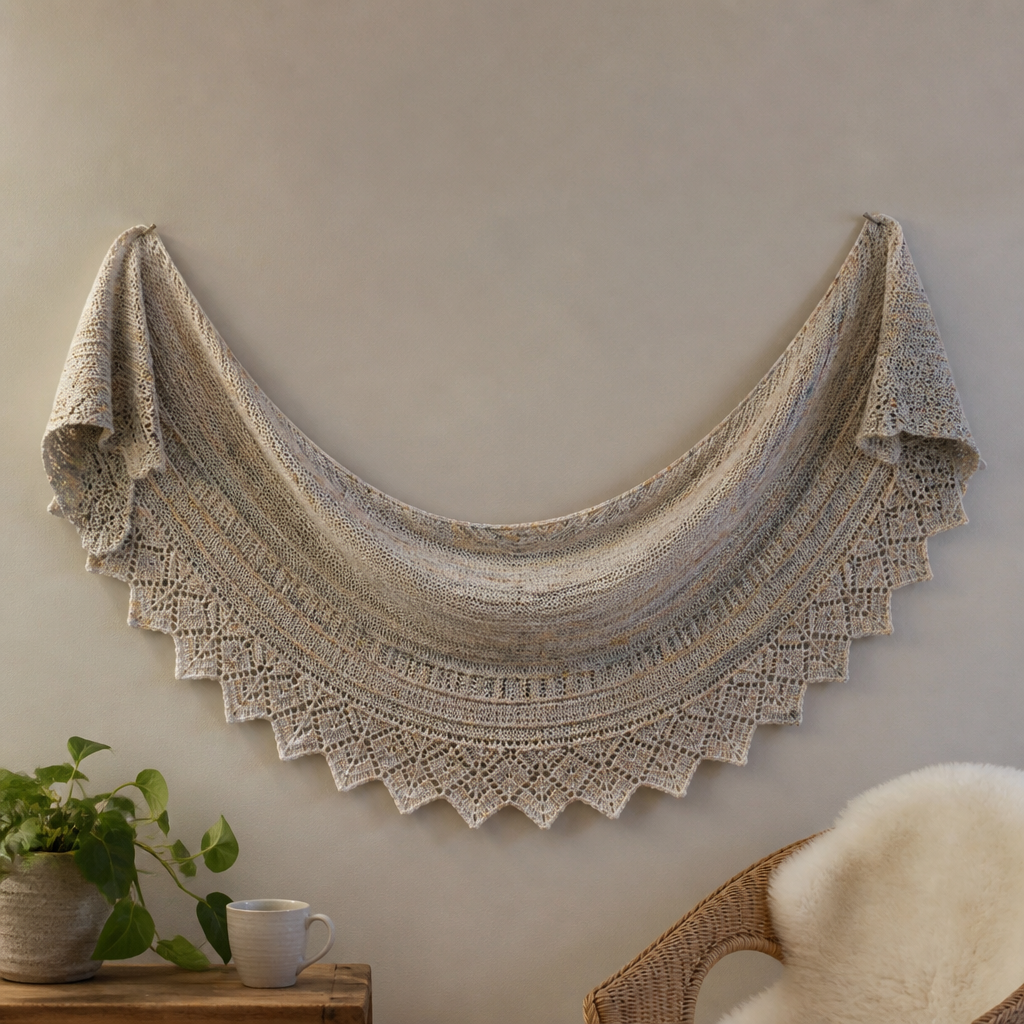
The Gilded Grapevine Shawlette Free Pattern – A Knitted Lace Vine Wrap with Beaded Tendrils

The Gilded Grapevine Shawlette: A Free Knitted Lace Vine Wrap with Beaded Tendrils
Wrap yourself in the elegance of a vineyard at dusk with this exquisite crescent-shaped shawlette. The Gilded Grapevine Shawlette features delicate leaf lace that cascades down a shimmering gradient, while hand-placed gold beads catch the light like dewdrops on grape leaves. Whether you're attending a festive gathering or enjoying a quiet evening by the fire, this stunning accessory adds a touch of vineyard romance to any outfit. Best of all, this free pattern is beginner-friendly with clear, step-by-step instructions that will guide you through every stitch.
Materials Needed
Before you begin your knitting journey, gather these essential supplies:
Yarn
- Fingering weight yarn in a gradient colorway – 400 yards (365 meters). Recommended: Malabrigo Sock in "Plomo" or "Arco Iris" for that perfect sunset-over-vineyard effect
- The gradient transition from deep burgundy through plum to amber creates the stunning visual effect described in the pattern
Beads
- 100 size 6/0 glass beads in gold or amber to match your yarn's warm tones
- These will become your "gilded" tendrils that catch the light beautifully
Needles & Tools
- US 6 (4.0 mm) circular needle, 24-inch or longer – the length is crucial for accommodating your growing stitch count
- Steel crochet hook (size 0.6 mm) for pre-stringing beads onto your yarn
- Stitch markers (optional but helpful)
- Lifeline thread or waste yarn for safety
- Blocking mats and T-pins for finishing
- Wool wash for the final blocking process
Gauge
20 stitches and 28 rows = 4 inches in stockinette after blocking. While gauge isn't critical for a shawlette, matching it ensures your finished piece has the intended drape and size.
Step-by-Step Instructions
This pattern is worked from the top center down, increasing outward in a crescent shape. Follow these detailed instructions carefully, and you'll create a stunning heirloom-quality piece.
Important Notes Before You Begin
- Use a lifeline after every 10 rows to make blocking easier and protect your work
- Bead application: Pre-string your beads onto the yarn using the small steel crochet hook. Slide a bead up to the needle before making a knit stitch to place it precisely where you want it
- Always keep the first and last 2 stitches as knit stitches on wrong-side rows for a clean, finished edge
Setup Section
Cast on 3 stitches.
Row 1 (Right Side): K1, yarn over (yo), k1, yo, k1 — you now have 5 stitches.
Row 2 (Wrong Side): K2, purl to last 2 stitches, k2.
Row 3 (RS): K1, yo, k1, yo, k1, yo, k1, yo, k1 — you now have 9 stitches.
Row 4 (WS): K2, purl to last 2 stitches, k2.
Row 5 (RS): K1, yo, k1, yo, k1, yo, k1, yo, k1, yo, k1 — you now have 13 stitches.
Row 6 (WS): K2, purl to last 2 stitches, k2.
Increase Section
Now we'll establish the simple increase pattern that forms the crescent shape:
Row 7 (RS): K1, yo, knit to last stitch, yo, k1 — you now have 15 stitches.
Row 8 (WS): K2, purl to last 2 stitches, k2.
Repeat Rows 7-8 until you have 45 stitches on your needle, always ending with a wrong-side row. This creates the foundation for your lace pattern.
Lace Pattern (Worked over 45 stitches)
Now the magic begins! This lace pattern creates the beautiful leaf and vine motifs. Pay close attention to the stitch counts as they increase with each right-side row.
Row 1 (RS): K1, yo, *k2tog, yo, k1, yo, ssk, k1; repeat from * to last 2 stitches, yo, k1 — you now have 47 stitches.
Row 2 (WS): K2, purl to last 2 stitches, k2.
Row 3 (RS): K1, yo, *k1, yo, ssk, k1, k2tog, yo; repeat from * to last 2 stitches, yo, k1 — you now have 49 stitches.
Row 4 (WS): K2, purl to last 2 stitches, k2.
Row 5 (RS): K1, yo, *k2tog, yo, k1, yo, ssk, k1; repeat from * to last 2 stitches, yo, k1 — you now have 51 stitches.
Row 6 (WS): K2, purl to last 2 stitches, k2.
Row 7 (RS): K1, yo, *k1, yo, ssk, k1, k2tog, yo; repeat from * to last 2 stitches, yo, k1 — you now have 53 stitches.
Row 8 (WS): K2, purl to last 2 stitches, k2.
Repeat Rows 1-8, but on every repeat, add 2 extra stitches to the pattern repeat (i.e., work the lace over 2 more stitches each time). This gradual expansion creates the beautiful cascading effect of the vine pattern.
Continue until the shawl measures 18 inches from the center cast-on edge, always ending with a wrong-side row.
Beaded Tendril Edging
This is where your shawlette transforms into something truly special. The beads create delicate, sparkling tendrils that curl outward like grapevines reaching for the sun.
Row 1 (RS): K1, yo, *k2tog, yo, slide bead, k1, slide bead, yo, ssk, k1; repeat from * to last 2 stitches, yo, k1.
Row 2 (WS): K2, purl to last 2 stitches, k2.
Row 3 (RS): K1, yo, *k1, yo, ssk, slide bead, k1, slide bead, k2tog, yo; repeat from * to last 2 stitches, yo, k1.
Row 4 (WS): K2, purl to last 2 stitches, k2.
Repeat Rows 1-4 for 3 more repeats (4 total repeats of the beaded edging), then bind off loosely knitwise to maintain the stretchy, scalloped edge.
Finishing & Blocking
The final steps are crucial for showcasing your beautiful work:
- Weave in all loose ends carefully with a tapestry needle, being sure to secure them well.
- Soak the shawlette in lukewarm water with a drop of wool wash for 20 minutes. This relaxes the fibers and allows the lace to open up.
- Gently squeeze out excess water — never wring or twist, as this can felt the yarn.
- Pin out to shape on a blocking mat, stretching the lace points to their full potential. Pay special attention to the beaded tendrils, positioning them to curl outward beautifully.
- Allow to dry completely before unpinning. This typically takes 24-48 hours depending on humidity.
Tips for Success
- Count your stitches regularly — the lace pattern increases are easy to miss, and catching errors early saves frustration
- Use stitch markers between pattern repeats to help you keep track of where you are
- Practice the bead placement on a swatch first to get comfortable with the technique
- Choose your gradient carefully — the way colors transition will dramatically affect your finished piece
Your Gilded Grapevine Shawlette will be a stunning addition to your wardrobe, perfect for special occasions or everyday elegance. The combination of delicate lace, rich gradient colors, and sparkling beads creates a truly heirloom-quality piece that you'll treasure for years to come. Happy knitting!