The Willowmere Seed Stitch Baby Cardigan: A Free Pattern for a Heirloom-Quality Knit
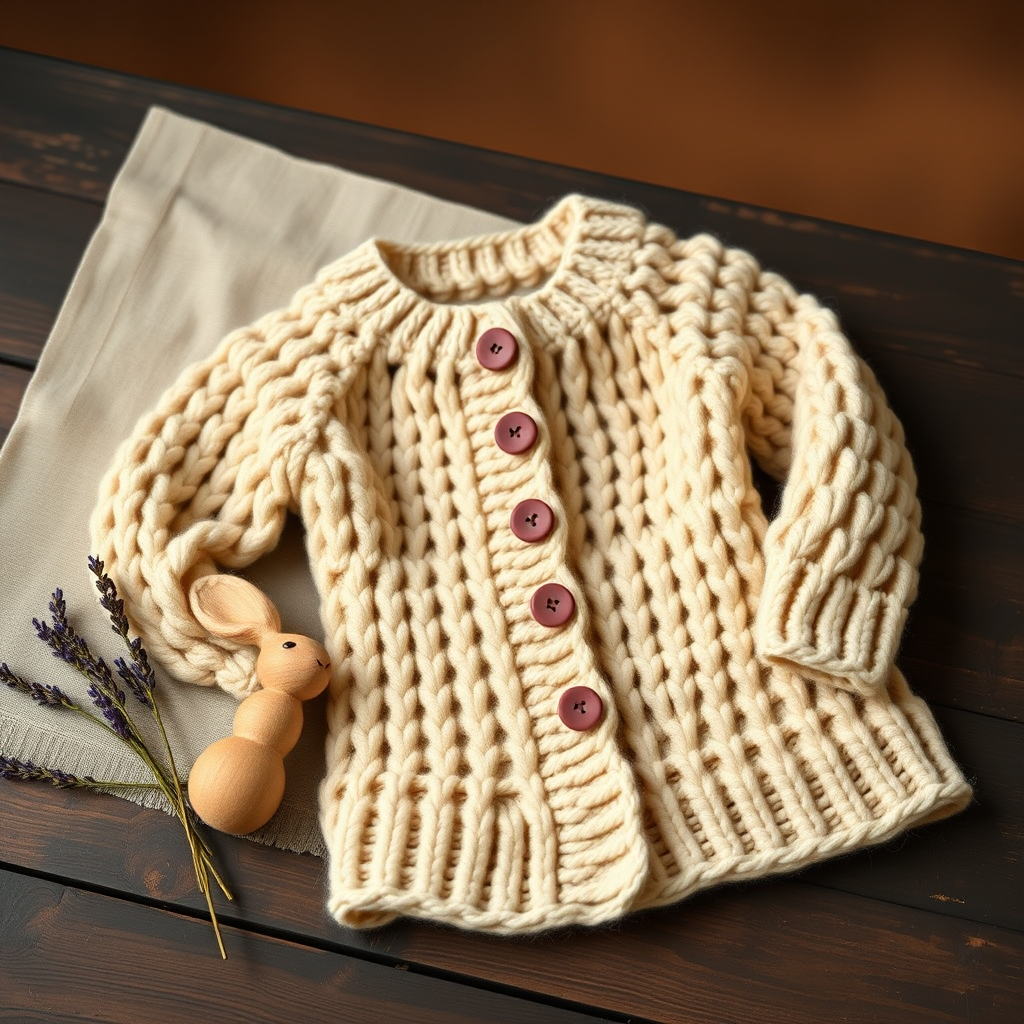
The Willowmere Seed Stitch Baby Cardigan: A Free Pattern for an Heirloom-Quality Knit
Wrap your little one in the gentle texture of the Willowmere, a modern take on a classic baby cardigan featuring a delicate seed stitch yoke and a soft, neutral palette. This free pattern is designed to be both a joy to knit and a timeless piece for your nursery. Whether you're a seasoned knitter or a confident beginner looking for a rewarding project, the Willowmere's top-down construction and simple stitch pattern make it an approachable and satisfying knit. The result is a beautiful, heirloom-quality garment that will be treasured for years to come.
Materials Needed
Before you begin, gather the following materials to ensure a smooth knitting experience. The Willowmere is knit with worsted weight yarn, which is widely available and perfect for creating a soft, durable fabric for a baby.
- Yarn: Worsted weight (Category 4) cotton-wool blend, approximately 300-350 yards (e.g., Cascade Yarns 220 Superwash or Lion Brand Heartland) in a soft oatmeal or dusty rose color.
- Needles: US Size 7 (4.5 mm) 16-inch circular knitting needle and a set of double-pointed needles (DPNs) for sleeves, or size needed to obtain gauge.
- Gauge: 20 stitches and 28 rows = 4 inches in seed stitch (blocked). Always check your gauge to ensure the correct finished size.
- Notions: Stitch markers, stitch holders or waste yarn, tapestry needle for weaving in ends, and 4-5 small buttons (wooden or otherwise).
Step-by-Step Instructions
This cardigan is knit top-down in one piece, with a simple seed stitch yoke that flows into a stockinette body. The instructions below are for sizes 0-3 (3-6, 6-12) months. Finished chest: 16 (18, 20) inches. Follow along carefully, and you'll have a beautiful cardigan in no time.
Abbreviations
- k = knit
- p = purl
- k2tog = knit two together
- yo = yarn over
- pm = place marker
- sm = slip marker
- st(s) = stitch(es)
- RS = right side
- WS = wrong side
Seed Stitch Pattern (over an odd number of sts)
This simple two-row repeat creates the beautiful, bumpy texture of the Willowmere.
- Row 1 (RS): *K1, p1; repeat from * to last st, k1.
- Row 2 (WS): *P1, k1; repeat from * to last st, p1.
- Repeat these 2 rows for the pattern.
Yoke
The yoke is worked flat, back and forth, from the neckline down. You will be increasing at four raglan points to shape the shoulders.
- With circular needle, cast on 45 (49, 53) sts. Do not join; work back and forth.
- Row 1 (WS): K1 (selvedge), p1, k1, p1, k1 (button band – 5 sts), pm, work seed stitch over next 7 sts (sleeve), pm, work seed stitch over next 19 (23, 27) sts (back), pm, work seed stitch over next 7 sts (sleeve), pm, work seed stitch over next 5 sts (button band), k1 (selvedge).
- Row 2 (RS): K1, work seed stitch to marker, sm, *k1, yo, k1* into next st (increase), work seed stitch to next marker, sm, *k1, yo, k1* into next st, work seed stitch to next marker, sm, *k1, yo, k1* into next st, work seed stitch to next marker, sm, *k1, yo, k1* into next st, work seed stitch to last st, k1. (4 increases made)
- Row 3 (WS): K1, work seed stitch across all sts, k1.
- Repeat Rows 2 and 3 until you have increased 12 (14, 16) times total on each side of the raglan lines. You will have 93 (105, 117) sts. End with a WS row.
Divide for Body and Sleeves
Now you will separate the sleeve stitches from the body stitches, setting the sleeves aside to work on later.
- Next row (RS): K1, work seed stitch over next 5 sts (button band), work seed stitch over next 14 (16, 18) sts (front), place next 20 (24, 28) sts on a holder for sleeve, cast on 4 (4, 6) sts underarm, work seed stitch over next 29 (33, 37) sts (back), place next 20 (24, 28) sts on holder for sleeve, cast on 4 (4, 6) sts underarm, work seed stitch over next 14 (16, 18) sts (front), work seed stitch over next 5 sts (button band), k1. Total body sts: 77 (85, 95) sts.
Body
The body is worked in one piece, continuing the seed stitch pattern. The selvedge edges create neat button bands.
- Continue in seed stitch across all sts, keeping the selvedge edge (k1 at each end) for the button bands.
- Work even until body measures 6 (7, 8) inches from underarm, ending with a WS row.
- Bind off all sts in pattern.
Sleeves
Now it's time to knit the sleeves in the round. The seed stitch pattern is adjusted for circular knitting.
- Transfer sleeve sts from holder to DPNs. Pick up and knit 4 (4, 6) sts from underarm cast-on. Place marker at center underarm.
- Work in seed stitch in the round, adjusting the pattern as follows:
- Round 1: *K1, p1; repeat from * to end.
- Round 2: *P1, k1; repeat from * to end.
- Repeat these 2 rounds.
- Decrease 1 st each side of marker every 6 (8, 10) rounds until you have 16 (18, 20) sts.
- Work even until sleeve measures 5 (6, 7) inches from underarm.
- Bind off loosely.
Finishing
The final steps bring your cardigan together, adding the buttonholes and buttons for a polished, professional look.
- Weave in all ends with a tapestry needle.
- Block gently to even out the stitches and set the shape.
- Sew buttons onto the left button band (if cardigan is for a girl, or right for a boy) opposite the buttonholes.
- For buttonholes: On the right button band (RS), work a 1-st buttonhole: On a RS row, k1, k2tog, yo, continue in pattern. Space 4-5 buttonholes evenly along the band. If you prefer, you can crochet a simple chain loop buttonhole after finishing.
Your Willowmere Seed Stitch Baby Cardigan is now complete! This beautiful, heirloom-quality piece is ready to be gifted or cherished in your own nursery. The soft texture and timeless design make it a perfect addition to any baby's wardrobe.


