Aurora Bloom Wall Mandala Free Pattern – Crochet a Radiant Boho Tapestry
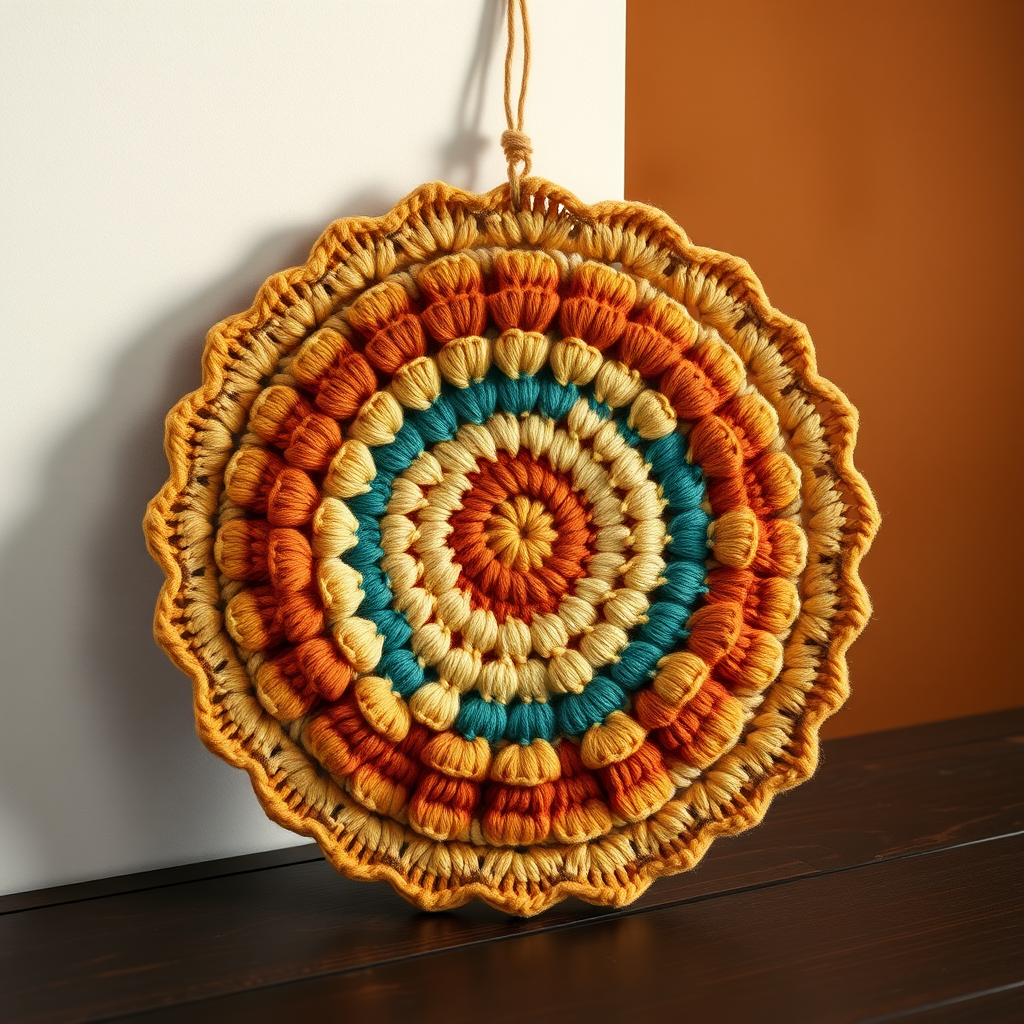
Aurora Bloom Wall Mandala Free Pattern – Crochet a Radiant Boho Tapestry
Bring the serene beauty of a celestial sunrise into your living space with this intricate crochet wall mandala, featuring layered petals in warm sunset hues. This meditative project creates a stunning textured centerpiece that adds a handcrafted, bohemian touch to any room. Whether you're an experienced crocheter looking for a mindful weekend project or a beginner eager to stretch your skills, this pattern is designed to guide you through every loop and stitch with clarity and confidence.
The Aurora Bloom is more than just a decorative piece—it's a journey through color and texture. Each round builds upon the last, transforming simple chains and double crochet clusters into a radiant, dimensional tapestry that captures the essence of dawn. The finished mandala measures approximately 18–20 inches in diameter (depending on your tension), making it a striking focal point for a living room, bedroom, or creative studio.
In this comprehensive guide, we'll walk you through every step, from gathering your materials to the final blocking and hanging. By the end, you'll have a beautiful, handmade piece that you'll be proud to display—and the satisfaction of knowing you created it entirely with your own two hands.
Materials Needed
Before you begin, gather the following supplies. Having everything ready will make your crochet session smooth and enjoyable.
Yarn
- Worsted weight cotton yarn in 5 colors:
- Terracotta (approx. 60 yards / 55 meters)
- Golden Yellow (approx. 50 yards / 46 meters)
- Coral Pink (approx. 55 yards / 50 meters)
- Cream (approx. 60 yards / 55 meters)
- Deep Teal (approx. 65 yards / 60 meters)
Pro tip: Cotton yarn is ideal for wall art because it holds its shape beautifully, has a lovely natural sheen, and is durable enough to last for years. If you prefer a softer drape, you can substitute a cotton-acrylic blend, but note that the texture may be slightly less defined.
Hook and Notions
- 5.0 mm (H-8) crochet hook – This size works perfectly with worsted weight yarn to create a dense, structured fabric.
- Stitch markers (at least 2) – Essential for tracking the beginning of each round, especially since this pattern is worked in a continuous spiral.
- Tapestry needle – For weaving in ends and attaching the hanging dowel.
- Scissors – For trimming yarn.
For Finishing and Hanging
- Foam board or blocking mat – To shape and set your mandala.
- Rust-proof pins – For blocking.
- Spray bottle with water – To dampen the piece for blocking.
- Wooden dowel or branch (approx. 20–24 inches long) – For hanging.
- Natural twine or yarn – To attach the mandala to the dowel.
Gauge and Sizing
Gauge: First 4 rounds measure 4 inches in diameter.
Gauge is important for this project because it determines the final size and drape of your mandala. If your first 4 rounds measure significantly more or less than 4 inches, adjust your hook size accordingly. A smaller hook (4.5 mm) will create a tighter, smaller mandala, while a larger hook (5.5 mm) will produce a looser, larger piece. Don't stress about perfection—consistency is what matters most.
Step-by-Step Instructions
This mandala is worked in continuous spiral rounds unless otherwise noted. This means you will not join at the end of each round with a slip stitch (except where specifically instructed). Instead, you'll work continuously, which creates a seamless, smooth spiral. Use a stitch marker to track the beginning of each round—place it in the first stitch of the round and move it up as you go.
Let's begin! Take a deep breath, settle into a comfortable chair, and enjoy the rhythmic flow of this meditative project.
Round 1: The Magic Ring Foundation
With Terracotta, make a magic ring (also called a magic circle). If you're new to this technique, here's how:
- Wrap the yarn around your fingers twice, creating a loop.
- Insert your hook into the loop, yarn over, and pull up a loop.
- Chain 1 to secure (this does not count as a stitch).
- Work 8 single crochet (sc) into the ring.
- Pull the tail end of the yarn to tighten the ring, closing the center completely.
Stitch count: 8 sts
Tip: Pull the magic ring tight but not so tight that the center puckers. You want a flat, smooth circle.
Round 2: Doubling Up
Work 2 single crochet (sc) in each stitch around the entire round. This is called an "increase" and it doubles your stitch count.
Stitch count: 16 sts
Tip: Keep your tension even. If your circle starts to ruffle, your tension is too loose; if it cups, it's too tight.
Round 3: Gradual Increases
This round creates a gentle expansion: *Sc in next st, 2 sc in next st* repeat from * to * around.
In plain English: single crochet in the first stitch, then 2 single crochet in the second stitch. Repeat this pattern all the way around.
Stitch count: 24 sts
Round 4: Continuing the Circle
Now we add another stitch between increases: *Sc in next 2 sts, 2 sc in next st* repeat around.
So: single crochet in the next two stitches, then 2 single crochet in the third stitch. Continue this pattern around.
Stitch count: 32 sts
Fasten off Terracotta. Cut the yarn, leaving a 6-inch tail, and pull it through the last loop to secure. Weave in this end later, or leave it for now—you'll weave all ends at the end.
Check your gauge: At this point, your circle should measure approximately 4 inches in diameter. If it's significantly off, now is the time to adjust your hook size and start over.
Round 5: First Chain Loops
Now we transition from a solid circle to the lacy petal structure. Join Golden Yellow in any stitch. To join, insert your hook into a stitch, yarn over with the new color, and pull through both the stitch and the loop on your hook (this is a slip stitch join).
Then: *Chain 5, skip 3 sts, sc in next st* repeat from * to * around.
Let's break this down:
- Chain 5 (this creates a loop).
- Skip the next 3 stitches (you're creating space).
- Single crochet in the 4th stitch.
- Repeat this pattern all the way around.
At the end of the round, you'll have 8 chain loops. End with a slip stitch to the first chain of the round to join. This is the one place where you join with a slip stitch in this section.
Stitch count: 8 chain loops
Tip: Count your loops as you go. It's easy to accidentally make 7 or 9, and it's much easier to fix now than later.
Round 6: First Petal Layer
Slip stitch into the first chain loop to position your hook inside the loop.
Now work the petal: *Work 5 double crochet (dc), chain 2, 5 dc in the same loop, sc in the next loop* repeat from * to * around.
Here's the detailed breakdown:
- Inside the chain-5 loop, work 5 double crochet stitches.
- Chain 2 (this creates a small gap at the top of the petal).
- Work 5 more double crochet in the same loop.
- Single crochet in the next chain loop (this separates the petals).
- Repeat this entire sequence for each of the 8 loops.
You'll end with 8 petals, each made of 10 double crochet total (5 on each side of the chain-2 gap).
Fasten off Golden Yellow.
Stitch count: 8 petals
Tip: The chain-2 gap is important—it creates a defined "V" shape at the top of each petal, which adds to the mandala's intricate look.
Round 7: Second Chain Loop Layer
Join Coral Pink in any chain-2 space (the gap at the top of a petal).
Work: *Chain 6, sc in the next chain-2 space* repeat around.
So: chain 6, then single crochet in the next chain-2 space (the gap between the two sets of 5 dc on the next petal). Continue this pattern around.
Stitch count: 8 chain loops
Note: These loops are longer (chain 6 instead of chain 5), which will create larger petals in the next round.
Round 8: Second Petal Layer
Slip stitch into the first chain loop.
Work: *Work 6 dc, chain 3, 6 dc in the same loop, sc in the next loop* repeat around.
This is the same pattern as Round 6, but with one more double crochet on each side (6 instead of 5) and a longer chain (3 instead of 2).
Fasten off Coral Pink.
Stitch count: 8 larger petals
Round 9: Third Chain Loop Layer
Join Cream in any chain-3 space.
Work: *Chain 8, sc in the next chain-3 space* repeat around.
Stitch count: 8 chain loops
Round 10: Third Petal Layer
Slip stitch into the first chain loop.
Work: *Work 7 dc, chain 4, 7 dc in the same loop, sc in the next loop* repeat around.
Fasten off Cream.
Stitch count: 8 extra-large petals
Tip: As the petals grow larger, the mandala will start to feel more substantial. This is a great time to admire your progress and see the beautiful gradient forming.
Round 11: Fourth Chain Loop Layer
Join Deep Teal in any chain-4 space.
Work: *Chain 10, sc in the next chain-4 space* repeat around.
Stitch count: 8 chain loops
Round 12: Final Petal Layer
Slip stitch into the first chain loop.
Work: *Work 8 dc, chain 5, 8 dc in the same loop, sc in the next loop* repeat around.
This is your largest and final petal layer. The deep teal creates a beautiful, grounding contrast to the warm sunset colors above it.
Fasten off Deep Teal.
Stitch count: 8 final petals
Congratulations! Your mandala is complete. Take a moment to admire your work—you've just created something truly beautiful.
Finishing: Weaving, Blocking, and Hanging
The crochet is done, but a few finishing touches will transform your mandala from "nice" to "stunning."
Weave in All Ends
Using your tapestry needle, carefully weave in all loose ends. Thread the needle with a yarn tail, then weave it through the back of the stitches in the same color, following the path of the yarn. Weave in at least 2–3 inches to ensure it's secure, then trim the excess.
Tip: Weave each end in a different direction to distribute the bulk and prevent any bumps from showing on the front.
Blocking: The Secret to a Perfect Mandala
Blocking is essential for this project. It opens up the stitches, evens out the tension, and gives your mandala that crisp, professional look.
- Lay your mandala on a foam board or blocking mat, right side up.
- Gently stretch it into a perfect circle, using your hands to shape it.
- Use rust-proof pins to secure the edges. Pin at the tip of each petal, and add a few pins along the edges to keep the circle shape. You can also pin the center to keep it flat.
- Spray the mandala with water until it's damp but not soaking wet. A spray bottle works perfectly for this.
- Allow it to dry completely—this can take 12–24 hours depending on humidity. Don't rush this step; the mandala needs to fully dry to hold its shape.
Tip: If you want extra definition in the petals, you can gently pull each petal tip outward before pinning. This will emphasize the layered, scalloped effect.
Attaching the Hanging Dowel
Once your mandala is completely dry, it's time to hang it.
- Cut a piece of natural twine or yarn about 24 inches long.
- Thread it through the back loops of the first round (the terracotta center). You can do this by inserting your tapestry needle through the back loops of the stitches in the first round, going in and out to create a series of loops along the top edge.
- Remove the needle and tie the two ends of the twine to the wooden dowel or branch, positioning the mandala so it hangs centered.
- Trim any excess twine.
Alternative: If you prefer, you can attach the twine to the back of the mandala at two points (one on each side of the top) for a more invisible hanging method. Simply thread the twine through the back loops at the 10 o'clock and 2 o'clock positions, then tie to the dowel.
Finally, hang your dowel on a nail or hook on your wall. Step back and admire your handiwork—you've created a stunning, one-of-a-kind piece of art!
Tips for Success
- Use a stitch marker from the very beginning. It's easy to lose your place in a spiral, and a marker will save you from counting stitches repeatedly.
- Count your stitches at the end of each round. It takes 30 seconds and prevents hours of frustration later.
- Keep your tension consistent. If you notice your circle starting toAlso Check Out: We think you'd love this beautiful pattern on our sister site: Aurora Bloom Buttoned Cardigan Free Knitting Pattern


