Celestial Drift Fingerless Gloves Free Pattern
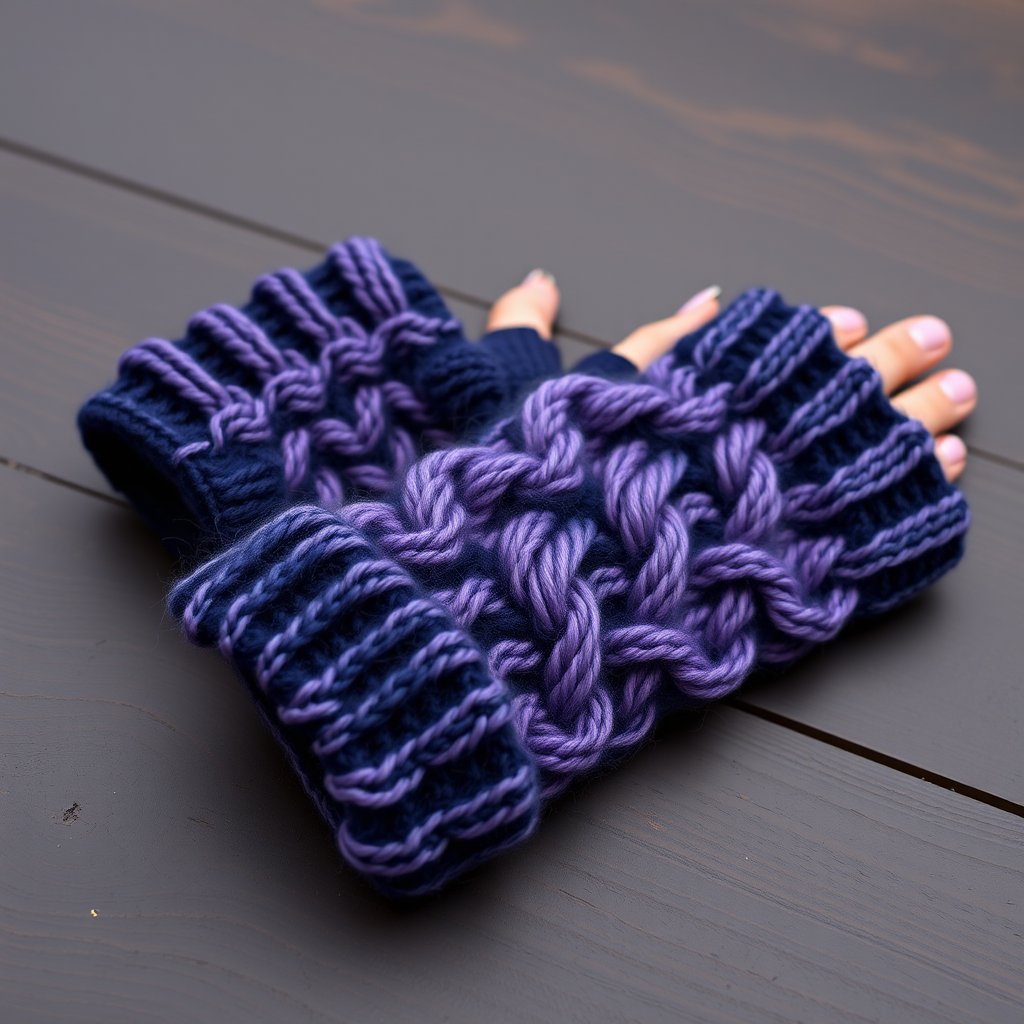
Celestial Drift Fingerless Gloves: A Free Knitting Pattern for Cozy, Starry Hands
Wrap your hands in the cozy comfort of a starry night sky with the Celestial Drift Fingerless Gloves. This free knitting pattern combines the modern beauty of gradient yarn with the timeless elegance of cable details, creating a uniquely textured accessory that feels both celestial and grounded. Whether you're sipping coffee on a crisp autumn morning or strolling through a winter market, these gloves add a touch of handmade magic to any outfit. The deep navy-to-soft-lavender gradient evokes swirling nebulas, while the braided cable panel along the back of the hand adds structure and visual interest. Perfect for intermediate knitters looking to expand their skills—or confident beginners ready for a rewarding challenge—this pattern is designed to be clear, detailed, and achievable at home.
In this post, we'll walk you through everything you need: the exact materials, a full list of abbreviations, and step-by-step instructions for both the right and left gloves. We've expanded every technical detail so you can knit with confidence, from the ribbed cuffs to the seamless thumb gusset. Let's dive in and create something beautiful!
Materials Needed for Your Celestial Drift Gloves
Before you cast on, gather these supplies. Using the recommended yarn weight and needle size ensures your gauge matches and your gloves fit perfectly.
Yarn
- Worsted weight yarn in a gradient colorway (e.g., from deep navy to soft lavender). Look for a self-striping or hand-dyed gradient skein for that celestial effect.
- Approximately 200 yards (183 meters) for a pair. A single 100g skein of most worsted weight yarns will suffice.
- Suggested yarn: Malabrigo Rios in 'Cielo' or any similar superwash worsted weight with a smooth texture that shows cables well.
Needles & Tools
- US 7 (4.5 mm) knitting needles – straight or circular (circulars are great for the small circumference of gloves, but straights work fine if you seam or use the magic loop method).
- Cable needle – any short double-pointed needle or cable hook.
- Stitch markers – at least 4, to mark the cable panel and thumb gusset.
- Tapestry needle – for weaving in ends and finishing.
- Stitch holder or waste yarn – to hold thumb stitches temporarily.
Gauge
20 stitches and 26 rows = 4 inches (10 cm) in stockinette stitch on US 7 needles. Always knit a swatch first to ensure your tension matches—this is crucial for a good fit.
Abbreviations & Special Stitches
Familiarize yourself with these terms before starting. We've included clear explanations for the cable stitches so you can work them confidently.
- CO: cast on
- K: knit
- P: purl
- K2tog: knit two stitches together (right-leaning decrease)
- SSK: slip, slip, knit (left-leaning decrease)
- M1: make one increase (knit front and back of the same stitch, or use a lifted increase)
- PM: place marker
- SM: slip marker
- C4F: cable 4 front – slip 2 stitches to cable needle, hold in front of work, knit next 2 stitches from left needle, then knit 2 stitches from cable needle
- C4B: cable 4 back – slip 2 stitches to cable needle, hold in back of work, knit next 2 stitches from left needle, then knit 2 stitches from cable needle
Step-by-Step Instructions: Knitting Your Celestial Drift Gloves
This pattern is worked flat (back and forth) for each glove, then seamed or joined. We'll guide you through the right glove first, then explain how to mirror for the left. Follow each row carefully, and don't rush—cables are forgiving and beautiful once blocked.
Right Glove
Step 1: Cast On & Ribbing
CO 40 stitches using your preferred method (long-tail is recommended for a stretchy edge).
Ribbing Rows 1-10: Work in K2, P2 ribbing across all 40 stitches. Repeat this row for a total of 10 rows. This creates a snug, stretchy cuff that will keep the glove in place.
Step 2: Set Up the Cable Panel
Now you'll establish the cable pattern that runs along the back of the hand. Place markers to isolate the 20 center stitches.
Row 11 (Right Side): K10, PM, work cable pattern over next 20 stitches as follows: (C4F, K4, C4B, K4, C4F) – that's 20 stitches total, PM, K10.
Row 12 (Wrong Side): Purl all stitches across (including between markers). This purl row provides a clean background for the cables.
Row 13: K10, SM, (K4, C4B, K4, C4F, K4) – 20 stitches, SM, K10.
Row 14: Purl all.
Row 15: K10, SM, (C4F, K4, C4B, K4, C4F) – 20 stitches, SM, K10.
Row 16: Purl all.
Row 17: K10, SM, (K4, C4B, K4, C4F, K4) – 20 stitches, SM, K10.
Row 18: Purl all.
Repeat Rows 11-18 until the piece measures 4 inches (10 cm) from the cast-on edge, ending with a wrong-side row (a purl row). This forms the main body of the glove up to the thumb.
Step 3: Thumb Gusset Increases
The gusset adds width for your thumb. You'll increase stitches on each side of a central marker, creating a wedge shape.
Next Row (Right Side): K10, SM, work cable pattern over 20 stitches as established (follow the pattern from Row 11 or 15), SM, K3, PM, M1 (increase by knitting front and back of next stitch), K4, M1, K3. You now have 42 stitches.
Continue in pattern, working the cable rows as established (alternating Rows 11-18 for the center 20 stitches). On every 4th row (which will be a right-side row), increase as follows:
- Knit to the gusset marker, M1, SM, knit to the next gusset marker, M1, SM, continue in pattern to the end of the row.
This adds 2 stitches per increase row. Work until you have 10 stitches between the two gusset markers (meaning you've made 5 increases on each side of the original 4 stitches). The total stitch count will now be 50 stitches.
Step 4: Separate the Thumb
Now you'll isolate the thumb stitches and continue with the hand body.
Next Row (Right Side): Work in pattern to the first gusset marker, remove that marker, place the next 10 stitches (the gusset stitches) onto a stitch holder or waste yarn for the thumb. CO 2 stitches (this bridges the gap), then continue in pattern to the end of the row. You'll have 42 stitches on your needles (40 original + 2 new).
Step 5: Hand Body
Continue working in the cable pattern over the center 20 stitches, with stockinette (knit on RS, purl on WS) on the side sections (10 stitches each side). Work straight until the glove measures 7 inches (18 cm) from the cast-on edge, or your desired length to the knuckles. End with a wrong-side row.
Step 6: Top Ribbing
Switch to K2, P2 ribbing across all 42 stitches. Work for 8 rows. This creates a neat, stretchy finish at the top of the glove.
Bind off loosely in pattern (knit the knits and purl the purls as you bind off). A loose bind-off ensures the top isn't too tight.
Step 7: Knit the Thumb
Transfer the 10 held thumb stitches onto your needles. With the right side facing, pick up and knit 2 stitches from the CO edge at the base of the thumb (where you cast on 2 stitches earlier). You now have 12 stitches.
Work in K2, P2 ribbing for 6 rows. Bind off loosely in pattern.
Left Glove
Work the left glove identically to the right, but mirror the thumb gusset placement. Instead of placing the gusset after the cable section, you'll place it before the cable section.
Setup: CO 40 stitches and work 10 rows of K2, P2 ribbing as before.
Main Body: Work the same cable pattern over the center 20 stitches, but when you reach the thumb gusset, place it on the left side of the cable panel (i.e., K10, work cable, then K3, M1, K4, M1, K3). This mirrors the thumb to the opposite hand.
Follow the same increase schedule, separation, and finishing steps as the right glove.
Finishing Touches
Once both gloves are complete, it's time to finish them beautifully.
- Weave in all ends using a tapestry needle. Be sure to secure the yarn at the thumb base and any color changes if you're using a hand-dyed gradient.
- Block gently to shape. Wet block or steam block according to your yarn's care instructions. This will even out the cables and give the gloves a professional, polished look.
- If you worked flat with straight needles, seam the side edges of each glove using mattress stitch or a whip stitch, leaving the thumb opening free. If you used circular needles or the magic loop, you may have a seamless tube—just close any small gaps at the thumb.
Tips for Perfect Celestial Drift Gloves
- Check your gauge – even a half-stitch difference can affect the fit. Knit a swatch and adjust needle size if needed.
- Use a cable needle you love – a slightly curved one prevents stitches from slipping off.
- Mark your right side – place a removable marker on the RS so you always know which row you're on, especially when working the gusset increases.
- Try on as you go – if the hand body feels too tight or loose, adjust the length or stitch count before finishing.
These Celestial Drift Fingerless Gloves are more than just a winter accessory—they're a wearable piece of art. The gradient yarn does the heavy lifting, while your cables add that handcrafted touch. Whether you keep them for yourself or gift them to a fellow stargazer, they're sure to become a favorite. Happy knitting, and may your hands drift through cozy, starry skies all season long!


