Chocolate Caramel Crochet Cuff Boots: Free Pattern for Bold Two-Tone Mid-Calf Boots
Chocolate Caramel Crochet Cuff Boots: A Cozy First Statement Piece
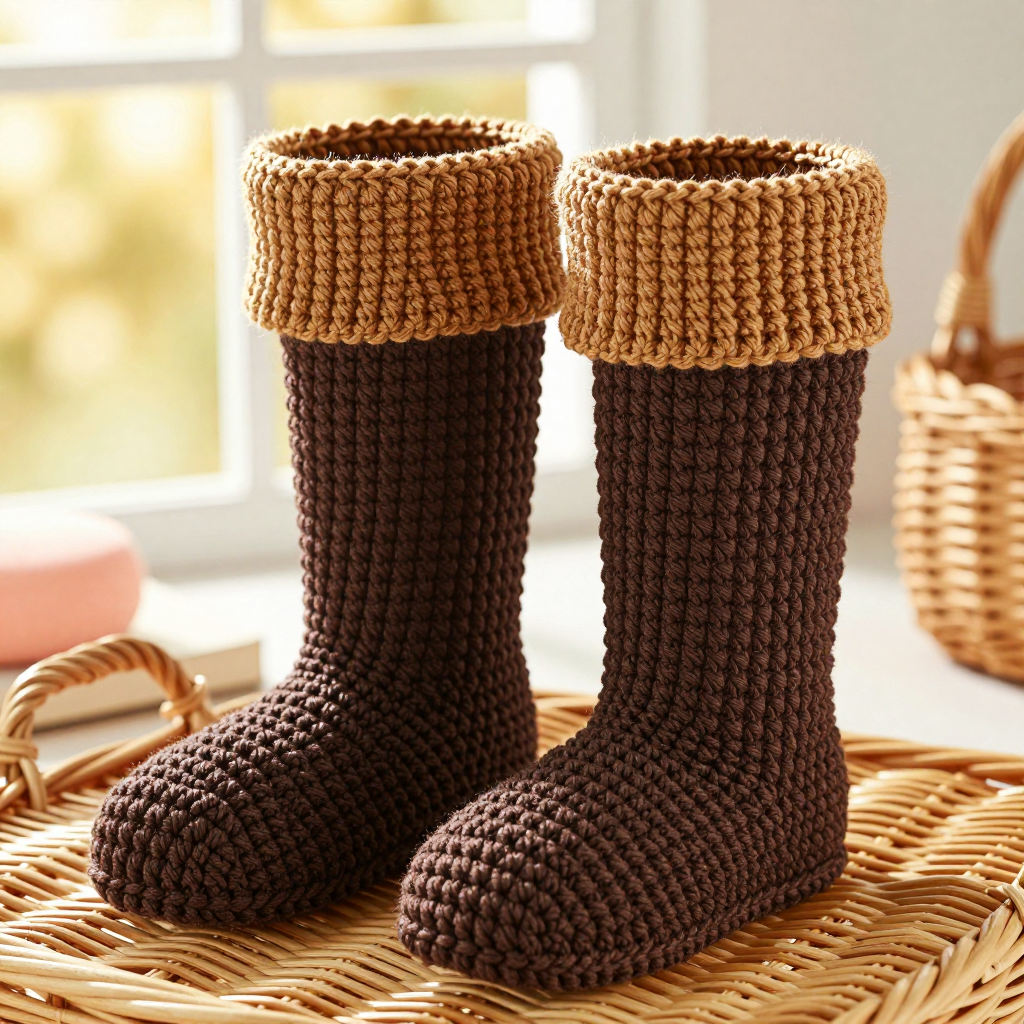
If you have ever looked at a pair of handmade boots and thought, "I could never make those," this pattern is here to prove you wrong. These Chocolate Caramel Crochet Cuff Boots are made from just two simple flat rectangles per boot, joined with a seam, which means no complicated shaping, no working in the round, and no scary techniques. The finished boots are a rich chocolate brown from toe to calf, topped with a wide, folded-over caramel cuff that gives them a bold, boutique-window look. They feel soft, slightly structured, and wonderfully warm, like a favorite sweater for your feet. This is the perfect project for a confident beginner who has mastered single crochet and wants to make something they will actually wear and show off.
Materials Needed
- Yarn: Worsted weight yarn (medium, CYC #4), acrylic or wool blend. Total approximately 400–450 yards: about 250 yards chocolate brown and 150–200 yards caramel. Choose a smooth, slightly sturdy yarn so the boots hold their shape.
- Crochet hook: Size H/8 (5.0 mm), or whatever size gets you the gauge below.
- Stitch markers: At least 4, to mark the toe, heel, and seam points.
- Yarn needle (tapestry needle): A large-eyed blunt needle for seaming and weaving in ends.
- Scissors for cutting yarn.
- Tape measure for checking your gauge and piece measurements.
- Optional: Non-slip sole material or suede scraps for outdoor wear.
- Finished size: Women's medium. Fits foot length approx. 9–9.5 in (23–24 cm) and calf circumference approx. 14–15 in (35–38 cm). Each boot measures approx. 10 in (25 cm) from toe to top and approx. 7.5 in (19 cm) wide at the top. The caramel cuff is approx. 4 in (10 cm) deep.
Abbreviations and Beginner Glossary
- ch – chain. Make a loop of yarn on your hook, wrap the yarn over the hook, and pull it through the loop. That is one chain. A row of chains is your starting foundation.
- sc – single crochet. Insert your hook into the stitch, wrap yarn over the hook, pull up a loop (2 loops on hook), wrap yarn over again, and pull through both loops. One single crochet made.
- sc2tog – single crochet 2 together (a decrease). Insert hook into the first stitch, pull up a loop, insert hook into the next stitch, pull up a loop (3 loops on hook), yarn over, pull through all 3 loops. This turns two stitches into one. (Not used in this pattern, but listed so you recognize it.)
- sl st – slip stitch. Insert hook into stitch, yarn over, pull through the stitch and through the loop on your hook in one motion. Used to join pieces.
- st(s) – stitch or stitches.
- RS – right side. The "public" side of your work that faces out when finished.
- WS – wrong side. The back side of your work.
- 2 sc in next st – work two single crochets into the same stitch. This is an increase and adds one stitch to your row.
- Turn – flip your work over so you can crochet back across the row you just made.
- Fasten off – cut the yarn a few inches from your work, pull the tail through the last loop, and tug to secure.
Gauge
14 single crochet stitches x 16 rows = 4 inches (10 cm) in single crochet worked flat.
Why gauge matters: Gauge is how many stitches and rows fit into a set measurement. If your stitches are bigger than the pattern's, your boots will come out too large; if smaller, too tight. Always check before you begin.
How to make a gauge swatch: Chain 22. Single crochet in the second chain from the hook and in each chain across (21 sts). Work 18 rows of single crochet, turning at the end of each row. Lay the swatch flat and measure a 4-inch square in the middle. Count your stitches and rows. If you have more than 14 stitches in 4 inches, switch to a larger hook. If you have fewer, switch to a smaller hook. Repeat until it matches.
Beginner Tips Before You Start
- Count every row. Single crochet rows look alike, so keep a tally on paper or use a row counter. Losing your place is the number one beginner mistake.
- Do not pull your yarn too tight. Tension should feel relaxed. Tight stitches make stiff, small boots that are hard to seam.
- Use stitch markers. Place one at the first stitch of each row and one where the toe and heel will be. This makes seaming much easier later.
- Work the two boots one after the other, not side by side. Finishing one completely keeps your tension consistent and prevents mix-ups.
- Keep your turning chain loose. The "ch 1, turn" at the start of each row should be relaxed so the edges stay straight and easy to sew.
- Check your measurements as you go. Lay the piece flat every few rows and measure. It is far easier to fix early than after seaming.
Step-by-Step Instructions
Chocolate Foot and Leg Piece (make 2)
With chocolate yarn, ch 21.
Row 1 (RS): Sc in 2nd ch from hook and in each ch across. (20 sc)
Row 2: Ch 1, turn. Sc in each st across. (20 sc)
Rows 3–24: Repeat Row 2 until the piece measures approx. 6 in / 15 cm from the beginning, ending with a WS row. (20 sc per row)
Shape the Calf (increase section)
Row 25 (RS): Ch 1, turn. Sc in first st, 2 sc in next st, sc in each st to last 2 sts, 2 sc in next st, sc in last st. (22 sc)
Row 26: Ch 1, turn. Sc in each st across. (22 sc)
Rows 27–28: Repeat Rows 25–26 once more. (24 sc)
Rows 29–32: Ch 1, turn. Sc in each st across. (24 sc)
Row 33: Ch 1, turn. Sc in first st, 2 sc in next st, sc in each st to last 2 sts, 2 sc in next st, sc in last st. (26 sc)
Row 34: Ch 1, turn. Sc in each st across. (26 sc)
Rows 35–40: Ch 1, turn. Sc in each st across. (26 sc)
The piece should measure approx. 10 in / 25 cm from the beginning and approx. 7.5 in / 19 cm wide at the top. Fasten off, leaving a long tail (about 24 in / 60 cm) for seaming.
Caramel Cuff (make 2)
With caramel yarn, ch 31.
Row 1 (RS): Sc in 2nd ch from hook and in each ch across. (30 sc)
Row 2: Ch 1, turn. Sc in each st across. (30 sc)
Rows 3–16: Repeat Row 2 until the cuff measures approx. 4 in / 10 cm from the beginning, ending with a WS row. (30 sc per row)
Fasten off, leaving a long tail (about 24 in / 60 cm) for seaming.
Assembly and Finishing
1. Seam the foot/leg piece. With the right side facing you, fold the chocolate piece in half lengthwise so the two long edges meet. Thread the long tail onto your yarn needle. Using a whipstitch (bring the needle up through both edges, over the top, and back up again in a small even stitch) or a mattress stitch (slide the needle under one horizontal bar on each edge, pulling snugly to close the gap), sew the back seam from the top of the calf down to the heel. Continue along the sole to the toe. Turn the boot right side out. It should now be a closed tube with a rounded toe and an open top.
2. Seam the cuff. Fold the caramel cuff in half widthwise so the short edges meet. Seam those short edges together with a whipstitch to form a tube. Turn right side out.
3. Attach the cuff. Slip the caramel cuff tube over the top of the chocolate boot, aligning the cuff seam with the boot's back seam. The cuff should overlap the top of the boot by approx. 1 in / 2.5 cm. Using caramel yarn and your yarn needle, whipstitch the lower edge of the cuff to the outside of the boot, catching only the outer loops so the stitching stays invisible from the inside. Work evenly around the circumference.
4. Fold the cuff. Fold the upper portion of the caramel cuff outward and downward over the seam to create a wide folded-over cuff. The fold should sit approx. 2 in / 5 cm above the join. Gently shape the fold with your hands.
5. Weave in all ends securely on the inside of the boot, running each tail back and forth through a few stitches before trimming.
6. Optional non-slip sole. For outdoor wear, cut a piece of non-slip sole material or suede to fit the sole of each boot and hand-sew it to the bottom with matching chocolate yarn.
Blocking: Lightly mist the finished boots with cool water, stuff the toes and calves with rolled towels to hold their shape, and let them dry flat away from direct heat. This smooths the seams and evens the stitches.
Pro Tips and Variations
- Change the colors: Swap chocolate and caramel for any two contrasting worsted yarns, such as charcoal and cream, or forest green and mustard, for a completely different look.
- Adjust the size: For a longer foot, add or subtract rows in Rows 3–24 in multiples of 2 rows (approx. 0.5 in / 1.3 cm per 2 rows). For a wider calf, add more increase rows, working increases every 4th row until you reach your desired circumference. For a taller boot, add extra even rows before the calf shaping. For a wider cuff, increase the starting chain by multiples of 2 chains.
- Substitute yarn: A wool-blend yarn gives warmth and a bit more stretch; a sturdy acrylic holds shape best for beginners. Avoid fuzzy or slippery yarns, which make seaming difficult.
- Add a decorative edge: Work a round of slip stitch in caramel around the top edge of the boot before attaching the cuff for a crisp, finished contrast line.