Cobalt Horizon Cropped Shrug Free Pattern: Two-Rectangle Knit with Intarsia Cuff Bands
Cobalt Horizon Cropped Shrug: A Free Two-Rectangle Beginner Knit Pattern
Introduction
If you have ever looked at a knitted shrug and thought "that looks complicated," this pattern is here to change your mind. The Cobalt Horizon Cropped Shrug is made from just two identical flat rectangles of simple stockinette stitch, seamed together in a clever way to create sleeves and a back. That is the whole secret! It is perfect for a complete beginner who has just learned to knit and purl, because there are no increases, no decreases, no shaping, and no working in the round.
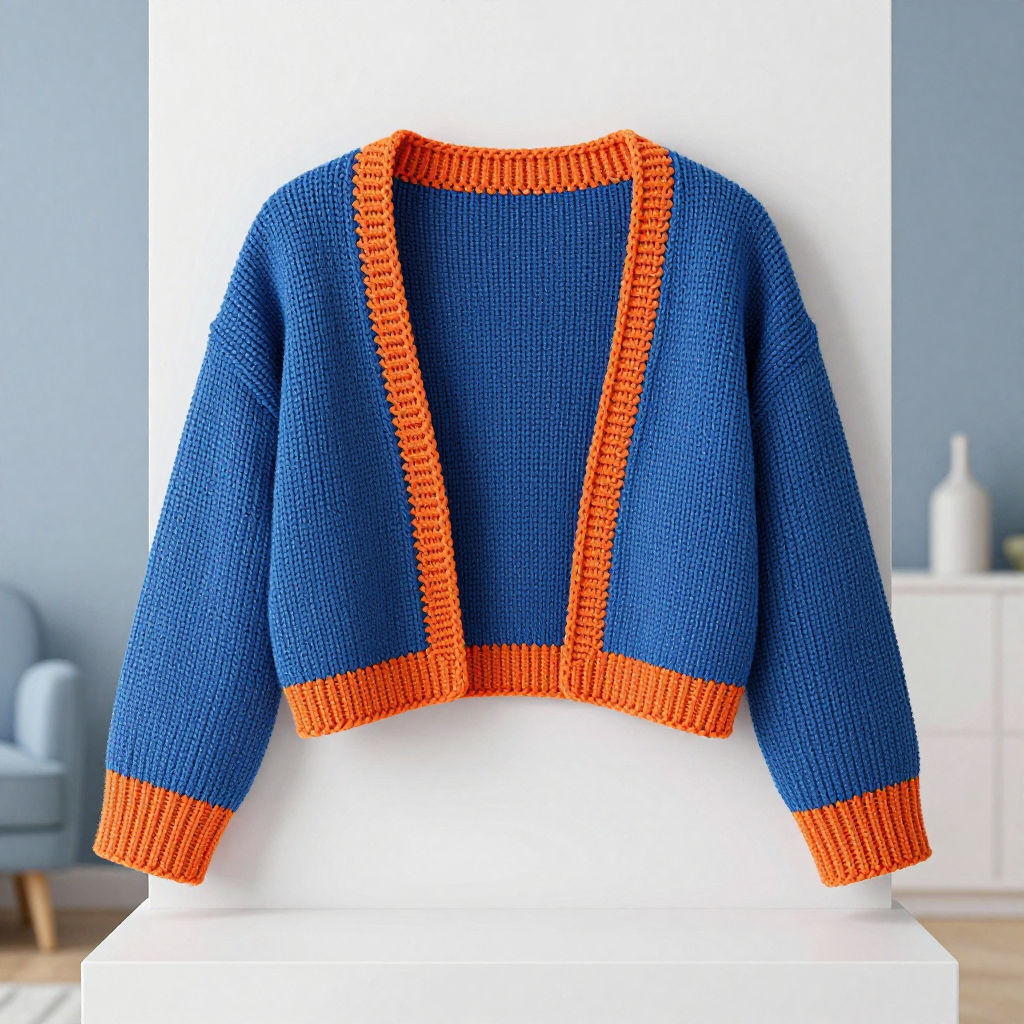
What makes this project special is the bold two-tone finish: a deep cobalt blue body with a bright orange band at each cuff, giving it a clean, modern Japandi look. The finished shrug is boxy and cropped, worn open at the front with no buttons or closures. In a soft bamboo cotton blend, it feels smooth, cool, and drapey against the skin — light enough for spring evenings and elegant enough to dress up a plain tee.
Materials Needed
- Yarn (Main Color, MC): Worsted-weight bamboo cotton blend (approx. 60% bamboo, 40% cotton; 200 yd / 183 m per 100 g skein). Cobalt blue: approx. 480 (560, 640, 720) yd / 440 (512, 585, 658) m.
- Yarn (Contrast Color, CC): Same yarn in bright orange: approx. 40 (45, 50, 55) yd / 37 (41, 46, 50) m.
- Needles: US 7 (4.5 mm) straight or circular knitting needles, or whatever size gives you the correct gauge (see Gauge section).
- Stitch markers: At least 4, to mark seam points.
- Tapestry needle: A blunt, large-eyed needle for seaming and weaving in ends.
- Scissors for cutting yarn.
- Stitch holders or spare needles (helpful, though not strictly required for this pattern).
- Optional: A 4.5 mm crochet hook if you want to add the optional single crochet front edge.
Finished sizes: XS/S (M/L, XL/2X, 3X/4X). Finished back width (seam to seam across the back): 20 (22, 24, 26) in / 51 (56, 61, 66) cm. Finished sleeve length from shoulder seam to cuff: 16 (17, 18, 19) in / 41 (43, 46, 48) cm. Finished body depth (top edge to lower edge): 14 (15, 16, 17) in / 36 (38, 41, 43) cm.
Abbreviations and Beginner Glossary
- st / sts – stitch / stitches. One "stitch" is one loop sitting on your needle.
- RS – right side. The "public" side of the fabric that faces out when worn. For stockinette, the RS is the smooth side with V shapes.
- WS – wrong side. The back side of the fabric that faces your body.
- Knit (k) – Insert the right needle into the front of the stitch from left to right, wrap the yarn around the needle, and pull the new loop through. This creates a bumpy stitch on the back and a smooth V on the front.
- Purl (p) – Insert the right needle into the front of the stitch from right to left, wrap the yarn, and pull the loop through toward you. This creates the bumpy texture on the RS.
- Stockinette stitch – Knit every stitch on RS rows and purl every stitch on WS rows. This gives you the classic smooth "V" fabric.
- Cast on – The very first step: creating the starting row of loops on your needle. This pattern uses the long-tail cast-on, a stretchy, tidy method (ask any beginner video to show you — it takes two minutes to learn).
- Bind off – The final step: locking the stitches so they cannot unravel, creating a finished edge.
- Intarsia – A color-blocking technique where you knit a section in one color, then switch to a second color for another section, without carrying the unused color across the back. Here it simply means: knit the first 12 rows in orange, then switch to blue.
- MC – Main Color (cobalt blue).
- CC – Contrast Color (bright orange).
- Mattress stitch – An invisible seaming technique that joins two edges so the seam disappears into the fabric. You pick up the horizontal bar between stitches on each edge, alternating sides, and pull snug.
- Blocking – Gently wetting or steaming your finished pieces and pinning them to the correct measurements so they dry flat and even.
Gauge
18 sts and 24 rows = 4 in / 10 cm in stockinette stitch, blocked.
Why gauge matters: This shrug is built entirely from rectangles whose size depends on your stitch count. If your stitches are bigger than the pattern's, your shrug will come out too large; if smaller, too small. Gauge is the difference between a shrug that fits and one that does not.
How to make a gauge swatch: Cast on 26 stitches with your MC. Work in stockinette (knit one row, purl one row) for about 30 rows, then bind off. Block it lightly and let it dry. Lay a ruler across the middle and count how many stitches fit in 4 inches (10 cm) — it should be 18. Count rows the same way — it should be 24. If you have more stitches than 18, your knitting is tight: go up a needle size. If you have fewer, go down a needle size. Repeat until you match.
Beginner Tips Before You Start
- Make both rectangles before you seam anything. It is much easier to compare two finished pieces side by side than to knit one, seam it, and try to match the second later.
- Do not pull your yarn tight. Beginners often tug each stitch, which makes stiff, narrow fabric. Let the yarn rest naturally on the needle — the bamboo cotton should feel smooth and relaxed.
- Use stitch markers to mark your seam points. When you reach the finishing stage, place a marker 10 (11, 12, 13) inches in from the inner corner of each top edge. This tells you exactly where the back seam ends and the sleeve seam begins.
- Count your cast-on stitches twice. With 90 (99, 108, 117) stitches, an accidental extra or missing stitch at the start will throw off your rectangle width. Count in groups of 10.
- Keep your color-change tails long. Leave a 6-inch tail when you switch from orange to blue, and a 24-inch tail when you bind off. You will need these for seaming and weaving in.
- Trust the length, not the row count. For larger sizes, work until the piece measures the stated length rather than counting every row — length is what makes the shrug fit.
Step-by-Step Instructions
Rectangle (Make 2 Identical)
Each rectangle becomes one sleeve plus half of the back. The orange band is worked first, at the cast-on edge, so it sits at the cuff once seamed.
With MC, cast on 90 (99, 108, 117) sts using the long-tail cast-on.
Set-up Row (WS): Purl all stitches. (90 [99, 108, 117] sts)
Cuff Band (Orange Intarsia)
Rows 1–12 (CC): Change to CC. Work in stockinette stitch: Row 1 (RS): Knit all sts. Row 2 (WS): Purl all sts. Repeat Rows 1–2 six times total (12 rows of orange stockinette). (90 [99, 108, 117] sts)
Cut CC, leaving a 6 in tail to weave in later.
Body (Cobalt Blue)
Rows 13–96 (MC): Change to MC. Work in stockinette stitch (knit on RS, purl on WS) until the piece measures 16 (17, 18, 19) in / 41 (43, 46, 48) cm from the cast-on edge, ending with a WS row. (90 [99, 108, 117] sts)
Note for sizes M/L and larger: Work additional rows as needed to reach the stated length. The row count is approximate — length is the priority.
Bind off all stitches knitwise on the RS. Do not cut the yarn too short; leave a 24 in tail for seaming.
Assembly and Finishing
Step 1 — Block both rectangles. Pin each rectangle to its finished measurements (width x length) on a towel or blocking mat. Steam lightly or wet-block according to the yarn label, and allow to dry completely. Blocking evens out the stitches and makes seaming easier.
Step 2 — Lay out the pieces. Place both rectangles flat with RS facing up and the orange cuff bands at the bottom. Label the left rectangle A and the right rectangle B.
Step 3 — Back seam. Bring the top inner edges of A and B together. Measure 10 (11, 12, 13) in / 25 (28, 30, 33) cm from the inner corner of each top edge and place a marker. Using mattress stitch and the long tail, seam A to B along the top edges from the inner corner to the marker. This forms the center back.
Step 4 — Sleeve seams. Fold each rectangle in half lengthwise with RS together so the top edge meets the side edge. The remaining unseamed portion of the top edge (from the back-seam marker to the outer corner) is joined to the side edge of the same rectangle, forming a tube for the sleeve. Pin and seam with mattress stitch. Repeat for the second rectangle.
Step 5 — Weave in ends. Thread each tail onto the tapestry needle and weave it through the back of the stitches along the seams, distributing them to keep the fabric smooth. Trim close to the fabric.
Step 6 — Steam the seams. Gently steam the seams flat. Do not press heavily; bamboo cotton benefits from a light steam only.
Optional edge finish: If a slightly tidier front opening is desired, work one row of single crochet along each front vertical edge using a 4.5 mm hook and MC, then fasten off and weave in ends. This is optional and does not change the design.
Care: Hand wash cold or machine wash gentle in a mesh bag; lay flat to dry away from direct sunlight. Do not tumble dry.
Pro Tips and Variations
- Play with color. Swap the cobalt and orange for any two-tone combination — cream and terracotta, sage and mustard, or charcoal and blush. Keep the CC band at 12 rows so the cuff proportion stays the same.
- Adjust the size. To make the shrug wider, cast on 9 extra stitches per 2 inches of extra width (that is 4.5 sts per inch). To make it longer, add rows in multiples of 6 to the blue body section.
- Substitute yarn. Any worsted-weight yarn that meets gauge will work. A wool blend will be warmer and springier; a cotton-linen blend will be cooler and more textured. Always swatch first, because fiber changes the drape.
- Add a tidy front edge. The optional single crochet border along the front vertical edges gives a crisp, finished look and helps the shrug hold its shape when worn open.