Strawberry Field Stripe Floor Cushion Free Knitting Pattern
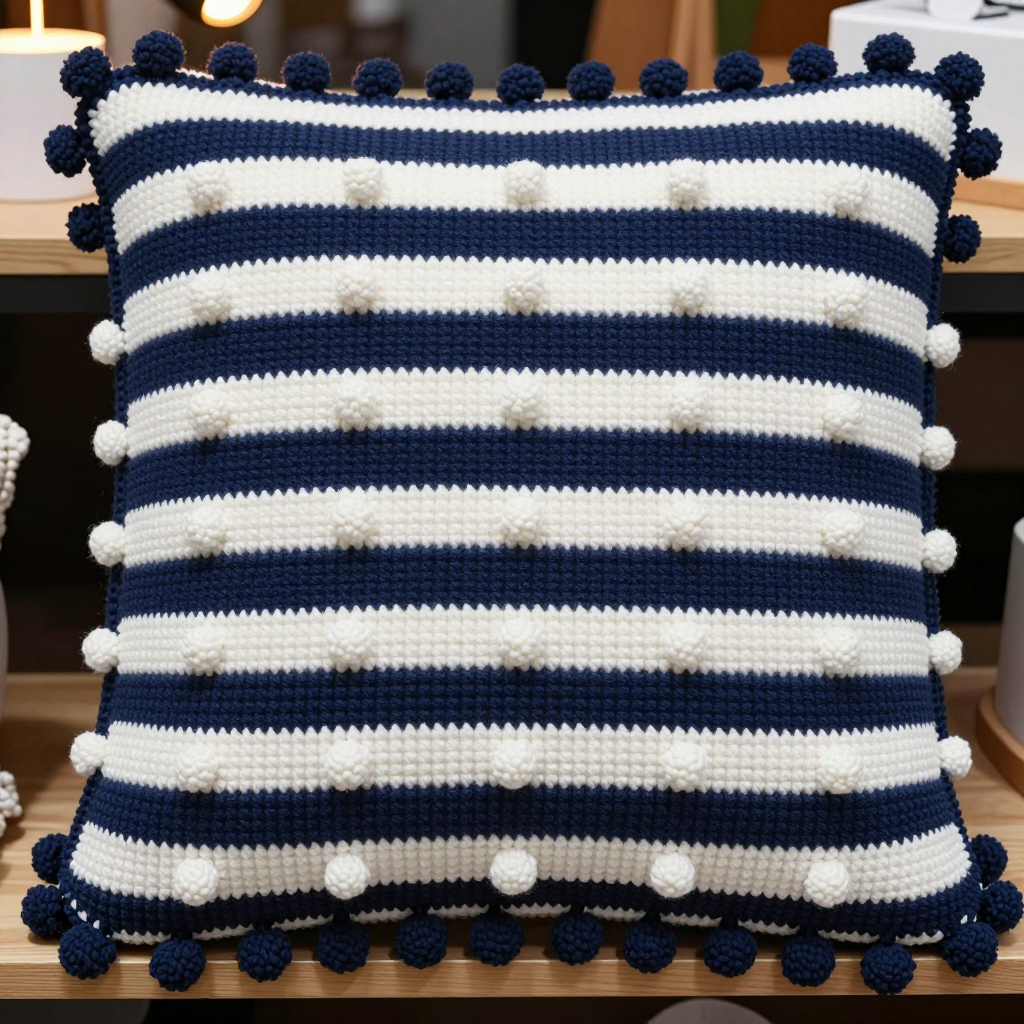
Strawberry Field Stripe Floor Cushion — Free Knitting Pattern
Introduction
If you have ever wanted to make something that makes people stop and say "you made that?", this is the project. The Strawberry Field Stripe Floor Cushion is a big, bold, squishy rectangle of wide navy-and-white stripes, dotted with little raised white bobbles that look like tiny strawberries scattered across a field. It is knitted flat on straight needles — no circular knitting, no shaping, no complicated counting — so it is a wonderful first "real" project for a brand-new knitter who has mastered knit and purl stitches. The finished cushion measures about 24 inches wide by 16 inches tall by 8 inches deep, and because it is worked in bulky wool, it feels dense, warm and satisfyingly firm once stuffed. It holds a crisp rectangular shape with softly rounded corners, and the short navy bobble fringe along the top and bottom edges gives it a playful, maximalist finish that looks gorgeous tossed on a floor, a window seat or the end of a sofa.
Materials Needed
- Yarn: Bulky (weight category 5) wool yarn — approximately 1,100 yd / 1,000 m total: 650 yd / 595 m navy and 450 yd / 410 m white. Wool gives the best stitch definition for bobbles; a wool-blend also works.
- Knitting needles: One pair of US 10.5 (6.5 mm) straight knitting needles.
- Extra needle: A spare US 10.5 (6.5 mm) needle (used for the three-needle bind-off and handy for holding stitches).
- Bobble helper: A cable needle or a spare double-pointed needle (dpn) to hold the bobble stitches while you work them.
- Stitch markers: At least 4, to mark stripe changes and panel edges.
- Tapestry needle: A blunt, large-eye needle for seaming and weaving in ends.
- Scissors for cutting yarn.
- Stuffing: Polyester fiberfill, or a foam insert measuring 24 x 16 x 8 in / 61 x 40.5 x 20 cm.
- Finished size: Width 24 in / 61 cm; Height 16 in / 40.5 cm; Depth 8 in / 20 cm.
Abbreviations and Beginner Glossary
Every abbreviation used in this pattern is explained below in plain English. If you have never knitted before, read this list twice before you cast on — it is your dictionary.
- st / sts — stitch / stitches. A "stitch" is one loop of yarn on your needle.
- k — knit. With the yarn behind your work, insert the right needle into the front of the stitch from left to right, wrap the yarn around the needle, and pull it through, sliding the old stitch off. This makes a smooth, flat "V" on the front.
- p — purl. With the yarn in front of your work, insert the right needle into the front of the stitch from right to left, wrap the yarn, pull it through and slide the old stitch off. This makes a bumpy texture on the back.
- yo — yarn over. Wrap the yarn once around the right needle to create an extra loop (and a small hole). Used inside bobbles to add stitches.
- RS — right side. The "public" side of the fabric that faces out when the cushion is finished.
- WS — wrong side. The "inside" side of the fabric.
- BOB — bobble. A small raised bump made by working several stitches into one stitch, then closing them back into one. Full instructions are in the Stitch Guide below.
- stockinette stitch — the classic smooth fabric made by knitting every stitch on right-side rows and purling every stitch on wrong-side rows.
- cast on — the very first step: creating the starting row of loops on your needle.
- bind off — the last step of a piece: closing the loops so they cannot unravel.
- rep from * — repeat the instructions after the asterisk as many times as stated.
- mattress stitch — an invisible seaming technique that joins two edges with tiny horizontal stitches (explained in Assembly).
- block — to wet or steam a finished piece and pin it to the correct measurements so it dries flat and even.
Stitch Guide: How to Make a Bobble (BOB)
Work all of the following into the same single stitch: (k1, yo, k1, yo, k1) — you now have 5 stitches on your right needle from that one stitch. Turn your work. P5. Turn. K5. Turn. P5. Turn. Now slip the 2nd, 3rd, 4th and 5th stitches over the first stitch, one at a time, and knit the remaining stitch. One bobble made — you are back to a single stitch. Do not pull these tiny rows tight; loose bobbles sit up proudly.
Gauge
14 sts and 19 rows = 4 in / 10 cm in stockinette stitch, blocked.
Gauge simply means "how big your stitches are." If your stitches are bigger than the pattern's, your cushion will come out too large and you may run short of yarn; if smaller, it will be too small and the stuffing will strain the seams. To check, cast on about 24 stitches and knit a 5 in / 12 cm square in stockinette (knit one row, purl one row, repeat). Bind off, steam it flat, then lay a ruler across the middle and count how many stitches fit in 4 inches and how many rows fit in 4 inches. If you have more stitches than 14, go up a needle size; if fewer, go down. Always swatch before you begin — it takes 20 minutes and saves hours.
Beginner Tips Before You Start
- Use stitch markers at every stripe change. Place a marker on your needle at the start of each new colour row so you never lose track of which stripe you are in.
- Do not pull the yarn too tight when you change colours or work bobbles. Tight yarn makes the fabric stiff and the bobbles shrink into the surface. Keep your tension relaxed and even.
- Carry the unused colour loosely up the side edge. When you switch from navy to white, simply drop navy and pick up white at the beginning of the row; the navy strand travels up the side. Keep that carried strand a little slack so the edge does not pucker.
- Count your bobbles as you go. Each white stripe has a set number of bobbles (12 on the first bobble row, 11 on the second). Count them at the end of the row before moving on.
- Work bobbles on right-side rows only — they are always made on the knit side so they pop out toward the viewer.
- Keep a tally of rows. Write down each row number on a scrap of paper and tick it off. This pattern has long plain sections, and a tally keeps you honest.
Step-by-Step Instructions
All pieces are knitted flat in stockinette stitch (knit on RS rows, purl on WS rows). Change colour at the beginning of a row. Every white stripe carries a staggered grid of white bobbles on the right side; every navy stripe is plain.
Back Panel
With navy, cast on 84 sts.
Row 1 (WS): Purl. (84 sts)
Row 2 (RS): Knit. (84 sts)
Rows 3–10: Work in stockinette (knit RS rows, purl WS rows), ending with a WS row. (84 sts)
Stripe 1 — Navy (10 rows):
Rows 1–10: Stockinette in navy. (84 sts)
Stripe 2 — White with bobbles (10 rows):
Row 1 (RS): K3, *BOB, k6; rep from * to last 3 sts, k3. (84 sts; 12 bobbles)
Rows 2–4: Stockinette in white. (84 sts)
Row 5 (RS): K7, *BOB, k6; rep from * to last 5 sts, k5. (84 sts; 11 bobbles, staggered)
Rows 6–10: Stockinette in white. (84 sts)
Repeat Stripes 1 and 2 three more times (that is 8 stripes total, 80 rows), then work Stripe 1 (navy) once more — 90 rows total from the start of Stripe 1. Bind off all sts knitwise. (84 sts bound off)
Front Panel
Work exactly as for the Back Panel, from cast-on through bind-off. (84 sts bound off)
Side Gusset (make 2)
With navy, cast on 40 sts.
Rows 1–76: Work in stockinette, ending with a WS row (approximately 16 in / 40.5 cm). (40 sts)
Bind off. (40 sts bound off)
Bobble Fringe (make 2)
With navy, cast on 84 sts.
Row 1 (RS): Knit. (84 sts)
Row 2 (WS): Purl. (84 sts)
Row 3 (RS): K1, *BOB, k1; rep from * to end. (84 sts; 42 bobbles)
Row 4 (WS): Purl. (84 sts)
Bind off all sts knitwise. (84 sts bound off)
Assembly and Finishing
- Block all pieces to measurements. Lightly steam or spritz each piece, pin it flat to the sizes given (panels 24 x 16 in / 61 x 40.5 cm; gussets 16 x 8 in / 40.5 x 20 cm), and let it dry completely. This settles the bobbles and evens the stripes.
- Attach the gussets to the front panel. With right sides facing you, pin one long edge of a Side Gusset to a side edge of the Front Panel. Seam with mattress stitch: bring the needle under one horizontal bar of the edge stitch on one piece, then under the matching bar on the other piece, and pull gently — the seam closes invisibly. Repeat with the second gusset on the other side, then repeat both seams for the Back Panel.
- Close the top and bottom. Seam the short ends of the gussets to the top and bottom edges of the Front and Back Panels, leaving a 10 in / 25 cm opening along the bottom edge for stuffing.
- Add the fringe. Sew one Bobble Fringe strip along the top edge and one along the bottom edge of the cushion, with the bobbles facing outward. Use small, firm stitches so the fringe sits flat.
- Stuff the cushion firmly with polyester fiberfill or slide in a 24 x 16 x 8 in foam insert. Push stuffing into the corners first, then fill the middle until the cushion holds a crisp shape.
- Close the opening with mattress stitch, matching the seam to the others.
- Weave in all ends on the wrong side using the tapestry needle, running each end through several stitches before trimming. Steam lightly to settle the bobbles — do not press flat, or you will crush them.
Pro Tips and Variations
- Change the colours: Swap navy for forest green and white for cream for a woodland look, or try mustard and white for a sunny, retro feel. Keep one colour plain and one colour bobbled so the pattern stays crisp.
- Adjust the size: The pattern repeat is 10 rows and 84 stitches wide. To make a wider cushion, add stitches in multiples of 7 (the bobble repeat) and adjust the gusset depth to match; to make it taller, add extra Stripe 1 and Stripe 2 repeats.
- Substitute yarn: A bulky wool-blend or a super-bulky yarn held singly will work, but always re-check your gauge — bulky yarns vary a lot between brands. If you use super-bulky, go up a needle size and expect to use slightly less yardage.
- Make it a pouf: Skip the gussets and seam the front and back panels directly together around three sides, then stuff for a flatter, rounder floor pouf — perfect for a reading nook.


