Crater Stitch Crochet Cowl Free Pattern: Sunset Ombre Post-Stitch Rib
Introduction
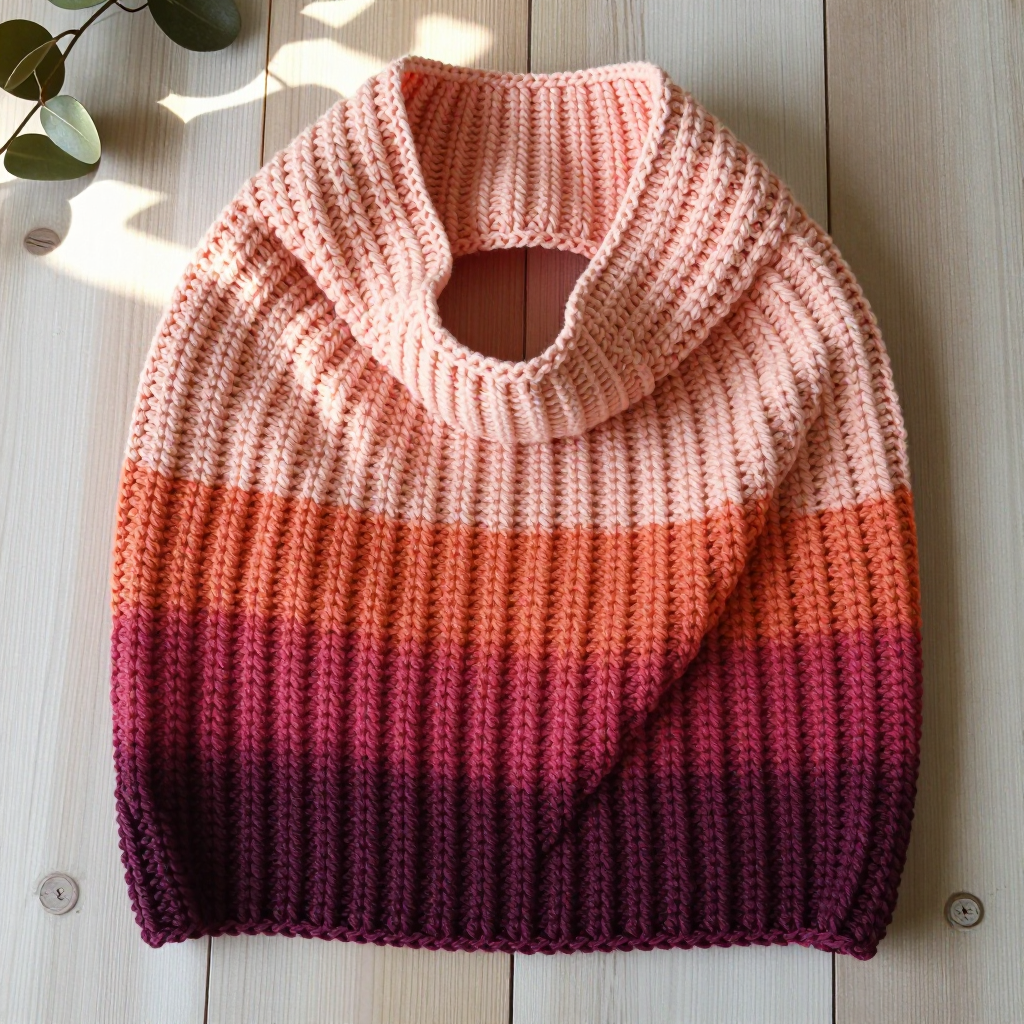
Welcome to the Crater Stitch Cowl — a sleek, space-age tube cowl that looks far more complicated than it actually is. This project is perfect for anyone who has crocheted a little before and wants to try something with gorgeous texture, but it is written so clearly that a brave complete beginner can absolutely make it too. The finished cowl is a soft, lightweight tube about 56 inches around and 9 inches tall, worn doubled around the neck like a cozy infinity scarf. The fabric is a raised post-stitch rib that creates pronounced vertical ridges — like the ridged inner wall of a crater — and the color flows in a continuous sunset gradient from deep plum at the bottom, up through magenta, coral, and apricot, to pale peach at the top. It feels smooth and matte in the hand, with a slight halo, and drapes beautifully.
Materials Needed
- Yarn: DK weight (category 3) yarn, approximately 380–420 yards (347–384 meters) total, worked as a continuous gradient from plum to peach. Suggested: one 400-yard gradient cake, OR five 80-yard mini skeins in plum, magenta, coral, apricot, and peach.
- Crochet hook: E/4 (3.5 mm), or whatever size you need to match the gauge below.
- Stitch markers: At least 2 — one to mark the first stitch of each round and one to mark your color-change point.
- Tapestry needle: A blunt-tipped needle with a large eye for weaving in ends.
- Scissors: Sharp craft scissors for cutting yarn.
- Measuring tape: For checking gauge and finished measurements.
- Steam iron and rust-proof pins: For light blocking at the end.
- Finished size: Circumference 56 inches (142 cm) unstretched; height 9 inches (23 cm).
Abbreviations and Beginner Glossary
- ch — chain. Make a loop of yarn on your hook, wrap the yarn over the hook, and pull it through the loop. That is one chain stitch.
- sc — single crochet. Insert your hook into the stitch, wrap yarn over the hook, pull up a loop (2 loops on hook), wrap yarn over again, and pull through both loops. One loop remains.
- hdc — half double crochet. Wrap yarn over the hook first, insert into the stitch, pull up a loop (3 loops on hook), wrap yarn over, and pull through all 3 loops at once.
- dc — double crochet. Wrap yarn over the hook, insert into the stitch, pull up a loop (3 loops on hook), wrap yarn over and pull through 2 loops, wrap yarn over and pull through the last 2 loops.
- FPdc — front post double crochet. Instead of inserting your hook into the top of the stitch, you insert it horizontally around the post (the vertical body) of the stitch from the front, pushing it out the back. Then work a normal double crochet. This pushes the stitch forward, creating a raised ridge.
- BPdc — back post double crochet. Same idea, but you insert your hook around the post of the stitch from the back, pushing it out the front, then work a normal double crochet. This pushes the stitch backward.
- sl st — slip stitch. Insert your hook into the stitch, wrap yarn over, and pull that loop straight through the loop on your hook. It joins without adding height.
- st(s) — stitch or stitches.
- Round — one complete trip around the tube. Because we work in a circle, we call each pass a "round" rather than a "row."
- Join — connect the last stitch of the round to the first with a slip stitch so the circle closes.
- Fasten off — cut the yarn a few inches from the work and pull the tail all the way through the last loop to lock it.
Gauge
20 stitches x 14 rounds = 4 inches (10 cm) in post-stitch rib worked in the round. Gauge is measured after light blocking.
Why gauge matters: Gauge is how big your stitches come out. If your stitches are bigger than the pattern's, your cowl will be wider and taller than 56 x 9 inches; if smaller, it will be tighter. Matching gauge means your finished cowl will fit and drape exactly as designed.
How to make a gauge swatch: With your chosen yarn and hook, ch 24. Work Round 1 as written below (dc in each ch), then work Round 2 (FPdc/BPdc rib) three times. Lay the swatch flat, gently steam it, and measure a 4-inch section. Count how many stitches across and how many rounds tall fit in 4 inches. If you have more stitches than 20, your stitches are too small — try a larger hook. If you have fewer, try a smaller hook. Repeat until it matches.
Beginner Tips Before You Start
- Count your starting chain twice. You need exactly 112 chains. If the chain twists when you join it into a ring, the whole cowl will twist — lay it flat on the table and make sure all the chains face the same way before joining.
- Use a stitch marker. Place one in the first stitch of each round so you always know where the round begins and ends. Place a second marker where you will change colors.
- Do not pull your yarn too tight. Post stitches need a little slack to wrap around the post comfortably. If your hook fights you, relax your tension.
- Change color only at the start of a round, never mid-round. Carry the old color loosely up the inside of the tube and pick it up again later — this means almost no ends to weave until the very end.
- Keep the right side facing out. The raised ridges should face you as you work. If you find yourself working on the inside of the tube, turn it right side out.
- Trust the two-stitch repeat. Every body round is the same simple FPdc, BPdc alternation. Once your fingers learn it, you can crochet almost without looking.
Step-by-Step Instructions
Setup
With Color A (plum), ch 112. Being careful not to twist the chain, join with a sl st to the first ch to form a ring. (112 ch)
Body
Round 1 (right side): Ch 2 (counts as first dc). Dc in each ch around. Join with a sl st to the top of the beginning ch 2. (112 dc)
Round 2: Ch 2 (counts as first dc). FPdc around the post of the next st, BPdc around the post of the next st. Repeat this two-stitch sequence around, ending with a BPdc. Join with a sl st to the top of the beginning ch 2. (112 sts: 56 FPdc, 56 BPdc)
Rounds 3–6: Repeat Round 2. At the end of Round 6, change to Color B (magenta). (112 sts)
Rounds 7–12: With Color B, repeat Round 2 six times. At the end of Round 12, change to Color C (coral). (112 sts)
Rounds 13–18: With Color C, repeat Round 2 six times. At the end of Round 18, change to Color D (apricot). (112 sts)
Rounds 19–24: With Color D, repeat Round 2 six times. At the end of Round 24, change to Color E (peach). (112 sts)
Rounds 25–30: With Color E, repeat Round 2 six times. Do not fasten off yet. (112 sts)
Top Edging
Round 31: Ch 1. Sc in each st around. Join with a sl st to the first sc. (112 sc)
Round 32: Ch 1. Sc in each st around. Join with a sl st to the first sc. Fasten off Color E. (112 sc)
Bottom Edging
Join Color A (plum) with a sl st to any stitch of the foundation chain edge, working along the opposite side of the starting chain.
Round 1: Ch 1. Sc in each ch around. Join with a sl st to the first sc. (112 sc)
Round 2: Ch 1. Sc in each st around. Join with a sl st to the first sc. Fasten off. (112 sc)
Assembly and Finishing
There is no seaming to do — this cowl is worked as one continuous tube, so assembly is all about tidying and shaping.
- Weave in ends: Thread each yarn tail onto your tapestry needle. Working on the wrong side (the inside of the tube), run the needle through the backs of several stitches in one direction, then reverse and run through a few more in the other direction. This locks the tail so it will not work loose. Trim the yarn close to the fabric.
- Blocking: Pin the cowl flat to the finished measurements (56 inches around, 9 inches tall) on a padded surface using rust-proof pins. Hold a steam iron about 2 inches above the fabric and let the steam penetrate — do not press the iron onto the stitches, or you will flatten the beautiful ridges. Let it dry completely before unpinning.
- Final check: After blocking, the post-stitch rib relaxes slightly and the gradient reads as one smooth plum-to-peach transition. Give the cowl a gentle shake, fold it in half, and it is ready to wear doubled around your neck.
Pro Tips and Variations
- Change the gradient: Swap the five colors for any ombre you love — ocean blues, forest greens, or a single solid shade for a minimalist look. Just keep each color band six rounds tall so the proportions stay balanced.
- Adjust the size: To make the cowl longer or shorter, add or remove chains in multiples of 2 (the rib repeat needs an even number). Every 20 chains adds roughly 4 inches of circumference. To change the height, add or remove full six-round color bands.
- Substitute yarn: A sport weight (category 2) yarn will give a finer, drapier cowl — swatch first and go down a hook size if needed. A worsted weight (category 4) will make a chunkier, warmer cowl; go up a hook size and check gauge carefully.
- Try a taller rib: For an even more dramatic crater texture, work the body in FPtreble/BPtreble (front and back post treble crochet) instead of double crochet. This uses more yarn, so buy an extra 50 yards.