Driftwood the Whale Crochet Plush Free Pattern – A Textured Ocean Companion
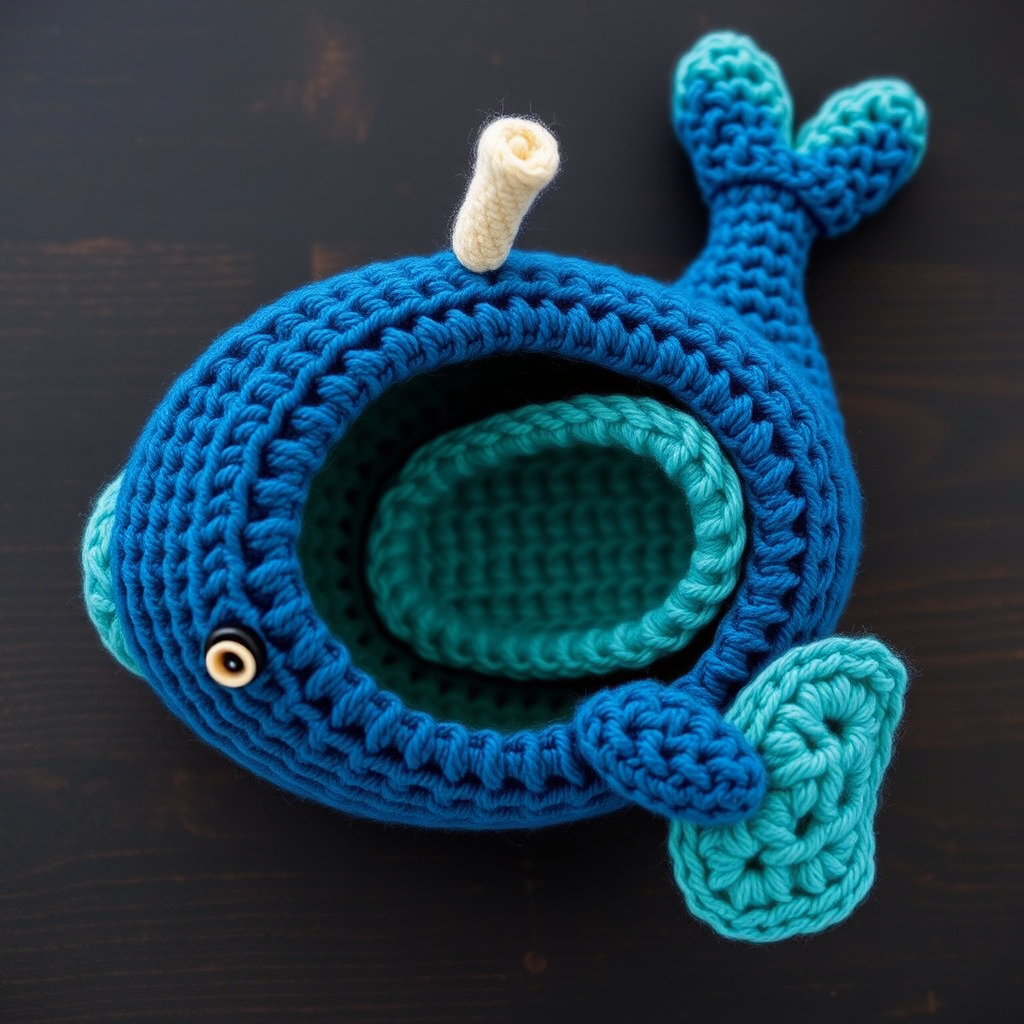
Driftwood the Whale Crochet Plush Free Pattern – A Textured Ocean Companion
Dive into the deep with Driftwood, a whimsical whale amigurumi featuring a rich tapestry of ocean-inspired stitches and a gentle, huggable form. This pattern guides you through creating a soft, textured companion that brings the calm of the sea into your home. Whether you're a seasoned crocheter or a brave beginner ready for a rewarding project, this pattern is designed to be clear, detailed, and utterly enjoyable. The result is a chubby, charming whale that makes a perfect gift, nursery decoration, or cozy friend for your sofa.
Materials Needed
Before you begin your journey into the deep, gather the following materials. Having everything ready will make the process smooth and enjoyable.
- Yarn: Worsted weight yarn in three colors:
- Deep Ocean Blue (main body) – approx. 150g
- Soft Teal (belly and fins) – approx. 80g
- Cream (eyes and spout) – approx. 20g
- Hook: 3.5mm crochet hook (or size needed to obtain gauge)
- Stuffing: Polyester fiberfill stuffing
- Notions: Yarn needle, stitch markers
- Eyes: Safety eyes (10mm) or black yarn for embroidered eyes
Gauge: 4 rounds x 4 rounds = 1 inch in single crochet. Note: Gauge is not critical for a plush toy, but maintaining consistent tension will ensure your whale is evenly shaped.
Abbreviations
Familiarize yourself with these standard crochet abbreviations before starting:
- MR: Magic ring
- sc: Single crochet
- inc: Increase (2 sc in same stitch)
- dec: Decrease (sc 2 together)
- sl st: Slip stitch
- ch: Chain
- st(s): Stitch(es)
- Rnd: Round
Step-by-Step Instructions
Body (Worked in Continuous Rounds, Starting from the Nose)
The body is worked in a spiral, starting from the nose and working towards the tail. Use a stitch marker to keep track of the beginning of each round.
- Rnd 1: With Deep Ocean Blue, make a MR, work 6 sc in the ring. (6 sts)
- Rnd 2: Inc in each st around. (12 sts)
- Rnd 3: (sc in next st, inc) around. (18 sts)
- Rnd 4: (sc in next 2 sts, inc) around. (24 sts)
- Rnd 5: (sc in next 3 sts, inc) around. (30 sts)
- Rnd 6: (sc in next 4 sts, inc) around. (36 sts)
- Rnd 7: (sc in next 5 sts, inc) around. (42 sts)
- Rnd 8: (sc in next 6 sts, inc) around. (48 sts)
- Rnd 9-15: Sc in each st around. (48 sts) – This forms the head and upper body. Work 7 rounds straight without increases.
- Rnd 16: (sc in next 6 sts, dec) around. (42 sts)
- Rnd 17: (sc in next 5 sts, dec) around. (36 sts)
- Rnd 18: (sc in next 4 sts, dec) around. (30 sts)
- Rnd 19: (sc in next 3 sts, dec) around. (24 sts)
- Rnd 20: (sc in next 2 sts, dec) around. (18 sts)
- Stuff firmly: Now is the time to stuff the body with fiberfill. Make sure to pack it well, especially in the nose area, to create a firm, huggable shape.
- Rnd 21: (sc in next st, dec) around. (12 sts)
- Rnd 22: Dec around. (6 sts)
- Fasten off: Cut the yarn, leaving a long tail. Weave the tail through the remaining 6 stitches and pull tight to close the hole. Weave in the end securely.
Belly (Worked Flat, Then Sewn onto Body)
The belly is a flat oval panel that will be attached to the front of the whale, providing a beautiful color contrast.
- With Soft Teal, ch 21.
- Row 1: Sc in the 2nd ch from the hook and across. (20 sts)
- Row 2-10: Ch 1, turn, sc in each st across. (20 sts) – Work 9 more rows, for a total of 10 rows.
- Fasten off: Leave a long tail (approx. 18 inches) for sewing.
Tail (Make 2 Pieces, Then Join)
The tail is made from two identical pieces that are crocheted together to form a fan shape.
Piece 1:
- With Deep Ocean Blue, MR, 6 sc in ring. (6 sts)
- Rnd 2: Inc in each st around. (12 sts)
- Rnd 3: (sc in next st, inc) around. (18 sts)
- Rnd 4-6: Sc in each st around. (18 sts) – Work 3 rounds straight.
- Fasten off: Leave a long tail for sewing.
Piece 2:
- Repeat as for Piece 1, but do not fasten off after Rnd 6.
- Joining: Place Piece 1 and Piece 2 together with right sides facing out (the wrong sides facing each other). Working through both layers, sc 18 sts across the edge to join them. This creates a flat, fan-shaped tail.
- Fasten off: Leave a long tail for sewing.
Dorsal Fin (Make 1)
This small triangular fin sits on top of the whale's back.
- With Deep Ocean Blue, MR, 6 sc in ring. (6 sts)
- Rnd 2: (sc in next st, inc) around. (9 sts)
- Rnd 3: (sc in next 2 sts, inc) around. (12 sts)
- Rnd 4-6: Sc in each st around. (12 sts) – Work 3 rounds straight.
- Fasten off: Leave a long tail for sewing.
Pectoral Fins (Make 2)
These small, rounded fins are attached to the sides of the whale.
- With Deep Ocean Blue, MR, 6 sc in ring. (6 sts)
- Rnd 2: (sc in next st, inc) around. (9 sts)
- Rnd 3: (sc in next 2 sts, inc) around. (12 sts)
- Rnd 4-7: Sc in each st around. (12 sts) – Work 4 rounds straight.
- Fasten off: Leave a long tail for sewing.
Spout (Make 1)
The spout is a small cream-colored cylinder on top of the head.
- With Cream, MR, 6 sc in ring. (6 sts)
- Rnd 2: (sc in next st, inc) around. (9 sts)
- Rnd 3-5: Sc in each st around. (9 sts) – Work 3 rounds straight.
- Fasten off: Leave a long tail for sewing.
Eyes (Make 2)
These cream circles provide a base for the safety eyes, giving the whale a gentle, friendly expression.
- With Cream, MR, 6 sc in ring. (6 sts)
- Rnd 2: Inc in each st around. (12 sts)
- Fasten off: Leave a long tail for sewing.
- Attach eyes: If using safety eyes, push them through the center of each cream circle. If embroidering, use black yarn to create a French knot or a few small stitches in the center.
Assembly
Now that all the pieces are complete, it's time to bring Driftwood to life. Take your time with the assembly to ensure a polished finish.
- Sew the belly: Position the belly panel on the front of the body, covering the lower half of the whale. The belly should sit centered, with the top edge roughly at the widest part of the body. Use the long tail and a whip stitch to sew around the entire edge of the belly, securing it firmly to the body.
- Sew the tail: Align the joined edge of the tail with the back end of the body. The tail should be centered vertically. Use the long tail to whip stitch the tail securely to the body, going through both layers of the tail and the body.
- Sew the dorsal fin: Position the dorsal fin on the top center of the body, about 2 inches from the tail. Sew it in place using the long tail, stitching around the base of the fin.
- Sew the pectoral fins: Position the pectoral fins on the sides of the body, just below the head area (roughly at the level of the belly's top edge). Sew each fin in place using its long tail, stitching around the base.
- Sew the spout: Position the spout on the top of the head, slightly off-center. Sew it in place using the long tail, stitching around the base.
- Sew the eyes: Position the eyes on the head, placing them about 1 inch apart and 1 inch from the nose. Sew each cream circle in place using its long tail, stitching around the edge. Ensure the safety eyes (if used) are facing forward.
- Weave in all ends: Use the yarn needle to weave in any remaining loose ends securely inside the whale.
Finishing
Your Driftwood the Whale is now complete! Gently shape the plush by squeezing and molding it to your liking. Fluff the yarn with your fingers to create a soft, inviting texture. Place your new ocean companion on a bed, shelf, or gift it to someone special. The textured single crochet stitches and the calming color palette make Driftwood a timeless piece that brings a touch of the sea's serenity into any space. Happy crocheting!



