Enchanted Aurora Ruffle Purse Free Pattern – Crochet a Shimmering Sashay Evening Bag
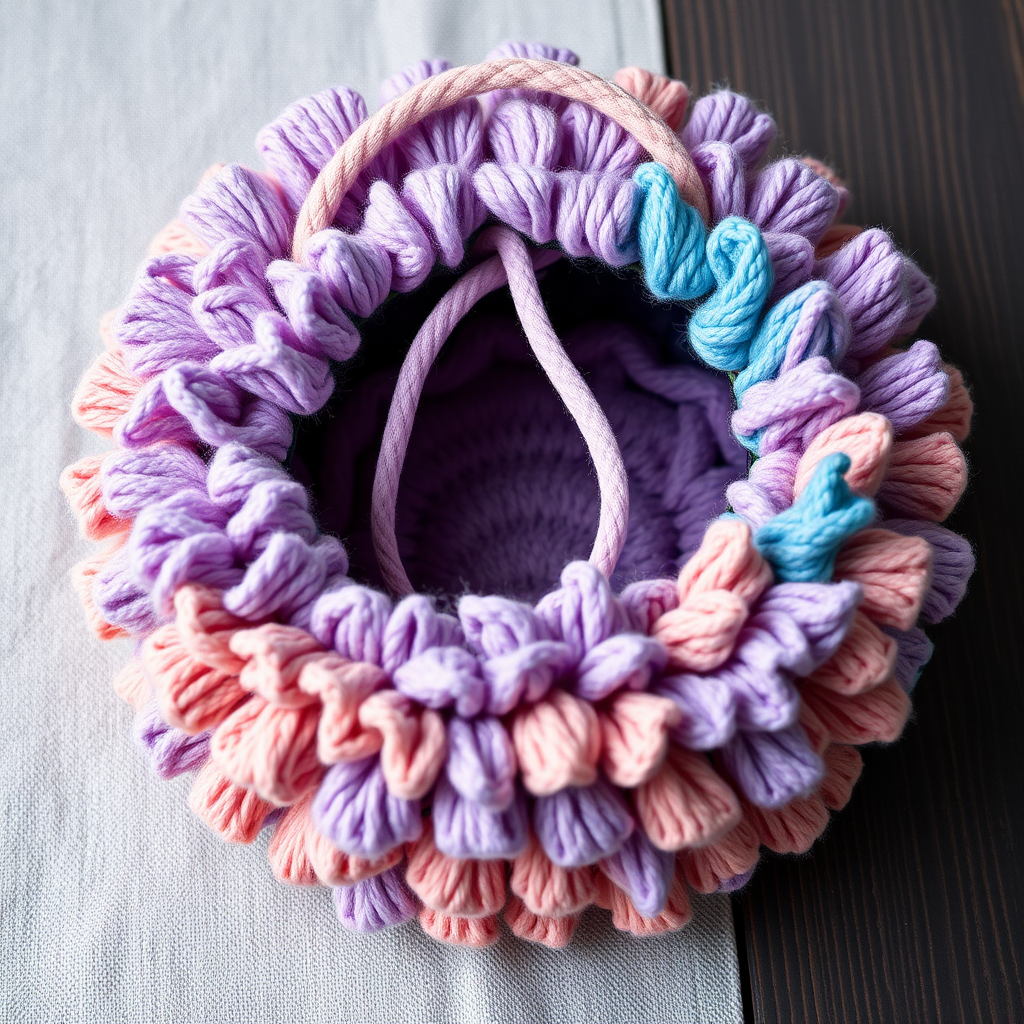
Enchanted Aurora Ruffle Purse Free Pattern – Crochet a Shimmering Sashay Evening Bag
Wrap your wrist in a cascade of celestial color with this dreamy sashay ruffle purse, crocheted from a single skein of gradient eyelash yarn. Its cloud-soft, feather-light texture and iridescent sheen make it the perfect statement accessory for twilight strolls and garden parties. This free crochet pattern is surprisingly beginner-friendly once you master the unique sashay technique—and the result looks like it came straight from a high-end boutique.
Why You'll Love This Sashay Ruffle Purse
Unlike traditional crochet, this pattern uses the innovative "sashay" method where you work through the mesh holes of eyelash yarn, creating a dense, luxurious ruffle fabric. The gradient colorway of lavender, rose gold, and deep teal shifts beautifully as you work, producing a mesmerizing celestial effect. Best of all, this entire project uses just one skein of yarn, making it an affordable and quick weekend project.
Materials Needed
Before you begin, gather the following supplies:
- Yarn: 1 skein (100g) of Red Heart Sashay or any eyelash/ruffle yarn in a gradient of lavender, rose gold, and deep teal (or your chosen colorway)
- Crochet Hook: Size 6.0 mm (J/10) crochet hook
- Tapestry Needle: For weaving in ends
- Optional Handle Yarn: Matching worsted-weight yarn or a doubled strand of sashay yarn
- Scissors
Gauge: 4 ruffle rows = 4 inches (10 cm) in width; 6 rows = 4 inches (10 cm) in height. Note: Gauge is flexible for this project, so don't stress about perfection—the ruffles hide minor variations!
Understanding the Sashay Technique
This pattern uses a unique technique where you crochet through the mesh holes of the eyelash yarn. The mesh side has small, evenly spaced holes that you'll use as your stitch foundation. As you work, the eyelash fringe naturally folds and ruffles, creating the gorgeous cloud-like texture. The key is to work loosely and consistently, letting the yarn do the magic.
Step-by-Step Instructions
Foundation Row
- Find the mesh edge of your sashay yarn (the side with small holes).
- Insert your hook into the first hole, yarn over, and pull up a loop.
- Chain 1 to secure.
- Work 30 single crochet (sc) stitches evenly across the mesh edge, placing one sc in each hole.
- Join with a slip stitch to the first sc. (30 sc)
Round 1: Increasing the Base
- Chain 1 (does not count as a stitch).
- Work 2 sc in each sc around.
- Join with a slip stitch to the first sc. (60 sc)
Round 2: Even Rounds
- Chain 1.
- Work 1 sc in each sc around.
- Join with a slip stitch. (60 sc)
Round 3: Second Increase
- Chain 1.
- *Work 2 sc in the next sc, 1 sc in the next 2 sc*; repeat from * to * around.
- Join with a slip stitch. (80 sc)
Round 4: Even Round
- Chain 1.
- Work 1 sc in each sc around.
- Join with a slip stitch. (80 sc)
Round 5: Third Increase
- Chain 1.
- *Work 2 sc in the next sc, 1 sc in the next 3 sc*; repeat from * to * around.
- Join with a slip stitch. (100 sc)
Rounds 6-12: Building the Body
- Chain 1.
- Work 1 sc in each sc around.
- Join with a slip stitch at the end of each round. (100 sc each round)
Pro Tip: Keep your tension consistent. The ruffles will naturally form as you work, so resist the urge to pull your stitches too tight.
Shaping the Top: Drawstring Casing
Round 13: Creating the Casing Spaces
- Chain 1.
- Work 1 sc in each of the next 10 sc.
- *Chain 5, skip 5 sc, work 1 sc in the next 10 sc*; repeat from * to * around.
- End with a chain 5, skip 5 sc, and slip stitch to the first sc.
- You will have 8 chain spaces around the top.
Round 14: Reinforcing the Casing
- Chain 1.
- Work 1 sc in each sc and 5 sc in each chain-5 space around.
- Join with a slip stitch. (100 sc)
Round 15: Final Edge
- Chain 1.
- Work 1 sc in each sc around.
- Join with a slip stitch.
- Fasten off and weave in ends with your tapestry needle.
Handle (Optional but Recommended)
- With a separate strand of matching worsted-weight yarn (or a doubled strand of sashay yarn), chain 80.
- Slip stitch into the first chain to form a loop.
- Attach the handle to the purse by threading it through the chain spaces of Round 13, or sew it securely to the inside top edge.
Alternative: For a more delicate look, create a twisted cord handle by twisting two strands of yarn together and attaching them to opposite sides of the bag.
Finishing Touches
- Weave in all loose ends with a tapestry needle.
- Gently steam block the purse to open up the ruffles, being careful not to flatten them.
- Allow to dry completely before use.
Tips for Perfecting Your Ruffle Purse
- Work in good lighting: The mesh holes can be tricky to see with dark or heavily textured yarn.
- Count your stitches: While gauge is flexible, maintaining the correct stitch count ensures your increases are evenly spaced.
- Don't over-block: Steam lightly and let the ruffles air-dry naturally to maintain their fluffy volume.
- Experiment with colorways: Try sunset oranges, ocean blues, or even a monochromatic metallic for different vibes.
Styling Your Enchanted Aurora Purse
This celestial accessory pairs beautifully with flowing maxi dresses, linen jumpsuits, or even a simple white tee and jeans for a boho-chic contrast. The iridescent shimmer catches the light at golden hour, making it perfect for outdoor concerts, garden weddings, or romantic dinner dates. Because it's feather-light, you'll forget you're carrying it—until someone asks where you found such a magical piece!
This pattern is a wonderful introduction to sashay yarn techniques and makes a thoughtful handmade gift. Once you've mastered the basics, you can experiment with different bag shapes, larger sizes, or even add beads and charms to the drawstring for extra sparkle.
Happy crocheting, and may your stitches always be blessed with a little celestial magic!


