Zine Star Messenger Tote Free Crochet Pattern
Zine Star Messenger Tote — Free Beginner Crochet Pattern
Introduction
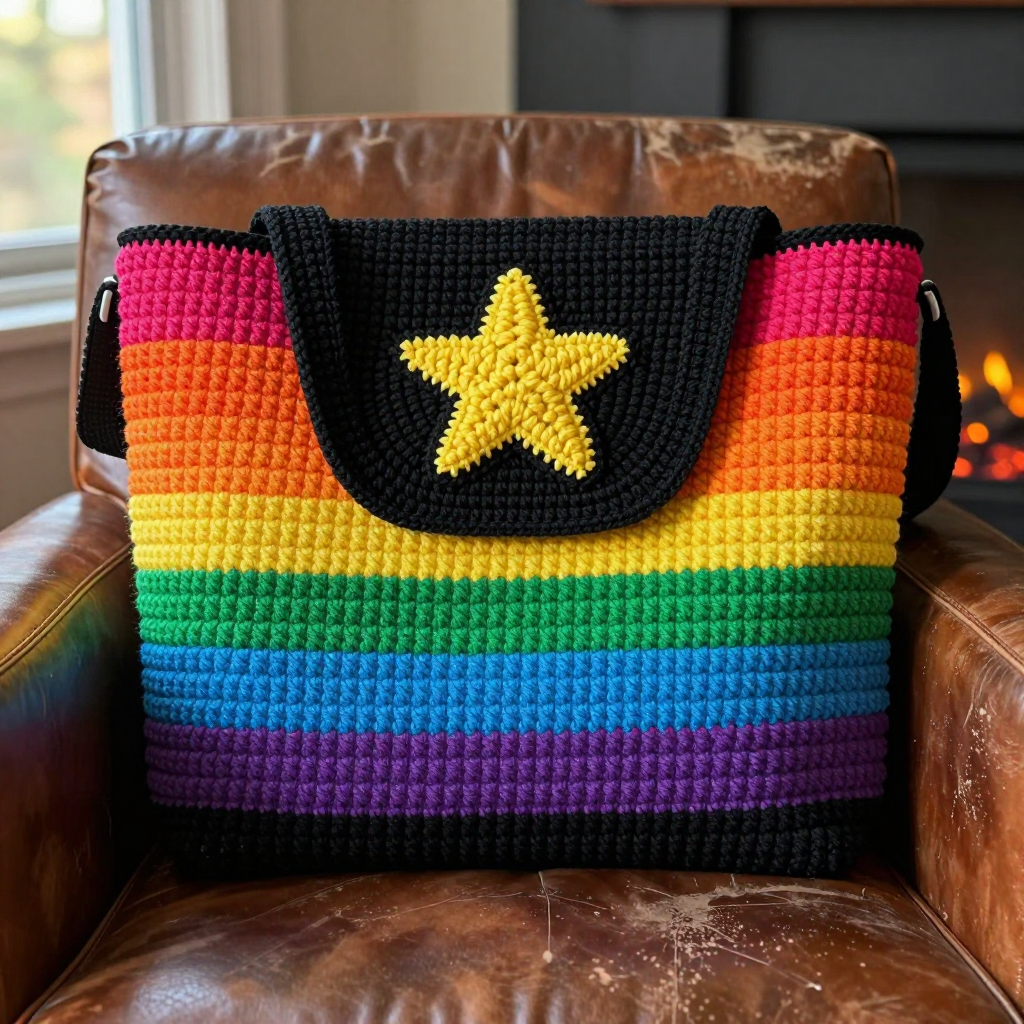
If you have never held a crochet hook before, this is the project that will make you fall in love with making things by hand. The Zine Star Messenger Tote is a flat, rectangular bag worked almost entirely in single crochet — the very first stitch most people learn — so you can build real confidence before you ever meet a tricky technique. It is perfect for absolute beginners, for anyone who wants a loud, scrappy, photocopied-zine kind of look, and for gift-making on a budget. The finished bag is about 34 cm wide and 27 cm tall, with a black flap that folds over the front and a big yellow five-point star appliqué outlined in black sitting right in the middle. Because it is worked in worsted-weight acrylic, it feels dense, sturdy, and slightly bumpy in the hand — the kind of bag that holds its shape and gets compliments at the coffee shop.
Materials Needed
- Yarn: Worsted weight (CYC category 4) acrylic yarn. You will need approximately 200 yards of hot magenta, 100 yards each of electric orange, sunshine yellow, acid green, cyan blue, and violet, and 150 yards of black for the flap, straps, edging, and seaming. One standard skein of each color is plenty.
- Crochet hook: 3.25 mm (US size D-3).
- Stitch markers: At least 4 (or use small safety pins or scrap yarn loops).
- Tapestry needle (yarn needle): A blunt-tipped needle with an eye big enough for worsted yarn, for seaming and weaving in ends.
- Scissors for cutting yarn.
- Optional: One button or snap for a closure, and sewing thread if you use a snap.
- Finished size: 34 cm wide x 27 cm tall (13.5 x 10.5 inches), with a 12 cm (4.75 inch) flap. Straps are 3.5 cm wide x 40 cm long (1.4 x 15.75 inches). Star is about 15 cm (6 inches) across.
Abbreviations and Beginner Glossary
- ch — chain. Make a loop of yarn on your hook, wrap yarn over the hook, and pull it through the loop. That is one chain. Chains are the foundation you build on.
- sc — single crochet. Insert your hook into the stitch, wrap yarn over the hook, pull up a loop (2 loops on hook), wrap yarn over again, pull through both loops. One loop remains. That is one single crochet.
- sl st — slip stitch. Insert hook into the stitch, wrap yarn over, and pull it through both the stitch and the loop on your hook at the same time. It makes a nearly invisible joining stitch.
- sc2tog — single crochet 2 together (a decrease). Insert hook into the first stitch, pull up a loop, insert hook into the next stitch, pull up a loop (3 loops on hook), wrap yarn over, pull through all 3 loops. Two stitches become one.
- dc — double crochet. Wrap yarn over hook first, insert into stitch, pull up a loop (3 loops on hook), wrap yarn over, pull through 2 loops, wrap yarn over, pull through last 2 loops.
- hdc — half double crochet. Wrap yarn over hook, insert into stitch, pull up a loop (3 loops on hook), wrap yarn over, pull through all 3 loops at once.
- st / sts — stitch / stitches.
- turn — flip your work over so you can work back across the row you just made.
- magic ring — an adjustable loop of yarn you crochet into, then pull tight so there is no hole in the center.
- fasten off — cut the yarn leaving a 6-inch tail, pull the tail all the way through the last loop, and tug gently to lock it.
- join with sl st — after working around a circle, slip stitch into the first stitch of that round to close the circle.
- whipstitch — a simple sewing stitch: bring the needle up through both layers, over the edge, and back up again, repeating around the shape.
Gauge
18 single crochet stitches x 20 rows = 4 x 4 inches (10 x 10 cm).
Gauge means how big your stitches come out. If your stitches are bigger than this, your bag will be floppy and oversized; if they are smaller, the bag will be stiff and too small for the star. To check, crochet a square about 5 inches wide in single crochet, then lay a ruler across the middle and count how many stitches fit in 4 inches. If you get more than 18, switch to a larger hook; if you get fewer, switch to a smaller hook. Do not skip this step — it takes 15 minutes and saves the whole project.
Beginner Tips Before You Start
- Count every row. Single crochet rows all look alike. Place a stitch marker in the first stitch of each row so you never lose your place.
- Do not pull the yarn tight. Tension should feel relaxed. If your hook squeaks or your hand aches, you are pulling too hard.
- Change colors on the last stitch of the row. Pull the new color through the final two loops of the last single crochet, then chain 1 with the new color. This hides the change neatly.
- Keep your turning chain small. One chain at the start of each row is all you need for single crochet. Do not count it as a stitch.
- Work in good light. Dark colors like black are hard to see. A bright lamp makes counting stitches much easier.
- Weave in ends as you go. Six colors means many tails. Thread each one onto your tapestry needle and weave it into the back of the work before starting the next stripe.
Step-by-Step Instructions
Bag Body (worked flat in one piece, then folded)
With hot magenta, ch 62.
Row 1: Sc in 2nd ch from hook and in each ch across. (61 sc)
Row 2: Ch 1, turn. Sc in each st across. (61 sc)
Rows 3–6: Repeat Row 2 in hot magenta. (61 sc; 6 rows total)
Rows 7–12: Change to electric orange. Repeat Row 2. (61 sc)
Rows 13–18: Change to sunshine yellow. Repeat Row 2. (61 sc)
Rows 19–24: Change to acid green. Repeat Row 2. (61 sc)
Rows 25–30: Change to cyan blue. Repeat Row 2. (61 sc)
Rows 31–36: Change to violet. Repeat Row 2. (61 sc)
Rows 37–42: Change to hot magenta. Repeat Row 2. (61 sc)
Rows 43–48: Change to electric orange. Repeat Row 2. (61 sc)
Rows 49–54: Change to sunshine yellow. Repeat Row 2. (61 sc)
Rows 55–60: Change to acid green. Repeat Row 2. (61 sc)
Rows 61–66: Change to cyan blue. Repeat Row 2. (61 sc)
Rows 67–72: Change to violet. Repeat Row 2. (61 sc)
Fasten off. The piece measures approximately 34 cm wide x 72 cm tall (13.5 x 28.5 inches). At 20 rows per 4 inches, 72 rows gives you roughly 14.4 inches of height, which folds in half to make the 27 cm bag body with the flap on top.
Flap
With black, join yarn at one short edge of the bag body (the top edge).
Row 1: Ch 1, sc in each st across. (61 sc)
Rows 2–16: Ch 1, turn. Sc in each st across. (61 sc)
Row 17: Ch 1, turn. Sc2tog, sc in each st across to last 2 sts, sc2tog. (59 sc)
Row 18: Ch 1, turn. Sc in each st across. (59 sc)
Row 19: Ch 1, turn. Sc2tog, sc in each st across to last 2 sts, sc2tog. (57 sc)
Row 20: Ch 1, turn. Sc in each st across. (57 sc)
Row 21: Ch 1, turn. Sc2tog, sc in each st across to last 2 sts, sc2tog. (55 sc)
Row 22: Ch 1, turn. Sc in each st across. (55 sc)
Row 23: Ch 1, turn. Sc2tog, sc in each st across to last 2 sts, sc2tog. (53 sc)
Row 24: Ch 1, turn. Sc in each st across. (53 sc)
Fasten off. The flap measures approximately 34 cm wide x 12 cm tall (13.5 x 4.75 inches).
Star Appliqué (make 1, worked in rounds)
With sunshine yellow, make a magic ring.
Round 1: Ch 1, 10 sc into ring, join with sl st to first sc. (10 sc)
Round 2: Ch 1, 2 sc in each st around, join with sl st. (20 sc)
Round 3: Ch 1, [sc in next 3 sts, 2 sc in next st] 5 times, join with sl st. (25 sc)
Round 4 (point 1): Ch 1, sc in next 5 sts, turn. Ch 1, sc2tog, sc in next st, sc2tog, turn. Ch 1, sc2tog, sc in next st, turn. Ch 1, sc2tog. Fasten off.
Points 2–5: Repeat Round 4 four more times, working each point into the next 5 unworked sts around the circle. (5 points total)
Weave in ends. The star measures approximately 15 cm (6 inches) across.
Star Outline (optional grunge detail)
With black, join yarn at any point tip. Work 1 round of sc evenly around the entire star outline, working 2 sc in each outer corner and 1 sc in each inner corner. Join with sl st. Fasten off.
Straps (make 2)
With black, ch 8.
Row 1: Sc in 2nd ch from hook and in each ch across. (7 sc)
Rows 2–40: Ch 1, turn. Sc in each st across. (7 sc)
Fasten off. Each strap measures approximately 3.5 cm wide x 40 cm long (1.4 x 15.75 inches).
Assembly and Finishing
Step 1 — Fold. Fold the bag body in half with right sides facing, aligning the 34 cm edges. The flap should extend over the front.
Step 2 — Seam the sides and bottom. Join black yarn at one side seam. Work sc evenly up the side seam, across the bottom, and down the other side seam to close the bag. Work through both layers with each stitch so the seam is strong. Fasten off.
Step 3 — Turn. Turn the bag right side out and push the corners out gently with your fingers.
Step 4 — Attach the star. Center the star appliqué on the flap, approximately 2.5 cm (1 inch) from the flap's lower edge. Pin in place. Using black yarn and a yarn needle, whipstitch the star to the flap around its outline. Keep your stitches small and even so the star lies flat.
Step 5 — Attach the straps. Position one strap end 5 cm (2 inches) from each side edge on the back of the bag, approximately 2.5 cm (1 inch) below the top edge. Pin. Using black yarn and a yarn needle, sew each strap end securely with a rectangular stitch pattern, then cross-stitch an X through the center for reinforcement. Repeat for the second strap on the front of the bag, positioning ends 5 cm from each side edge and 2.5 cm below the flap edge.
Step 6 — Weave in all ends. Thread every tail onto the tapestry needle and weave it back and forth through the inside of the work for about 2 inches, then trim close.
Step 7 — Block. Lightly mist the bag with water, shape it to the finished measurements on a towel, and let it dry flat overnight. Do not iron acrylic yarn — the heat will melt it.
Step 8 — Closure (optional). Add a button or snap closure at the center front of the flap and the corresponding position on the bag body if desired.
Pro Tips and Variations
- Change the rainbow. Swap the six stripe colors for any palette you love — pastels for a soft look, or black, white, and one neon for a sharper zine feel. Keep each stripe 6 rows tall so the finished size stays the same.
- Resize the bag. Add or remove 6-row stripes to make the bag taller or shorter. Each 6-row stripe adds about 3 cm (1.2 inches). If you change the width, start with a chain that is a multiple of 6 plus 2, and remember the flap and star will need adjusting too.
- Substitute the yarn. Cotton yarn gives a crisper, washable bag that holds its shape even better. Just check your gauge again, because cotton behaves differently from acrylic.
- Make the star pop. Work the star in a contrasting color like hot magenta or cyan blue instead of yellow, and skip the black outline for a cleaner graphic look — or double the outline for extra grunge.