Enchanted Fern Crochet Backpack Free Pattern
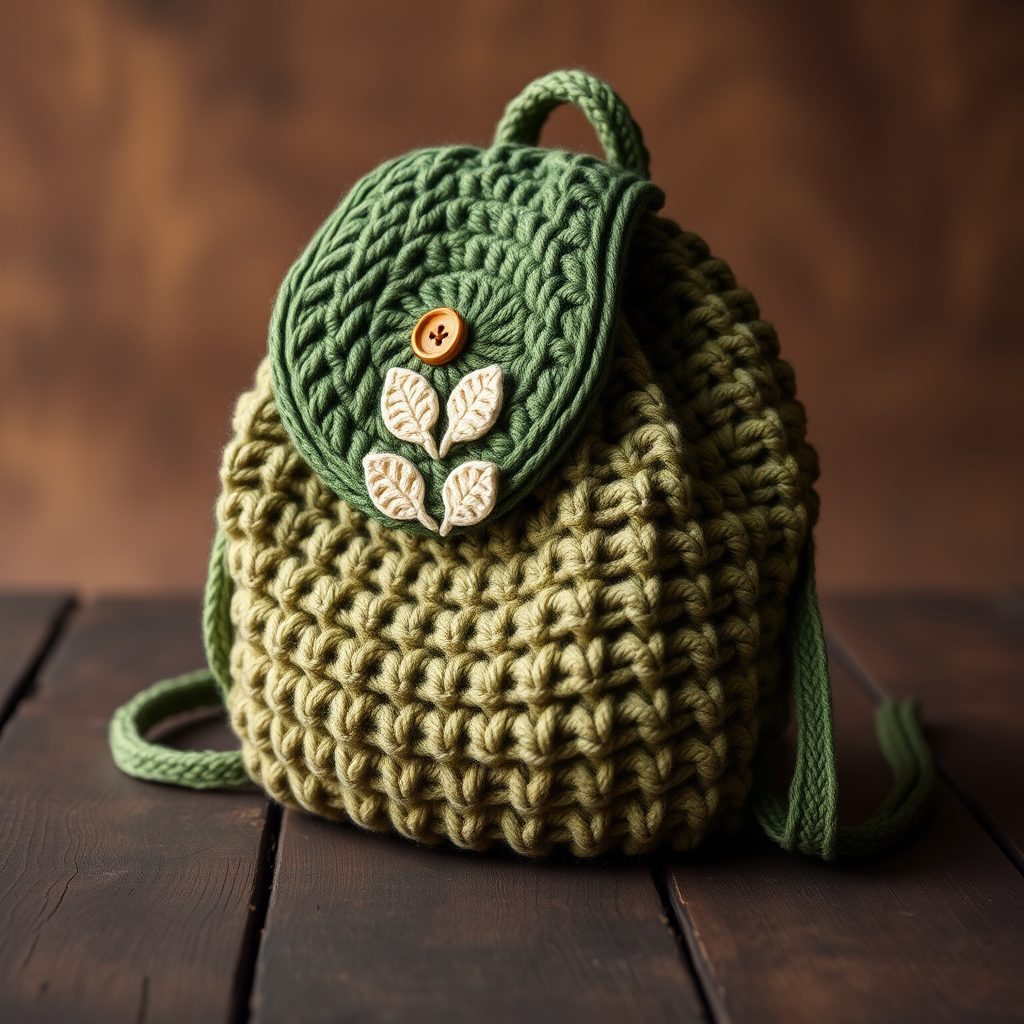
Carry a Piece of the Forest: The Enchanted Fern Crochet Backpack
Imagine a bag that feels like a walk through a sun-dappled forest—earthy, textured, and quietly beautiful. That's exactly what you'll create with the Enchanted Fern Crochet Backpack. This free pattern combines a unique, organic fern stitch with a classic, hands-free backpack silhouette, making it the perfect companion for farmers' market trips, nature hikes, or everyday errands. The rich moss green, forest green, and cream color palette, paired with a natural wooden button closure, gives this bag a boho, nature-inspired charm that you simply won't find in a store. Whether you're a seasoned crocheter looking for a new texture or a confident beginner ready for a rewarding project, this pattern is designed to guide you every step of the way. Let's get started on creating your new favorite handmade accessory.
Materials Needed: Gathering Your Forest Treasures
Before you begin, gather these supplies to ensure a smooth and enjoyable crocheting experience. The quality of your materials will directly impact the final look and durability of your backpack.
- Yarn: Worsted weight cotton yarn (e.g., Lion Brand 24/7 Cotton) in three colors:
- Moss Green (MC): Approximately 500g (about 5 skeins) – for the main body and straps.
- Forest Green (CC1): Approximately 200g (about 2 skeins) – for the flap and leaf motifs.
- Cream (CC2): Approximately 100g (about 1 skein) – for leaf embroidery details.
- Crochet Hook: 5.0 mm (H-8) crochet hook. This size is crucial for achieving the correct gauge and a sturdy fabric.
- Notions: Yarn needle for weaving in ends and sewing pieces together, stitch markers to keep track of rounds, and a large wooden button (about 1 inch in diameter) for the closure.
- Gauge: 16 single crochet (sc) x 18 rows = 4 x 4 inches (10 x 10 cm). Always check your gauge before starting to ensure your backpack turns out the right size. If your swatch is too small, try a larger hook; if it's too big, use a smaller hook.
Step-by-Step Instructions: Crafting Your Enchanted Backpack
This pattern is worked in continuous rounds from the bottom up, creating a seamless, sturdy bag. Take your time, count your stitches carefully, and you'll be amazed at what you create. Let's begin!
Part 1: The Backpack Body (Worked in the Round)
We'll start by creating a flat, circular base, then work upward in the beautiful fern stitch pattern.
Round 1: With MC, make a magic ring. Work 6 single crochet (sc) into the ring. Pull the tail to close the ring tightly. (6 stitches)
Round 2: Work 2 sc in each stitch around. (12 stitches)
Round 3: *Sc in the next stitch, 2 sc in the next stitch*; repeat from * to * around. (18 stitches)
Round 4: *Sc in the next 2 stitches, 2 sc in the next stitch*; repeat from * to * around. (24 stitches)
Round 5: *Sc in the next 3 stitches, 2 sc in the next stitch*; repeat from * to * around. (30 stitches)
Round 6: *Sc in the next 4 stitches, 2 sc in the next stitch*; repeat from * to * around. (36 stitches)
Round 7: *Sc in the next 5 stitches, 2 sc in the next stitch*; repeat from * to * around. (42 stitches)
Round 8: *Sc in the next 6 stitches, 2 sc in the next stitch*; repeat from * to * around. (48 stitches)
Round 9: *Sc in the next 7 stitches, 2 sc in the next stitch*; repeat from * to * around. (54 stitches)
Round 10: *Sc in the next 8 stitches, 2 sc in the next stitch*; repeat from * to * around. (60 stitches)
Round 11: *Sc in the next 9 stitches, 2 sc in the next stitch*; repeat from * to * around. (66 stitches)
Round 12: *Sc in the next 10 stitches, 2 sc in the next stitch*; repeat from * to * around. (72 stitches)
Your base is now complete and should be a flat circle. Now, we'll begin the magical fern stitch pattern that gives this bag its unique texture.
Round 13 (Fern Stitch Pattern): Ch 1. *Sc in the next stitch, double crochet (dc) in the next stitch*; repeat from * to * around. Join with a slip stitch (sl st) to the first sc. (72 stitches)
Round 14: Ch 1. *Dc in the next stitch, sc in the next stitch*; repeat from * to * around. Join with a sl st to the first dc. (72 stitches)
Rounds 15-30: Repeat Rounds 13 and 14 alternately. This means Round 15 is like Round 13, Round 16 is like Round 14, and so on. This alternating pattern creates the beautiful, textured fern effect. At the end of Round 30, do not fasten off. You will continue directly into shaping the top.
Part 2: Shaping the Top of the Backpack
Now we will gently taper the top of the bag to create a rounded, gathered opening. This is done by working decrease rounds (sc2tog) evenly spaced.
Round 31: Ch 1, sc in each stitch around, join with a sl st. (72 stitches)
Round 32: Ch 1, *sc in the next 10 stitches, sc2tog (single crochet 2 together)*; repeat from * to * around, join. (66 stitches)
Round 33: Ch 1, sc in each stitch around, join. (66 stitches)
Round 34: Ch 1, *sc in the next 9 stitches, sc2tog*; repeat from * to * around, join. (60 stitches)
Round 35: Ch 1, sc in each stitch around, join. (60 stitches)
Round 36: Ch 1, *sc in the next 8 stitches, sc2tog*; repeat from * to * around, join. (54 stitches)
Round 37: Ch 1, sc in each stitch around, join. (54 stitches)
Round 38: Ch 1, *sc in the next 7 stitches, sc2tog*; repeat from * to * around, join. (48 stitches)
Round 39: Ch 1, sc in each stitch around, join. (48 stitches)
Round 40: Ch 1, *sc in the next 6 stitches, sc2tog*; repeat from * to * around, join. (42 stitches)
Round 41: Ch 1, sc in each stitch around, join. (42 stitches)
Round 42: Ch 1, *sc in the next 5 stitches, sc2tog*; repeat from * to * around, join. (36 stitches)
Round 43: Ch 1, sc in each stitch around, join. (36 stitches)
Round 44: Ch 1, *sc in the next 4 stitches, sc2tog*; repeat from * to * around, join. (30 stitches)
Round 45: Ch 1, sc in each stitch around, join. (30 stitches)
Round 46: Ch 1, *sc in the next 3 stitches, sc2tog*; repeat from * to * around, join. (24 stitches)
Round 47: Ch 1, sc in each stitch around, join. (24 stitches)
Round 48: Ch 1, *sc in the next 2 stitches, sc2tog*; repeat from * to * around, join. (18 stitches)
Round 49: Ch 1, sc in each stitch around, join. (18 stitches)
Round 50: Ch 1, *sc in the next stitch, sc2tog*; repeat from * to * around, join. (12 stitches)
Round 51: Ch 1, sc2tog around. (6 stitches)
Fasten off, leaving a long tail (about 12 inches). Thread the tail onto your yarn needle and weave it through the front loops of the remaining 6 stitches. Pull tight to close the opening completely, then secure the yarn and weave in the end.
Part 3: Creating the Straps, Flap, and Leaf Motifs
With the main body complete, it's time to create the functional and decorative pieces.
Straps (Make 2):
With MC, chain (ch) 100. Row 1: Sc in the 2nd ch from the hook and in each ch across. (99 stitches) Fasten off and weave in the ends. These long, sturdy straps will be sewn onto the back of the bag.
Flap:
With MC, ch 26. Row 1: Sc in the 2nd ch from the hook and in each ch across. (25 stitches) Turn.
Rows 2-10: Ch 1, sc in each stitch across. (25 stitches) Turn. At the end of Row 10, fasten off, leaving a long tail for sewing. This creates a simple, rectangular flap that will fold over the top of the bag.
Leaf Motif (Make 2):
With CC1 (Forest Green), ch 10. Row 1: Sc in the 2nd ch from the hook, hdc (half double crochet) in the next ch, dc in the next 2 ch, tr (treble crochet) in the next 2 ch, dc in the next 2 ch, hdc in the next ch, sc in the last ch. Fasten off, leaving a long tail for sewing. This creates a lovely, elongated leaf shape.
Part 4: Assembly and Finishing Touches
Now for the exciting part—bringing all the pieces together to create your finished backpack.
- Attach the Flap: Position the flap on the back of the backpack, centered over the top opening. The bottom edge of the flap should align with the top edge of the bag's back. Using the long tail, sew the flap securely to the bag with a whip stitch or mattress stitch. Weave in the end.
- Attach the Button and Loop: Sew the wooden button onto the front of the backpack, centered, about 2 inches below the edge of the flap. To create a button loop, use MC yarn to crochet a small chain (about 8-10 chains) and secure it to the center of the flap's front edge. Fold the flap over and check that the loop fits snugly over the button. Adjust the chain length if needed.
- Attach the Straps: Place the backpack flat with the back facing you. Position one strap on each side, about 2 inches from the top edge of the bag and 3 inches apart from each other. Using a yarn needle and MC yarn, sew the ends of the straps securely to the inside or outside of the bag. Make sure they are firmly attached to support the weight of the bag's contents.
- Add the Leaf Motifs: Sew the two leaf motifs onto the flap, positioning them on either side of the button loop. Use CC2 (Cream) yarn to add small, simple embroidery stitches down the center of each leaf to create the look of veins. This adds a beautiful, delicate detail.
Finishing: The Final Flourish
Weave in all remaining ends with your yarn needle. To give your backpack a professional, polished shape, lightly block it. You can do this by gently misting the bag with water and shaping it with your hands, then allowing it to dry completely. This helps the fern stitch pattern to relax and lay beautifully.
Congratulations! You've just created your very own Enchanted Fern Crochet Backpack. This unique, nature-inspired bag is not only a stylish accessory but a testament to your creativity and skill. Carry it with pride, knowing you've crafted something truly special with your own two hands. Happy crocheting!


