Enchanted Meadow Bunny Free Pattern – A Crocheted Garden Guardian
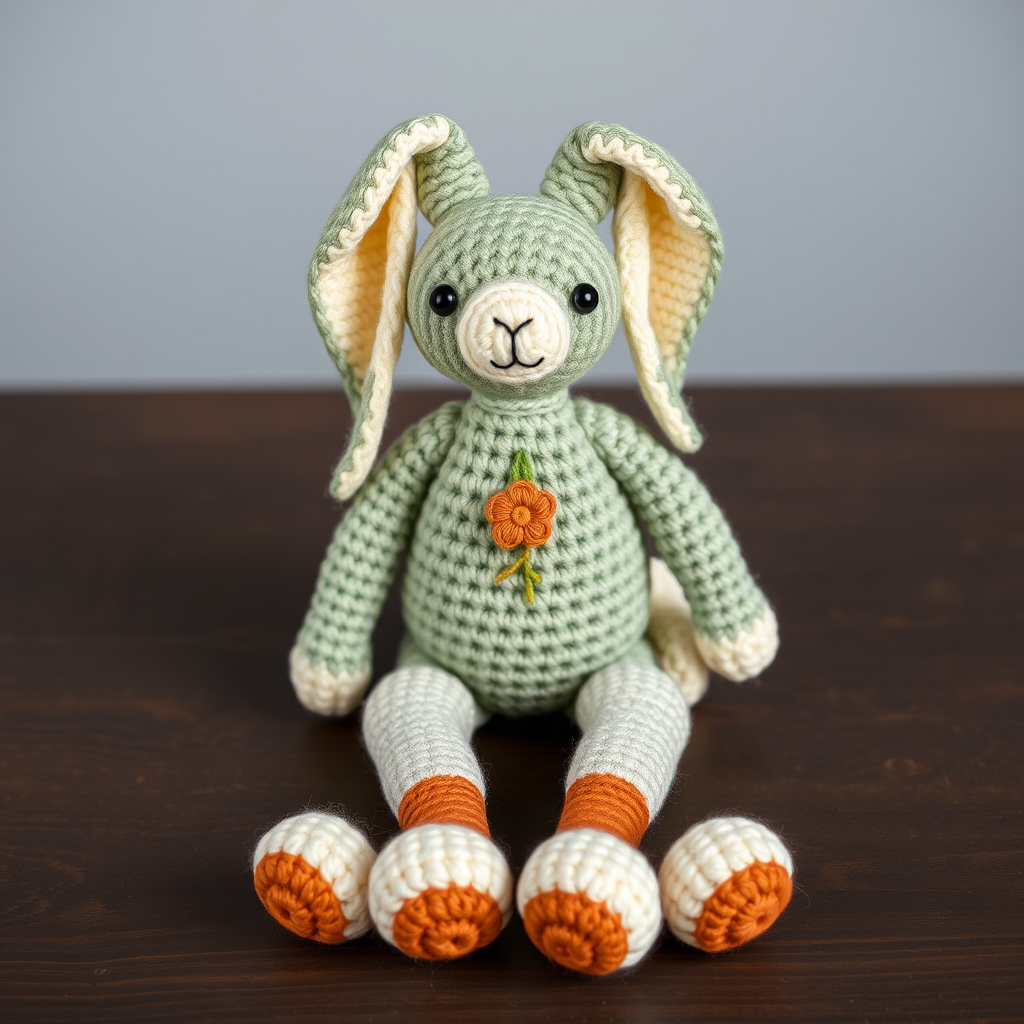
Enchanted Meadow Bunny Free Pattern – A Crocheted Garden Guardian
Welcome to a world of woodland whimsy! Today, we're crafting the Enchanted Meadow Bunny, a charming amigurumi guardian designed to bring a touch of rustic magic to your home or garden. This pattern is perfect for beginners and seasoned crocheters alike, featuring simple single crochet stitches, easy increases and decreases, and a delightful embroidery detail that gives this bunny its heirloom character.
With its earthy palette of sage green, cream, terracotta, and dusty rose, this little guardian sits upright with long, floppy ears and a delicate floral emblem on its chest. Whether perched on a shelf, nestled among potted plants, or gifted as a handmade treasure, this bunny is sure to become a beloved keepsake. Let's gather our materials and bring this garden guardian to life!
Materials Needed
Before we begin, ensure you have all the necessary supplies. This project uses simple, accessible materials:
- Yarn: Worsted weight cotton yarn in the following colors:
- Sage Green (for the body)
- Cream (for the head, ears, arms, and tail)
- Terracotta (for the legs and flower center)
- Dusty Rose (for the embroidered flower)
- Hook: 3.5mm crochet hook (or size needed to achieve a tight, firm fabric)
- Stitch Marker (to track your rounds)
- Yarn Needle (for sewing pieces together and weaving in ends)
- Polyester Fiberfill (for stuffing)
- Scissors
Note on Gauge: Gauge is not critical for amigurumi, but maintaining consistent tension throughout is key to preventing stuffing from showing through. Aim for a firm, even stitch.
Step-by-Step Instructions
This pattern is worked in continuous spirals unless otherwise noted. Always use a stitch marker to track the beginning of each round. Let's start with the head.
Head (Cream Yarn)
- R1: Create a magic ring, work 6 single crochet (sc) into the ring. (6 stitches)
- R2: Increase (inc) in each stitch around. (12 stitches)
- R3: (Sc in next stitch, inc) repeat around. (18 stitches)
- R4: (Sc in next 2 stitches, inc) repeat around. (24 stitches)
- R5: (Sc in next 3 stitches, inc) repeat around. (30 stitches)
- R6-10: Sc in each stitch around for 5 rounds. (30 stitches)
- R11: (Sc in next 3 stitches, decrease (dec)) repeat around. (24 stitches)
- R12: (Sc in next 2 stitches, dec) repeat around. (18 stitches)
- R13: (Sc in next stitch, dec) repeat around. (12 stitches)
- Stuff the head firmly with fiberfill, shaping it as you go.
- R14: Decrease around until the opening closes. (6 stitches)
- Fasten off, leaving a long tail for sewing. Set aside.
Ears (Make 2 – Cream Yarn)
- R1: Magic ring, 6 sc. (6 stitches)
- R2: (Sc in next stitch, inc) repeat around. (9 stitches)
- R3-8: Sc in each stitch around for 6 rounds. (9 stitches)
- R9: (Sc in next stitch, dec) repeat around. (6 stitches)
- Fasten off, leaving a long tail. Do not stuff. Flatten the ear and sew the bottom edge closed to create a neat base.
Body (Sage Green Yarn)
- R1: Magic ring, 6 sc. (6 stitches)
- R2: Inc in each stitch around. (12 stitches)
- R3: (Sc in next stitch, inc) repeat around. (18 stitches)
- R4: (Sc in next 2 stitches, inc) repeat around. (24 stitches)
- R5-8: Sc in each stitch around for 4 rounds. (24 stitches)
- R9: (Sc in next 2 stitches, dec) repeat around. (18 stitches)
- R10: (Sc in next stitch, dec) repeat around. (12 stitches)
- Stuff the body firmly with fiberfill.
- R11: Decrease around until the opening closes. (6 stitches)
- Fasten off, leaving a long tail for sewing.
Arms (Make 2 – Cream Yarn)
- R1: Magic ring, 6 sc. (6 stitches)
- R2-5: Sc in each stitch around for 4 rounds. (6 stitches)
- Fasten off, leaving a long tail. Do not stuff. Fold the arm flat for sewing.
Legs (Make 2 – Terracotta Yarn)
- R1: Magic ring, 6 sc. (6 stitches)
- R2: (Sc in next stitch, inc) repeat around. (9 stitches)
- R3-4: Sc in each stitch around for 2 rounds. (9 stitches)
- Fasten off, leaving a long tail. Stuff lightly to give the legs shape.
Tail (Cream Yarn)
- R1: Magic ring, 6 sc. (6 stitches)
- R2: Inc in each stitch around. (12 stitches)
- R3: Sc in each stitch around. (12 stitches)
- R4: Dec around. (6 stitches)
- Fasten off, leaving a long tail. Stuff lightly to create a fluffy puff.
Assembly
Now that all pieces are complete, it's time to bring your bunny together. Use the long tails left on each piece and a yarn needle for sewing.
- Head to Body: Align the head over the body, matching the decreases. Whipstitch securely around the neck opening, ensuring the head is centered and sits upright.
- Ears: Position the ears on the top of the head, approximately 4 stitches apart. Fold each ear slightly to create a natural, floppy curve before sewing. Attach them securely with a few hidden stitches.
- Arms: Sew the arms to the sides of the body, just below the neck seam. Position them so they hang naturally at the bunny's sides.
- Legs: Attach the legs to the bottom front of the body. This placement allows the bunny to sit upright stably. Sew them on firmly.
- Tail: Sew the tail to the back bottom of the body, opposite the legs, so it peeks out from behind.
Embroidered Details
This is where your bunny gains its unique, heirloom charm. Using the dusty rose and terracotta yarn, we'll add a delicate flower to the chest.
- The Flower: Using the dusty rose yarn, thread your needle. Make 5 straight stitches radiating from a single center point on the bunny's chest. This creates a simple, five-petal flower.
- The Center: Switch to the terracotta yarn. Create a French knot in the center of the flower by wrapping the yarn around the needle twice and pulling it through the fabric.
- The Leaves: Using the sage green yarn, add two or three small straight stitches on either side of the flower to represent tiny leaves.
Finishing Touches
Your Enchanted Meadow Bunny is almost complete! Follow these final steps to ensure a polished, professional finish.
- Weave in Ends: Carefully weave in all remaining yarn tails using your yarn needle. Trim any excess.
- Optional Charm: For an extra touch of magic, tie a small ribbon around the bunny's neck or attach a tiny jingle bell. This adds a lovely sensory detail.
- Final Shaping: Gently manipulate the bunny's ears and limbs to ensure they sit exactly as you like. Give it a final fluff!
Congratulations! You've created your very own Enchanted Meadow Bunny. This little guardian is ready to watch over your garden, brighten a bookshelf, or become a cherished handmade gift. Enjoy your beautiful, rustic creation!



