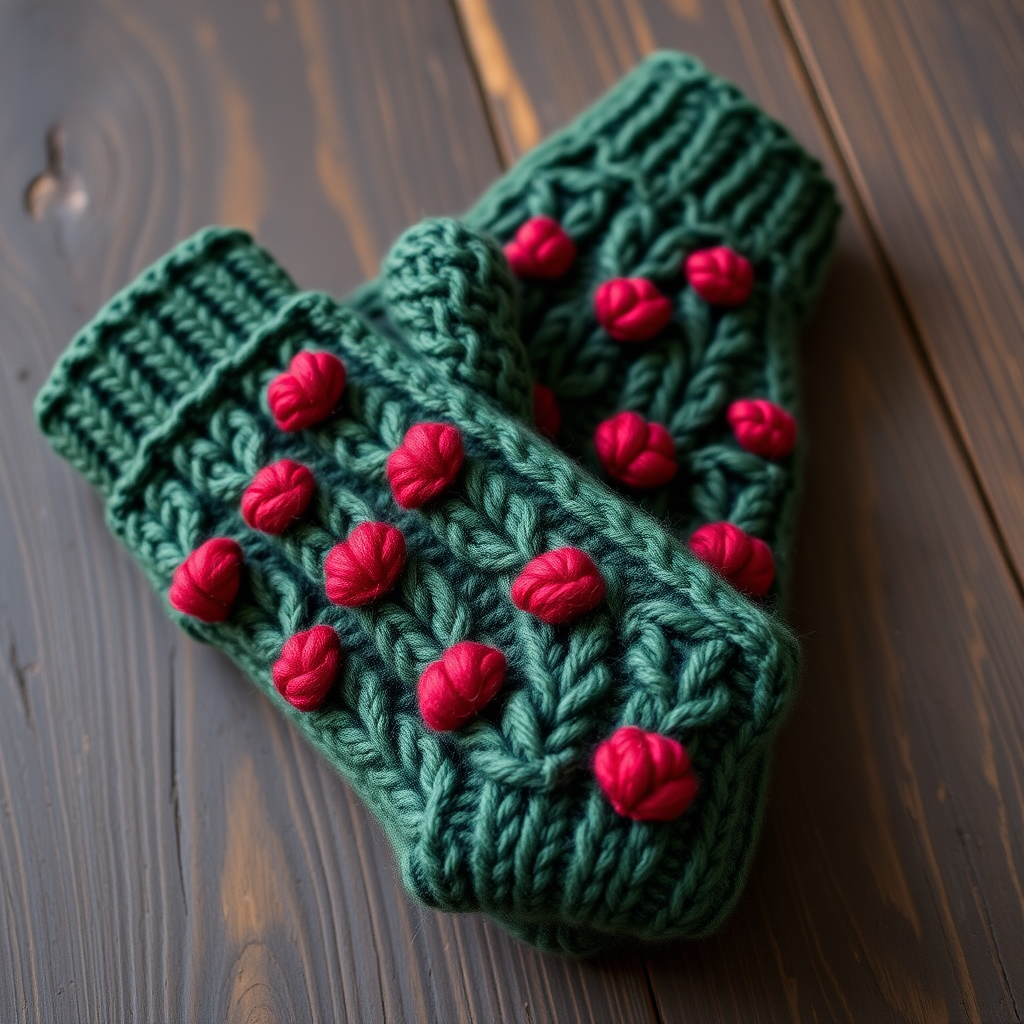
Frosted Berry Bramble Mittens Free Knitting Pattern

Frosted Berry Bramble Mittens: A Cozy Knitting Pattern for Beginners
Wrap your hands in the cozy luxury of bramble stitch and a touch of delicate lace, inspired by the last wild berries of autumn. These mittens are a quick, satisfying knit that feels like a warm hug on a chilly day. The rich, textured bramble stitch creates a beautiful, bumpy, berry-like pattern across the hand, while the optional cream lace edge adds a touch of feminine elegance. Perfect for beginners looking to expand their skills, this pattern uses simple knit and purl stitches with a few clever increases to create a stunning, wearable result.
Whether you're a seasoned knitter or just starting your journey, these mittens are an ideal project. They work up quickly in worsted weight yarn, making them a fantastic weekend project or a heartfelt handmade gift. The deep burgundy and soft cream color combination evokes frosty autumn mornings and cozy evenings by the fire. Let's dive into this delightful pattern and create something beautiful for your hands.
Materials Needed
Before you begin, gather all your materials. Having everything ready will make your knitting experience smooth and enjoyable. Here's what you'll need:
Yarn
- Main Color (MC): Worsted weight yarn, approximately 180 yards. A deep burgundy like "Cranberry" works beautifully.
- Contrast Color (CC): Worsted weight yarn, approximately 50 yards. A soft cream like "Vanilla" adds a lovely accent.
Needles & Notions
- US 6 (4.0 mm) double-pointed needles (or a circular needle for the magic loop method)
- Stitch markers (at least 4)
- Tapestry needle for weaving in ends
- Stitch holder or waste yarn for the thumb stitches
- Scissors
Gauge
20 stitches and 28 rows = 4 inches in stockinette stitch (knit one row, purl one row) after blocking. Getting the correct gauge is crucial for a proper fit, so take a moment to knit a swatch before starting.
Step-by-Step Instructions
This pattern is written for a Women's Medium (fits 7-8 inch hand circumference). To adjust the size, add or subtract stitches in multiples of 4 (the bramble repeat) and adjust the thumb placement accordingly. Let's get started!
Abbreviations
- k = knit
- p = purl
- k2tog = knit two together (decrease)
- yo = yarn over (increase)
- sl1 = slip one stitch purlwise
- psso = pass slipped stitch over
- pm = place marker
- slm = slip marker
- rm = remove marker
- M1 = make one (increase)
- MC = Main Color
- CC = Contrast Color
Special Stitches
Bramble Stitch (worked over 4 stitches):
- Row 1 (RS): *k1, p1, k1 into the same stitch (this increases 2 stitches), p3tog* repeat to end.
- Row 2 (WS): Purl all stitches.
- Row 3 (RS): *p3tog, k1, p1, k1 into same stitch* repeat to end.
- Row 4 (WS): Purl all stitches.
Mitten (Make 2)
Cuff
- With MC, cast on 40 stitches. Distribute them evenly on 4 double-pointed needles (10 stitches per needle). Join in the round, being very careful not to twist your stitches.
- Work in K2, P2 ribbing for 2 inches. This creates a snug, stretchy cuff that will keep the cold out.
Hand (Worked in the Round)
Now we'll begin the beautiful bramble stitch pattern. Follow these rounds carefully:
- Round 1: Knit all stitches.
- Round 2: Purl all stitches.
- Round 3: *Work Bramble Stitch over the next 4 stitches* repeat to end of round (you'll have 10 repeats).
- Round 4: Purl all stitches.
- Round 5: Knit all stitches.
- Round 6: Purl all stitches.
- Repeat Rounds 3-6 until the piece measures 3.5 inches from the cast-on edge, ending with a Round 6 (a purl round).
Thumb Gusset
The thumb gusset adds extra stitches to create room for your thumb. Pay close attention to the marker placement here.
- Next Round: Work in the established pattern (bramble or plain, depending on where you are in the sequence) across the first 20 stitches, place marker (pm), M1 (make one), k1, M1, place marker (pm), work to end of round. You've now increased 2 stitches (total 42 stitches).
- Next Round: Work in pattern, slipping the markers as you come to them. Do not increase this round.
- Increase Round: Work to the first marker, slip marker (slm), M1, knit to the second marker, M1, slm, work to end of round. (2 stitches increased)
- Repeat this increase round every 3rd round until you have 13 stitches between the markers. (Total stitches will be 52).
- Work even in pattern (without increasing) until the thumb gusset measures 1.5 inches from the last increase.
Separate Thumb
- Next Round: Work to the first marker, remove marker (rm), place the next 13 stitches onto a stitch holder or waste yarn for the thumb, rm, cast on 1 stitch (this bridges the gap), work to end of round. You now have 40 stitches back on your needles for the hand.
- Continue working in the round on these hand stitches until the mitten measures 2 inches from the thumb separation, ending with a Round 6 (purl round).
Top Decreases
Now we'll shape the top of the mitten. This creates a gentle, rounded curve.
- Round 1: *Work Bramble Stitch over the next 4 stitches, k2tog* repeat to end of round. (You'll have 30 stitches)
- Round 2: Purl all stitches.
- Round 3: *K2tog* repeat to end of round. (15 stitches)
- Round 4: Purl all stitches.
- Round 5: *K2tog* repeat to the last stitch, k1. (8 stitches)
- Cut the yarn, leaving a 6-inch tail. Thread the tail through a tapestry needle, pass it through the remaining 8 stitches, pull tight to close the top, and secure the yarn inside the mitten.
Thumb
- Transfer the 13 thumb stitches from the holder back onto your double-pointed needles.
- With MC, pick up and knit 1 stitch from the cast-on edge at the base of the thumb. (You'll now have 14 stitches).
- Knit in the round for 1.5 inches, or until the thumb covers your thumb comfortably.
- Decrease Round: *K2tog* repeat to end of round. (7 stitches)
- Cut the yarn, thread it through the remaining stitches, pull tight, and secure the end inside the thumb.
Finishing
- Weave in all loose ends using your tapestry needle. Be sure to weave them in securely so they don't come undone with wear.
- Block the mittens lightly. This helps even out the bramble stitch and gives a professional finish.
Lace Edge (Optional, with CC)
This delicate lace edge adds a beautiful, feminine touch to the cuffs. It's a simple two-row repeat that creates a lovely scalloped effect.
- With CC, pick up and knit 40 stitches along the cast-on edge of the cuff.
- Row 1: *Yo, k2tog* repeat to end of row.
- Row 2: Knit all stitches.
- Bind off loosely. Weave in the ends.
Repeat the entire process to make the second mitten. Once both are complete, you'll have a beautiful pair of Frosted Berry Bramble Mittens to keep your hands warm and stylish all winter long. The rich texture and elegant lace edge make these mittens a true handmade treasure. Happy knitting!