Granny Galaxy Runner: Free Crochet Hexagon Table Runner Pattern
Granny Galaxy Runner: A Rainbow Hexagon Table Runner for Total Beginners
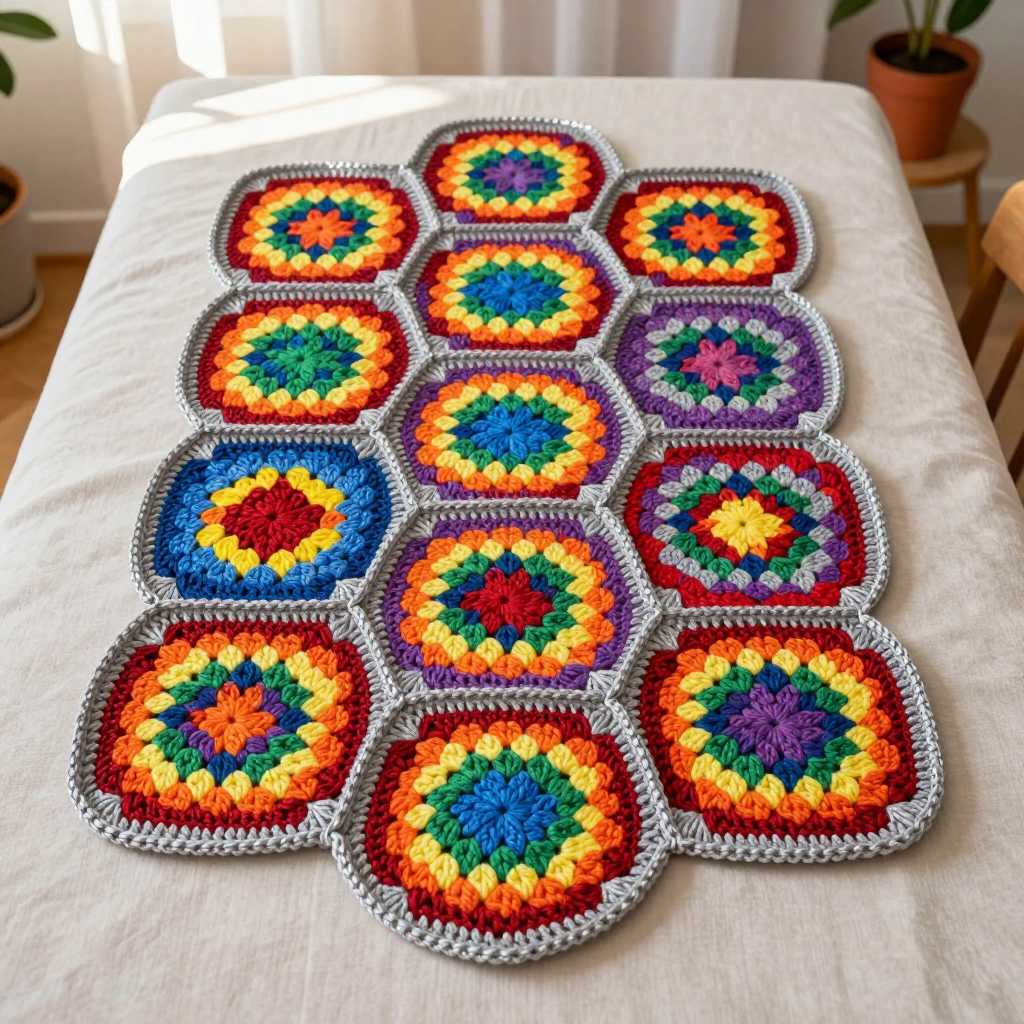
If you have never held a crochet hook before, this is the perfect first big project for you. The Granny Galaxy Runner is made from thirteen small, identical hexagon motifs — each one a single bright rainbow color ringed in silver-gray — so you only ever have to learn one small shape and then repeat it. Because every motif is worked separately, you can practice, set your work down, and pick it back up without losing your place. The finished runner is about 60 inches long and 14 inches wide, a long, flat rectangle of nested hexagons that looks like a little galaxy of color glowing against a silver frame. It drapes softly over a table, feels smooth and sturdy in worsted weight yarn, and looks far more complicated than it actually is.
Materials Needed
- Yarn: Worsted weight (category 4) acrylic or cotton-blend yarn, approximately 540 yards total:
- About 40 yards each of 7 bright colors: red, orange, yellow, green, blue, indigo, and violet (about 280 yards total for the colored centers).
- About 220 yards of silver-gray for the motif borders, the joining, and the edging.
- Crochet hook: Size I/9 (5.5 mm).
- Stitch markers: At least 6 (or use small safety pins or scrap yarn loops).
- Tapestry needle: A large blunt needle with an eye big enough for worsted yarn, for weaving in ends and any whipstitch joining.
- Scissors for cutting yarn.
- Finished size: Approximately 60 x 14 inches after light blocking.
Abbreviations and Beginner Glossary
Every term below is explained as if you have never crocheted. Read this list once before you begin and keep it nearby.
- ch – chain. Make a loop of yarn on your hook, then pull the yarn through that loop. Each pull-through makes one chain stitch. Chains are the "ladder" you build on.
- sl st – slip stitch. Insert your hook into the stitch, wrap yarn over the hook, and pull that loop straight through both the stitch and the loop already on your hook. It makes a nearly invisible joining stitch.
- sc – single crochet. Insert hook into the stitch, wrap yarn over and pull up a loop (2 loops on hook), wrap yarn over again and pull through both loops. One sc made.
- dc – double crochet. Wrap yarn over the hook first, insert hook into the stitch, wrap yarn over and pull up a loop (3 loops on hook), wrap yarn over and pull through 2 loops, wrap yarn over and pull through the last 2 loops. One dc made.
- st / sts – stitch / stitches. One completed loop or "V" in your fabric.
- sp – space. The gap under a chain (for example, a ch-2 space is the little hole made by two chains).
- magic ring – an adjustable loop of yarn you crochet into, then pull tight so the center closes with no hole. Make a loop, hold the crossing point, and work your stitches into the loop.
- join with sl st – finish a round by making a slip stitch into the first stitch of that round so the round closes into a circle.
- fasten off – cut the yarn a few inches from your work and pull the tail all the way through the last loop to lock it.
- corner space – the ch-2 gap at each point of the hexagon.
- flat slip-stitch join – holding two motifs edge to edge, work slip stitches through matching stitches of both layers to sew them together with yarn.
Gauge
Gauge: One finished hexagon motif measures 4.5 inches point-to-point across. The first 2 rounds of a motif measure 2 inches across.
Gauge means how big your stitches come out. It matters here because the runner's finished size depends on the size of your hexagons: if your motifs come out too large, the runner will be longer and wider than 60 x 14 inches; too small, and it will shrink. To check, make one complete practice motif exactly as written, then lay it flat and measure from one point straight across to the opposite point. If it is bigger than 4.5 inches, try a slightly smaller hook (H/8, 5.0 mm); if smaller, try a slightly larger hook (J/10, 6.0 mm). Gauge is not critical for "fit" the way it is for a sweater, but matching it keeps your runner at the stated size.
Beginner Tips Before You Start
- Make one practice motif first. Work a full hexagon in scrap yarn before starting your real colors. It teaches you the shape with zero pressure.
- Use a stitch marker in the first stitch of every round. Place a marker in the very first stitch you make, then move it up each round. This is how you always know where to join.
- Do not pull your yarn too tight. Tension should feel relaxed. If your hook fights you, you are pulling too hard — loosen your grip and let the yarn flow.
- Count after every round. The stitch counts in parentheses tell you exactly how many stitches you should have. Count before moving on.
- Keep your silver-gray separate. Do not cut the silver-gray after each motif border if you plan to use it for joining — leave a 6-inch tail and set the motif aside.
- Lay motifs out before joining. Arrange all 13 on a flat surface in the two-row offset layout so you can see the nesting before you commit to any seams.
Step-by-Step Instructions
Part 1: The Hexagon Motifs (make 13)
Color assignment: Motif 1 red, 2 orange, 3 yellow, 4 green, 5 blue, 6 indigo, 7 violet, then repeat the sequence for motifs 8–13 (8 red, 9 orange, 10 yellow, 11 green, 12 blue, 13 indigo).
With your bright color, make a magic ring.
Round 1: Ch 3 (this counts as your first dc), work 11 dc into the ring, join with sl st to the top of the ch-3. (12 dc)
Round 2: Ch 3, dc in the same stitch, then 2 dc in each stitch around, join with sl st to the top of the ch-3. (24 dc)
Round 3 (shaping to a hexagon): Ch 3, dc in the same stitch, dc in the next stitch, then [2 dc in the next stitch, dc in the next stitch] 11 times, join with sl st to the top of the ch-3. (36 dc)
Round 4 (hexagon corners): Ch 1, sc in the same stitch, sc in each of the next 4 stitches, *ch 2, sc in each of the next 6 stitches; repeat from * 4 more times, ch 2, sc in the last stitch, join with sl st to the first sc. Fasten off the bright color. (6 corners formed, 6 sc between corners)
Round 5 (silver-gray border): Join silver-gray with a sl st in any corner ch-2 space, ch 3, then (dc, ch 2, 2 dc) in the same space, *dc in each sc across to the next corner space, (2 dc, ch 2, 2 dc) in the corner space; repeat from * around, join with sl st to the top of the ch-3. Fasten off, leaving a 6-inch tail. (Each side gains 4 dc per corner pair; the motif measures about 4.5 inches point-to-point.)
Repeat the entire motif 12 more times following the color assignment above, for 13 motifs total.
Part 2: Laying Out the Runner
Lay all 13 motifs on a flat surface in 2 rows: the top row has 7 motifs, the bottom row has 6 motifs. Center each bottom-row motif beneath the gap between two top-row motifs so the hexagons nest together and the runner forms a long rectangle about 60 inches long and 14 inches tall (two hexagons deep plus the offset).
Part 3: Joining the Motifs
Join with silver-gray using the flat slip-stitch join (or whipstitch through both loops if you prefer).
Step 1: Join the 7 top-row motifs into a strip by working sl st through matching stitches along the touching diagonal edges.
Step 2: Join the 6 bottom-row motifs into a strip the same way.
Step 3: Join the two strips along their long touching edges, working sl st through matching stitches of both layers, easing the offset hexagons so the runner edge stays straight.
Weave in all ends.
Part 4: Edging
Round 1: Join silver-gray at any corner of the runner, ch 1, sc evenly around the entire outer edge, working 1 sc in each stitch and 2 sc in each corner, join with sl st to the first sc.
Round 2: Ch 1, sc in each sc around, working 2 sc in each corner, join with sl st to the first sc. Fasten off and weave in ends.
Assembly and Finishing
Seaming: The flat slip-stitch join is done by holding two motifs with their right sides facing you and edges touching. Insert your hook through the matching stitch of the front motif and the matching stitch of the back motif at the same time, wrap silver-gray yarn over, and pull through both stitches and the loop on your hook. Repeat along the whole edge, keeping your stitches even. This creates a slightly raised seam that looks intentional and tidy.
Weaving in ends: Thread each yarn tail onto your tapestry needle. Turn the runner to the wrong side and weave the tail in and out through the backs of several stitches (about 2 inches), then reverse direction and weave back through a few stitches to lock it. Trim close to the fabric.
Blocking: Lightly mist the finished runner with water (or pin it to a towel and spritz it). Gently pat and stretch it to 60 x 14 inches, making sure the hexagon points are even and the edges are straight. Let it dry completely flat before using it.
Pro Tips and Variations
- Change the color story: Swap the rainbow for a single color family (all blues, or autumn oranges and browns) for a more subtle runner. Keep the silver-gray border for the same crisp frame.
- Adjust the size: Add or remove motifs to change the length. Each motif adds about 4.5 inches, so 15 motifs (8 top, 7 bottom) makes a longer runner; 11 motifs (6 top, 5 bottom) makes a shorter one.
- Substitute yarn: Cotton-blend yarn gives a crisper, more washable runner; acrylic gives a softer drape. Just check your gauge motif again, since fiber changes stitch size.
- Try a different join: If you prefer a flatter seam, whipstitch the motifs together instead of slip-stitching — it is slightly less raised but just as strong.