Lucky Jackpot Pillow Amigurumi Free Pattern
Lucky Jackpot Pillow Amigurumi Free Pattern
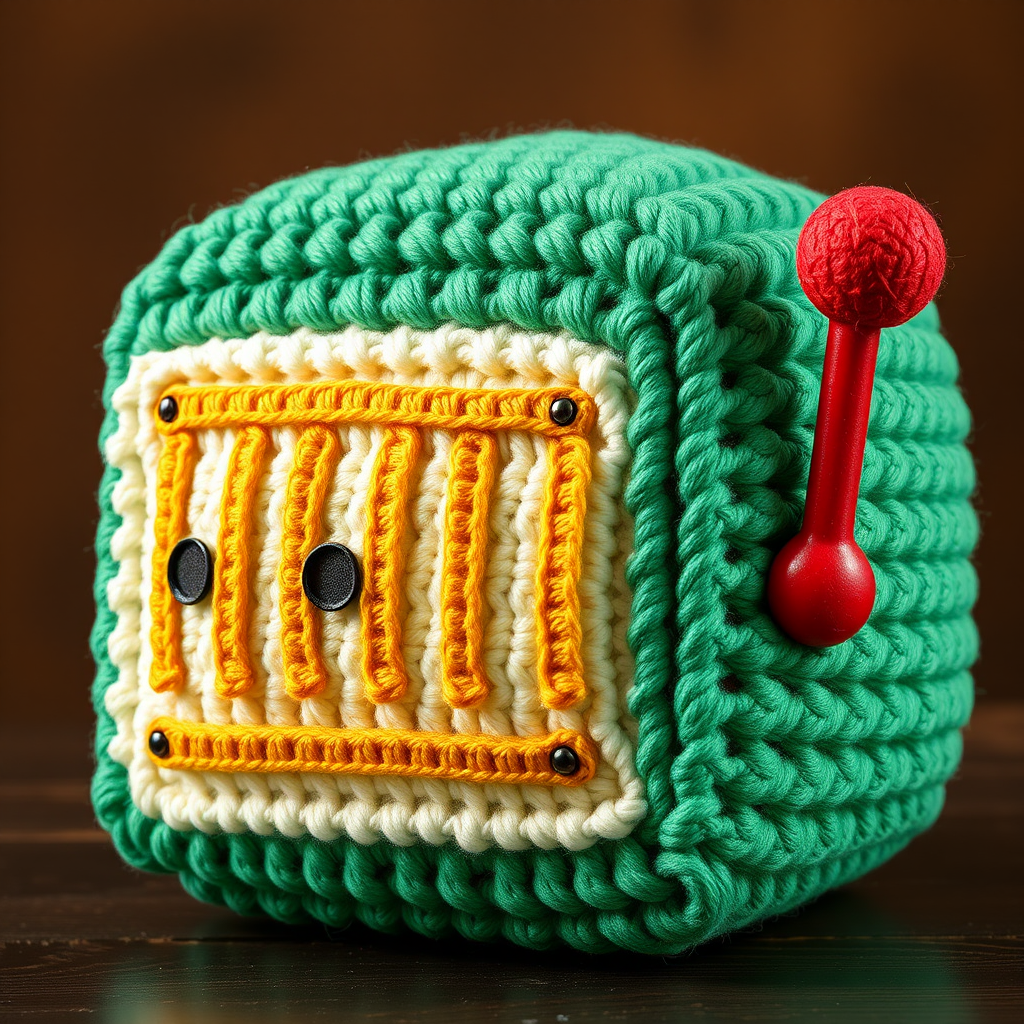
Bring the thrill of the casino home with this plush, crocheted slot machine pillow that's pure cozy comfort. Featuring a soft, textured body and vibrant, tactile details, it's a playful conversation starter for any game night. Whether you're a seasoned crocheter or a curious beginner, this pattern is designed to be approachable and fun, resulting in a delightful, huggable decoration that adds a touch of vintage Vegas charm to your living room, game room, or bedroom.
This amigurumi project is perfect for using up scrap yarn and makes an unforgettable handmade gift for casino lovers, game enthusiasts, or anyone who appreciates quirky, cozy decor. The finished pillow is sturdy enough to lean on but soft enough to cuddle, and the step-by-step instructions below will guide you through every stitch. Let's get started and make some lucky jackpots!
Materials Needed
Before you begin, gather the following supplies. All yarn is worsted weight, and you'll be working with a 5.0 mm hook, which creates a nice, dense fabric perfect for amigurumi.
- Yarn: Worsted weight yarn in the following colors:
- Emerald Green (main pillow body) – approx. 200 yards
- Cream (front panel) – approx. 50 yards
- Gold (reels) – approx. 30 yards
- Black (symbols and embroidery) – small amount
- Red (lever) – small amount
- Crochet Hook: 5.0 mm (US H-8)
- Other Notions:
- Stitch marker (to track rounds)
- Yarn needle (for sewing and weaving ends)
- Polyester fiberfill (for stuffing)
- Scissors
Gauge: 4 inches = 16 sc and 18 rows in single crochet. Gauge is not critical for this project, but maintaining consistent tension will ensure your pillow is evenly shaped.
Step-by-Step Instructions
This pattern is worked in continuous rounds unless otherwise stated. Use a stitch marker to keep track of rounds. The entire pillow is constructed from simple single crochet (sc) stitches, increases, and decreases, making it a great project for practicing amigurumi basics.
Pillow Body (Emerald Green)
The body is worked from the bottom up, starting with a magic ring and increasing evenly to create a flat circle, then working straight for the height, and finally decreasing to close the top. Stuff firmly before closing.
- Make a magic ring, ch 1, work 6 sc into ring. (6)
- 2 sc in each st around. (12)
- *Sc in next st, 2 sc in next st* repeat around. (18)
- *Sc in next 2 sts, 2 sc in next st* repeat around. (24)
- *Sc in next 3 sts, 2 sc in next st* repeat around. (30)
- *Sc in next 4 sts, 2 sc in next st* repeat around. (36)
- *Sc in next 5 sts, 2 sc in next st* repeat around. (42)
- *Sc in next 6 sts, 2 sc in next st* repeat around. (48)
- *Sc in next 7 sts, 2 sc in next st* repeat around. (54)
- *Sc in next 8 sts, 2 sc in next st* repeat around. (60)
- *Sc in next 9 sts, 2 sc in next st* repeat around. (66)
- *Sc in next 10 sts, 2 sc in next st* repeat around. (72)
- Rounds 13-30: Sc in each st around. (72) – Repeat for 18 rounds to create the height of the pillow. This section forms the cylindrical body.
- Round 31: *Sc in next 10 sts, sc2tog* repeat around. (66)
- Round 32: *Sc in next 9 sts, sc2tog* repeat around. (60)
- Round 33: *Sc in next 8 sts, sc2tog* repeat around. (54)
- Round 34: *Sc in next 7 sts, sc2tog* repeat around. (48)
- Round 35: *Sc in next 6 sts, sc2tog* repeat around. (42)
- Round 36: *Sc in next 5 sts, sc2tog* repeat around. (36)
- Round 37: *Sc in next 4 sts, sc2tog* repeat around. (30)
- Round 38: *Sc in next 3 sts, sc2tog* repeat around. (24)
- Round 39: *Sc in next 2 sts, sc2tog* repeat around. (18)
- Round 40: *Sc in next st, sc2tog* repeat around. (12)
- Round 41: Sc2tog around. (6)
Finishing the Body: Fasten off, leaving a long tail. Thread the tail through a yarn needle and weave it through the front loops of the remaining 6 stitches. Pull tight to close the hole, and secure with a knot. Important: Before closing the top completely, stuff the pillow firmly with polyester fiberfill. The pillow should be plump but not overly stretched. Weave in the end securely.
Front Panel (Cream)
This is a simple flat rectangle worked in rows. It will be sewn onto the front of the pillow body.
- Ch 21, sc in 2nd ch from hook and across. (20)
- Rows 2-20: Ch 1, turn, sc in each st across. (20)
Fasten off, leaving a long tail for sewing. The panel should measure approximately 4 inches wide and 5 inches tall, fitting nicely on the front of the pillow.
Reels (3 panels, Gold)
These are the vertical strips that mimic the spinning reels of a slot machine. Make three identical panels.
- Ch 11, sc in 2nd ch from hook and across. (10)
- Rows 2-10: Ch 1, turn, sc in each st across. (10)
Fasten off, leaving a long tail for sewing. Each reel should be about 2 inches wide and 4 inches tall.
Reel Symbols (Black)
These small circles represent the symbols on the reels. Make three of them.
- Magic ring, 6 sc into ring. (6)
- 2 sc in each st around. (12)
Fasten off, leaving a tail for sewing. These will be attached to the gold reels in a vertical line.
Lever (Red)
This is the iconic side lever, worked in the round and lightly stuffed.
- Magic ring, 6 sc into ring. (6)
- 2 sc in each st around. (12)
- Rounds 3-5: Sc in each st around. (12)
- Round 6: Sc2tog around. (6)
Fasten off, leaving a tail. Stuff lightly with a small amount of fiberfill to give it shape without making it too bulky.
Assembly
Now it's time to bring all the pieces together. Use a yarn needle and the long tails left on each piece for sewing.
- Attach the Front Panel: Position the cream panel on the front of the pillow body, centered horizontally and vertically. Pin it in place if needed. Sew it on using a whip stitch or mattress stitch, ensuring the edges are secure and neat.
- Attach the Reels: Sew the three gold reels onto the cream panel, side by side. Space them evenly so they look like a slot machine display. Leave a small gap between each reel for a realistic look.
- Attach the Symbols: Sew one black circle onto each gold reel, positioning them in a vertical line down the center of each reel. This mimics the symbols lining up.
- Attach the Lever: Sew the red lever onto the right side of the pillow body, near the top. Position it so it protrudes outward, like a real slot machine lever. Secure it firmly with several stitches.
- Embroider the '7': Using black yarn and a yarn needle, embroider a small '7' on the middle reel. This is the classic jackpot symbol. You can use a simple backstitch or chain stitch to form the number. Place it above or below the black circle, or replace the circle with the '7' if you prefer.
- Weave in All Ends: Carefully weave in any remaining yarn tails inside the pillow or on the back of the panels to ensure a clean, professional finish.
Your Lucky Jackpot Pillow is now complete! Display it on a couch, chair, or bed to add a fun, cozy vibe to your space. It's sure to be a hit at your next game night or a delightful gift for someone who loves a little casino flair. Enjoy your handmade creation!



