Moonlit Meadow Bunny Free Pattern – Knit a Dreamy Starry-Eyed Companion
Moonlit Meadow Bunny Free Pattern – Knit a Dreamy Starry-Eyed Companion
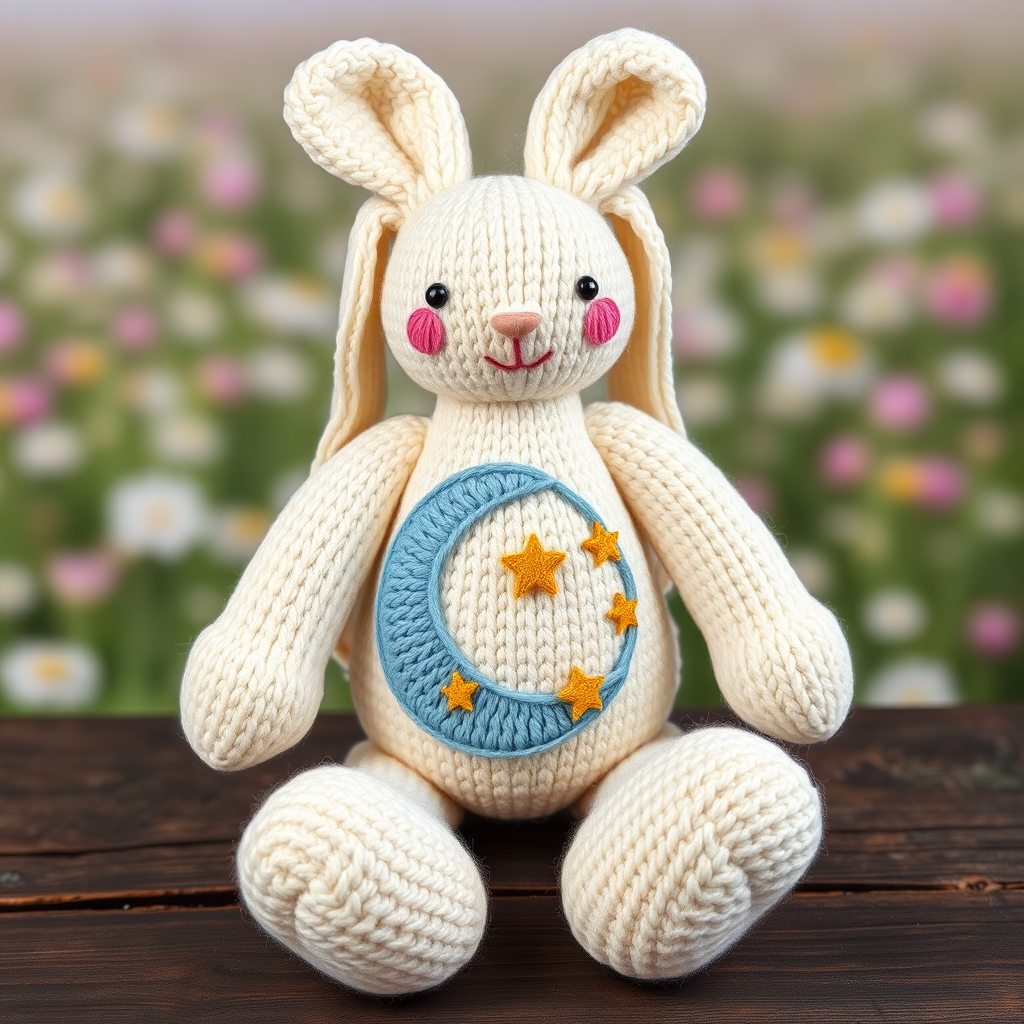
Imagine a soft, handmade companion that brings the magic of a starry night into your home. The Moonlit Meadow Bunny is exactly that—a whimsical knitted amigurumi with a crescent moon belly and twinkling star patches, designed to charm nurseries, woodland-themed decor, and cozy reading corners. Whether you're crafting a heartfelt gift for a new baby or adding a celestial touch to your own space, this pattern combines soft textures with dreamy charm. Best of all, it's beginner-friendly, worked in simple stockinette stitch, and assembled with love. Let's knit a little piece of the night sky!
Materials Needed
Before you begin, gather these supplies to ensure a smooth knitting experience:
- Yarn: Worsted weight yarn in the following colors:
- Main Color (MC): Cream
- Contrast Color 1 (CC1): Dusty blue (for the moon belly patch)
- Contrast Color 2 (CC2): Soft gold (for the star patches)
- Contrast Color 3 (CC3): Blush pink (for the face details)
- Needles: US 4 (3.5 mm) knitting needles for flat pieces, and double-pointed needles (DPNs) for the tail (worked in the round).
- Gauge: 22 stitches and 30 rows = 4 inches in stockinette stitch. Gauge isn't critical for amigurumi, but consistent tension ensures a neat, even fabric.
- Extras: Tapestry needle for seaming, polyester fiberfill for stuffing, black embroidery floss for eyes, and stitch markers (optional).
Step-by-Step Instructions
This pattern is knitted flat in pieces and seamed, with the tail worked in the round. Each piece is knitted separately, then assembled. Follow the instructions carefully, and you'll have your own Moonlit Meadow Bunny in no time!
Head (Worked Flat in Stockinette Stitch)
With MC, cast on 6 stitches.
- Row 1 (RS): Knit all stitches.
- Row 2: Purl all stitches.
- Row 3: Kfb across – you'll have 12 stitches. (Kfb = knit into the front and back of the same stitch to increase.)
- Row 4: Purl all stitches.
- Row 5: (K1, kfb) across – 18 stitches.
- Row 6: Purl all stitches.
- Row 7: (K2, kfb) across – 24 stitches.
- Row 8: Purl all stitches.
- Rows 9-16: Work even in stockinette (knit on RS, purl on WS) for 8 rows.
- Row 17: (K2, k2tog) across – 18 stitches. (K2tog = knit two stitches together to decrease.)
- Row 18: Purl all stitches.
- Row 19: (K1, k2tog) across – 12 stitches.
- Row 20: Purl all stitches.
- Row 21: K2tog across – 6 stitches.
Cut the yarn, leaving a long tail. Thread the tail through the remaining 6 stitches, pull tight to close the top, and seam the back of the head. Leave an opening for stuffing.
Body (Worked Flat in Stockinette Stitch)
With MC, cast on 8 stitches.
- Row 1 (RS): Knit all stitches.
- Row 2: Purl all stitches.
- Row 3: Kfb across – 16 stitches.
- Row 4: Purl all stitches.
- Row 5: (K1, kfb) across – 24 stitches.
- Row 6: Purl all stitches.
- Rows 7-18: Work even in stockinette for 12 rows.
- Row 19: (K2, k2tog) across – 18 stitches.
- Row 20: Purl all stitches.
- Row 21: (K1, k2tog) across – 12 stitches.
- Row 22: Purl all stitches.
- Row 23: K2tog across – 6 stitches.
Cut the yarn, thread through remaining stitches, pull tight, and seam the back, leaving a gap for stuffing. Stuff the body firmly with fiberfill, then close the gap.
Ears (Make 2, Worked Flat in Stockinette)
With MC, cast on 4 stitches.
- Row 1 (RS): Knit all stitches.
- Row 2: Purl all stitches.
- Row 3: Kfb, k2, kfb – 6 stitches.
- Row 4: Purl all stitches.
- Row 5: Kfb, k4, kfb – 8 stitches.
- Rows 6-14: Work even in stockinette for 9 rows.
- Row 15: K2tog, k4, k2tog – 6 stitches.
- Row 16: Purl all stitches.
- Row 17: K2tog, k2, k2tog – 4 stitches.
- Row 18: Purl all stitches.
Bind off. Fold each ear in half lengthwise and seam the bottom edge, leaving the top open. Do not stuff—the ears should stay flat and floppy.
Arms (Make 2, Worked Flat in Stockinette)
With MC, cast on 4 stitches.
- Row 1 (RS): Knit all stitches.
- Row 2: Purl all stitches.
- Row 3: Kfb, k2, kfb – 6 stitches.
- Rows 4-12: Work even in stockinette for 9 rows.
- Row 13: K2tog, k2, k2tog – 4 stitches.
- Row 14: Purl all stitches.
Bind off. Fold each arm in half lengthwise and seam, leaving the top open. Stuff lightly with fiberfill.
Legs (Make 2, Worked Flat in Stockinette)
With MC, cast on 5 stitches.
- Row 1 (RS): Knit all stitches.
- Row 2: Purl all stitches.
- Row 3: Kfb, k3, kfb – 7 stitches.
- Rows 4-10: Work even in stockinette for 7 rows.
- Row 11: K2tog, k3, k2tog – 5 stitches.
- Row 12: Purl all stitches.
Bind off. Fold each leg in half lengthwise and seam, leaving the top open. Stuff lightly.
Tail (Worked in the Round with Double-Pointed Needles)
With MC, cast on 6 stitches, distributing them evenly on 3 DPNs (2 stitches per needle).
- Round 1: Kfb on each needle – 12 stitches total.
- Rounds 2-4: Knit even (no increases or decreases).
- Round 5: K2tog on each needle – 6 stitches total.
Cut the yarn, thread through remaining stitches, pull tight, and seam the small opening. Stuff to form a fluffy ball.
Moon Belly Patch (Worked Flat in Stockinette)
With CC1 (dusty blue), cast on 3 stitches.
- Row 1 (RS): Knit all stitches.
- Row 2: Purl all stitches.
- Row 3: Kfb, k1, kfb – 5 stitches.
- Row 4: Purl all stitches.
- Row 5: Kfb, k3, kfb – 7 stitches.
- Row 6: Purl all stitches.
- Row 7: Kfb, k5, kfb – 9 stitches.
- Row 8: Purl all stitches.
- Row 9: Kfb, k7, kfb – 11 stitches.
- Row 10: Purl all stitches.
- Row 11: K2tog, k7, k2tog – 9 stitches.
- Row 12: Purl all stitches.
- Row 13: K2tog, k5, k2tog – 7 stitches.
- Row 14: Purl all stitches.
- Row 15: K2tog, k3, k2tog – 5 stitches.
- Row 16: Purl all stitches.
- Row 17: K2tog, k1, k2tog – 3 stitches.
- Row 18: Purl all stitches.
Bind off. This creates a crescent shape. Sew it onto the bunny's belly using matching thread.
Star Patches (Make 3, Worked Flat in Stockinette)
With CC2 (soft gold), cast on 1 stitch.
- Row 1 (RS): Kfb – 2 stitches.
- Row 2: Purl all stitches.
- Row 3: Kfb, kfb – 4 stitches.
- Row 4: Purl all stitches.
- Row 5: K2tog, k2tog – 2 stitches.
- Row 6: Purl all stitches.
- Row 7: K2tog – 1 stitch.
Cut the yarn and fasten off. This forms a small diamond shape. Sew onto the bunny's body and ears as desired.
Assembly
Now it's time to bring your bunny to life! Follow these steps carefully:
- Stuff the head firmly with fiberfill, then sew it to the top of the body using a whipstitch or mattress stitch.
- Sew the ears to the top of the head, positioning them slightly to the sides so they flop naturally.
- Attach the arms to the sides of the body, just below the neck, so they hang down gently.
- Attach the legs to the bottom front of the body, allowing the bunny to sit upright.
- Sew the tail to the back bottom of the body, centered for balance.
- Embroider the face:
- Using CC3 (blush pink), embroider a small triangle nose and a tiny mouth just below it.
- Using black embroidery floss, create two small French knots or satin stitches for eyes, placed about 1 inch apart.
- Add a small blush on each cheek using CC3, with a few short straight stitches.
- Weave in all ends securely with a tapestry needle to ensure durability, especially if this is a gift for a child.
And there you have it—your very own Moonlit Meadow Bunny! This dreamy companion is perfect for snuggling, decorating, or gifting. The combination of cream, dusty blue, soft gold, and blush pink creates a celestial palette that feels both cozy and magical. Whether you're a seasoned knitter or a curious beginner, this pattern is a delightful project that yields a truly special keepsake. Happy knitting!



