Oatmeal Nordic Cross Wreath Crochet Square Free Pattern
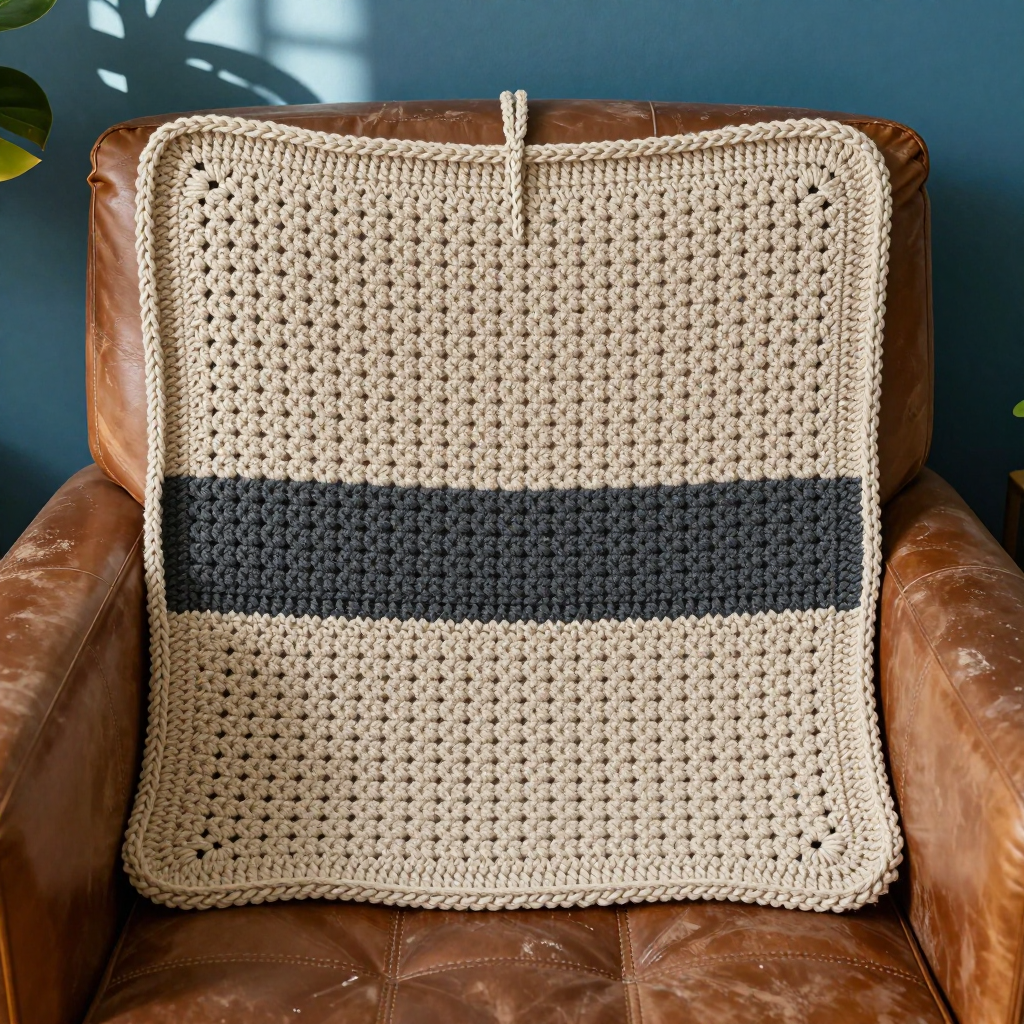
Oatmeal Nordic Cross Wreath Crochet Square
If you have never held a crochet hook before, this is the project I would hand you first. This flat 12-inch square is worked entirely in single crochet — one simple stitch repeated over and over — so your hands can learn the rhythm while your eyes enjoy watching a bold charcoal stripe appear across warm oatmeal. The finished piece is a soft, dense, modern square with clean edges and a two-round border that frames it like a picture, and it looks far more complicated than it is. Hang it on a dowel, tack it to the wall, or lean it on a shelf, and you have a piece of Scandinavian-style decor made completely by you. There is no shaping, no counting complicated repeats, and no sewing pieces together — just rows, a border, and a little loop.
Materials Needed
- Yarn: Worsted weight (category 4) acrylic or cotton blend yarn — approximately 180 yards oatmeal (Color A) and 60 yards charcoal (Color B).
- Crochet hook: Size H/8 (5.0 mm).
- Stitch markers: At least 4 (helpful for corners and for counting rows).
- Tapestry needle: A blunt-tipped needle with a large eye for weaving in ends.
- Scissors.
- Optional: A 12-inch wooden dowel for hanging.
- Finished size: Approximately 12 inches wide x 12 inches tall (30.5 x 30.5 cm), plus a 3-inch hanging loop.
Abbreviations and Beginner Glossary
- ch – chain. Make a loop with the yarn, pull a new loop through it, and repeat. Each loop is one chain. Chains form your starting foundation.
- sc – single crochet. Insert your hook into the stitch, yarn over (wrap the yarn around the hook), pull up a loop (you now have 2 loops on the hook), yarn over again, and pull through both loops. One single crochet made.
- st / sts – stitch / stitches. One completed stitch, or several.
- sl st – slip stitch. Insert hook into the stitch, yarn over, and pull the yarn straight through both the stitch and the loop on your hook in one motion. Used here to join rounds invisibly.
- FO – fasten off. Cut the yarn leaving a 6-inch tail, then pull the tail all the way through the last loop on your hook to lock it.
- turn – flip your work over so you can work back across the row you just made.
- yarn over – wrap the working yarn over your hook from back to front.
- row – one horizontal line of stitches worked back and forth.
- round – one complete circuit of stitches worked around an edge (used for the border).
- row end – the side edge of a row; you will work stitches into these when you make the border.
- lark's head knot – fold a strand in half, push the folded loop through a stitch, then pull the two loose ends through that loop and tighten.
Gauge
14 single crochet stitches x 16 rows = 4 inches (10 cm).
Gauge means how many stitches and rows fit into a measured square of fabric. It matters because it controls the finished size: if your stitches are looser than mine, your square will grow past 12 inches; if tighter, it will shrink. Gauge is not critical for a wall hanging, but a consistent tension keeps the square flat and even. To check yours, chain 22, work 18 rows of single crochet, and measure the middle 4 inches with a ruler. If you have more than 14 stitches in 4 inches, go up one hook size; if fewer, go down one. This swatch also doubles as your practice piece — perfect before you begin.
Beginner Tips Before You Start
- Count every row. Single crochet rows are easy to lose track of. Place a stitch marker in the first stitch of each row so you always know where the row begins and ends.
- Do not pull the yarn too tight. Tension is the number one beginner struggle. Hold the yarn gently — snug, not strangling. Tight stitches make a stiff, curling square.
- Always work the first sc of each row into the first stitch. Do not skip it. Skipping is the most common cause of a square that narrows into a triangle.
- Change colors on the last stitch of a row. Complete the final yarn over of the last stitch with the new color. This hides the change neatly at the edge.
- Carry the unused color loosely up the side edge rather than cutting it every time, or cut and rejoin if you prefer a cleaner edge. Loose carrying prevents puckering.
- Keep your chain-1 turning chain loose. A tight turning chain pulls the edge in and makes the border harder to work.
Step-by-Step Instructions
Bottom Border Section (Oatmeal, Color A)
Row 1 (A): Ch 43. Sc in the 2nd ch from hook and in each ch across. (42 sc)
Rows 2–6 (A): Ch 1, turn. Sc in each st across. (42 sc) — 6 oatmeal rows total.
Charcoal Cross Section (Color B)
Row 7 (B): Ch 1, turn. Sc in each st across. (42 sc)
Rows 8–18 (B): Ch 1, turn. Sc in each st across. (42 sc) — this gives you 12 charcoal rows total (Rows 7 through 18).
Top Border Section (Oatmeal, Color A)
Row 19 (A): Ch 1, turn. Sc in each st across. (42 sc)
Rows 20–24 (A): Ch 1, turn. Sc in each st across. (42 sc) — 6 oatmeal rows total. Do not fasten off; you will continue straight into the edging.
Edging
Round 1 (A): Do not turn. Ch 1. Work sc evenly around the entire perimeter of the square: 1 sc in each row end along the sides, 1 sc in each st along the top and bottom edges, and 3 sc in each corner. Join with sl st to the first sc. (Approximately 160 sc)
Round 2 (A): Ch 1. Sc in each sc around, working 3 sc in each corner. Join with sl st to the first sc. FO and weave in ends. (Approximately 168 sc)
Hanging Loop
Cut a 10-inch length of oatmeal yarn. Fold it in half and attach it to the top center of the square using a lark's head knot, or crochet a ch-20 loop and sew it securely to the top center with your tapestry needle. Weave in all ends.
Assembly and Finishing
Weaving in ends: Thread each yarn tail onto your tapestry needle and run it back and forth through the back of several stitches (about 2 inches), then trim close to the fabric. Never knot your ends — knots create lumps that show through the front.
Blocking: Soak the square in cool water for 10 minutes, gently squeeze (do not wring) in a towel, then pin it flat to a 12-inch square on a blocking mat or towel-covered board. Use your stitch markers or pins at each corner to hold a crisp right angle. Let it dry completely — usually overnight. Blocking is what makes the edges straight and the border lie flat.
Hanging: If using a dowel, slide it through the hanging loop, or sew a small casing along the top edge with your tapestry needle and slip the dowel through that instead.
Pro Tips and Variations
- Change the palette: Swap charcoal for deep navy, forest green, or terracotta for a different mood. Keep the oatmeal base for that soft Nordic feel, or try cream and black for high contrast.
- Resize the square: Add or remove rows in multiples of 6 to keep the proportions balanced. For a wider square, chain a longer foundation — just keep your stitch count consistent across every row.
- Substitute yarn: Cotton gives a crisp, matte finish that blocks beautifully; acrylic is softer and more affordable. Match the worsted weight (category 4) and always swatch first, since fiber changes gauge.
- Add texture: Work the charcoal section in half double crochet (hdc) instead of sc for a slightly raised stripe — just remember hdc rows are taller, so use fewer rows to keep the same height.