Paprika Wave Granny Bandana Free Pattern: A Folk-Art Crochet Chevron for Small Dogs
Paprika Wave Granny Bandana: A Folk-Art Crochet Chevron for Small Dogs
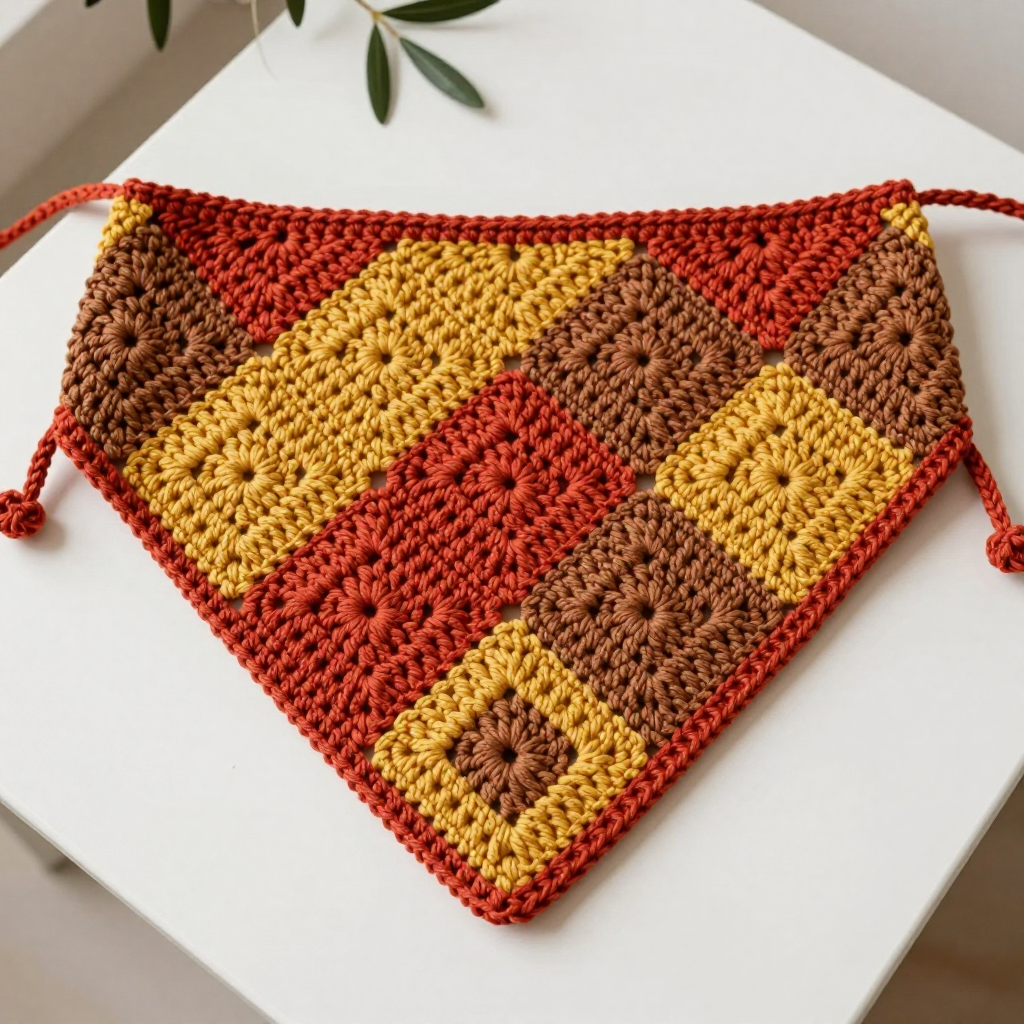
If you have never held a crochet hook before, this is the perfect first project to fall in love with. The Paprika Wave Bandana is built from fifteen small, simple granny squares that you join into a staggered chevron triangle, so you only ever learn one tiny motif and then repeat it. The finished piece is a flat, lightweight patchwork triangle about 15 inches wide and 7.5 inches deep, rippling through warm spice-market colors: deep red-orange paprika, golden mustard, and cozy cinnamon brown. It drapes softly over your dog's shoulders, ties gently behind the neck, and looks like a little piece of handmade folk art. Best of all, every stitch is a basic one, and by the end you will have made something beautiful and completely your own.
Materials Needed
- Yarn: Worsted-weight (category 4) cotton yarn, approximately 120 yards total: 50 yards paprika (deep red-orange), 40 yards mustard (golden yellow), and 30 yards cinnamon (warm brown). The sample used a smooth 4-ply worsted cotton.
- Crochet hook: Size 5.0 mm (US H-8), or whatever size you need to match the gauge below.
- Stitch markers: At least 4, to mark corners and count squares.
- Tapestry needle: A blunt-tipped needle with a large eye, for weaving in yarn tails and seaming squares.
- Scissors: Sharp small scissors for trimming yarn.
- Optional: A blocking mat and rust-proof pins for shaping squares and the finished bandana.
- Finished size: Width across the top edge approximately 15 inches (38 cm); depth from top edge to bottom point approximately 7.5 inches (19 cm). Fits small dogs with a neck circumference of 10–14 inches (25–36 cm); the tie closure adjusts.
Abbreviations and Beginner Glossary
- ch – chain: wrap the yarn over the hook and pull it through the loop on your hook. This makes a small link.
- sl st – slip stitch: insert the hook into the stitch, wrap yarn over, and pull it through both the stitch and the loop on your hook at once. This joins things without adding height.
- sc – single crochet: insert the hook into the stitch, wrap yarn over, pull up a loop (2 loops on hook), wrap yarn over again, and pull through both loops. One short, firm stitch.
- dc – double crochet: wrap yarn over the hook first, insert into the stitch, wrap yarn over, pull up a loop (3 loops on hook), wrap yarn over and pull through 2 loops, wrap yarn over and pull through the last 2 loops. A taller stitch.
- st / sts – stitch / stitches: one completed loop or unit of crochet.
- rep – repeat: do the same instruction again.
- beg – beginning: the start of a round or row.
- magic ring – an adjustable loop of yarn you crochet into, then pull tight so no hole remains in the center.
- ch-2 corner space – the little gap made by two chains at a corner; you work your corner stitches into that gap.
- fasten off – cut the yarn a few inches from your work and pull the tail through the last loop to lock it.
- lark's head knot – fold a length of yarn in half, push the folded loop through a hole, then pull the two loose ends through that loop and tighten.
- blocking – dampening and pinning your work to shape it and even out the stitches as it dries.
Gauge
One finished granny square = 2.5 inches (6.5 cm) square after blocking. Within a square, 4 dc = 1 inch (2.5 cm) and 2 dc rounds = 1 inch (2.5 cm).
Gauge matters because it is how we guarantee the bandana comes out the right size. If your squares are bigger than 2.5 inches, the whole bandana grows and may be too large for a small dog; if they are smaller, it shrinks. To check, make one complete practice square using the motif instructions below, block it lightly, and measure across the middle from side to side. If it is larger than 2.5 inches, try a smaller hook; if smaller, try a larger hook. Once one square measures right, all fifteen will match.
Beginner Tips Before You Start
- Make one practice square first. Crochet a single square, measure it, and only then make the rest. It saves you from redoing fifteen.
- Use stitch markers in every corner. Slip a marker into each ch-2 corner space so you always know where the next corner goes.
- Do not pull your yarn too tight. Keep a relaxed, even tension; tight stitches make stiff, small squares that are hard to seam.
- Count after every round. Check your stitch count against the number in parentheses before moving on.
- Keep all seams on the wrong side. Decide now which side is the "back" so your joins stay hidden.
- Weave in tails as you go. Finish each square's tails before starting the next so you never face a pile of ends at the end.
Step-by-Step Instructions
Color Plan (15 Squares)
Paprika: 6 squares. Mustard: 5 squares. Cinnamon: 4 squares. Arrange them in this staggered chevron layout:
- Top row (5 squares): Paprika, Mustard, Cinnamon, Mustard, Paprika
- Second row (4 squares): Mustard, Paprika, Mustard, Cinnamon
- Third row (3 squares): Cinnamon, Mustard, Paprika
- Fourth row (2 squares): Paprika, Cinnamon
- Bottom point (1 square): Mustard
Square Motif (make 15)
Round 1: With your chosen color, make a magic ring. Ch 3 (this counts as your first dc), work 2 dc into the ring, ch 2, then [3 dc into the ring, ch 2] 3 times. Join with a sl st to the top of the beginning ch-3. (12 dc, 4 ch-2 corners)
Round 2: Ch 3, dc in each of the next 2 dc, then *(2 dc, ch 2, 2 dc) in the next ch-2 corner space, dc in each of the next 3 dc; repeat from * around, ending with (2 dc, ch 2, 2 dc) in the last corner. Join with a sl st to the top of the ch-3. (28 dc, 4 ch-2 corners)
Round 3: Ch 3, dc in each dc to the next corner, then *(2 dc, ch 2, 2 dc) in the corner space, dc in each dc to the next corner; repeat from * around. Join with a sl st to the top of the ch-3. Fasten off, leaving a 6-inch tail. (44 dc, 4 ch-2 corners)
Weave in the ends. Block each square to 2.5 inches (6.5 cm) square and let it dry completely.
Joining the Squares
Join the squares with a flat slip-stitch seam (or whipstitch) with right sides together, matching corner to corner, following the color plan and staggered chevron layout above. Work one seam at a time:
- Row 1: Join the 5 top-row squares side by side. (4 seams)
- Row 2: Join the 4 second-row squares side by side. (3 seams)
- Attach Row 2 to Row 1: Sew Row 2 to the lower edge of Row 1, offset by half a square so the rows stagger. (1 long seam)
- Row 3: Join the 3 third-row squares side by side, then attach to the lower edge of Row 2, offset by half a square. (2 seams + 1 long seam)
- Row 4: Join the 2 fourth-row squares side by side, then attach to the lower edge of Row 3, offset by half a square. (1 seam + 1 long seam)
- Bottom point: Center the single mustard square under Row 4 and sew it in place. (1 seam)
Keep all seams on the wrong side. Do not join the top edge of Row 1.
Chevron stagger note: Because each row is offset by half a square, the lower edge of the joined piece forms a stepped chevron. After all squares are joined, the outer edges will be stepped; the border in the next step smooths them into a clean triangle.
Border and Tie
Round 1 (border): With paprika, join yarn at the top-right corner of the bandana. Ch 1, sc evenly around the entire outer edge, working 1 sc in each dc and 1 sc in each seam, and working 3 sc in each outer corner to keep the edge flat. At the two top corners, work (sc, ch 2, sc) to form a small tie loop point. Join with a sl st to the first sc. Fasten off. (Work 1 sc per stitch and per seam; 3 sc at each outer corner; 1 ch-2 loop at each top corner.)
Round 2 (optional accent): With mustard, sc in each sc around, working 3 sc in each corner ch-2 space. Join, fasten off, and weave in the ends. (Same stitch count as Round 1, plus 3 sc in each corner space.)
Tie Closure
Cut two lengths of paprika yarn, each 18 inches (46 cm). Fold each in half and attach with a lark's head knot through the ch-2 loop at each top corner. Braid or twist each tie, knot the end, and trim. Tie behind the dog's neck; the ties adjust to fit 10–14 inch necks.
Assembly and Finishing
Seaming: Hold two squares with right sides facing each other. Thread your tapestry needle with a matching yarn tail. Working through the back loops only of the edge stitches, make small, even slip stitches or whipstitches from corner to corner, keeping the seam flat and not pulling tight. Fasten off and weave the tail into the seam. Repeat for each seam in the order listed above.
Weaving in ends: Thread each tail onto the tapestry needle and run it back and forth through the back of several stitches, changing direction once, then trim close to the work. Never knot tails on the right side.
Blocking: Lightly steam or dampen the finished bandana. Pin the top edge straight and the bottom point centered on a blocking mat, smoothing the stepped edges into a clean triangle. Let it dry completely before removing the pins.
Final check: Trim any remaining tails and gently tug the border so it lies flat.
Pro Tips and Variations
- Change the colors: Swap paprika, mustard, and cinnamon for any three shades you love, keeping the same 6/5/4 square split so the patchwork stays balanced.
- Adjust the size: For a larger dog, add one more square to each row (6, 5, 4, 3, 2, 1) and widen the border; for a tiny dog, remove the bottom point square and stop at Row 4.
- Substitute yarn: Any worsted-weight (category 4) yarn works; cotton gives a crisp, washable finish, while acrylic or a cotton-blend feels softer and drapes more.
- Skip the accent round: Leave the border in a single paprika round for a simpler, more rustic look, or add a third round in cinnamon for extra folk-art contrast.