Savanna Snuggle Elephant Tissue Box Cover Free Pattern – Crochet a Cozy Safari Keeper
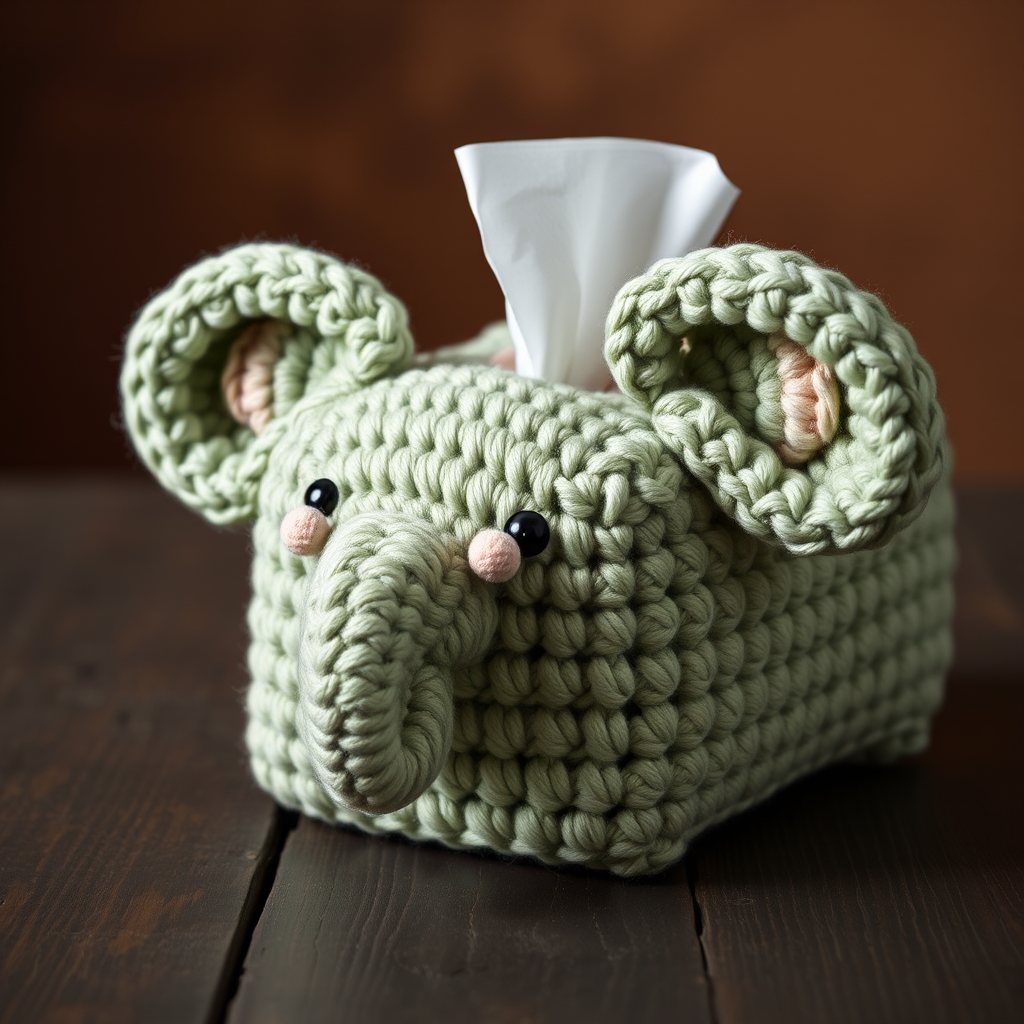
Savanna Snuggle Elephant Tissue Box Cover: A Free Crochet Pattern
Transform your everyday tissue box into a charming safari companion with this crocheted elephant cover. Featuring a soft, textured body and a gentle, trunk-like opening, this pattern blends playful amigurumi techniques with practical home decor, creating a warm and whimsical accent for any room. Perfect for beginners and experienced crocheters alike, this project works up quickly and makes a wonderful handmade gift.
Materials Needed
Before you begin, gather the following supplies to ensure a smooth crocheting experience:
- Yarn: Worsted weight yarn in three colors:
- Soft sage green (main body & trunk) – approximately 200g
- Warm cream (tusks & inner ears) – approximately 50g
- Dusty rose (ears & cheeks) – approximately 30g
- Hook: 5.0 mm (H-8) crochet hook
- Tapestry needle for weaving in ends and sewing pieces together
- Stitch markers to keep track of rounds
- Scissors
- Optional: 12mm safety eyes (or black yarn for embroidered eyes)
- Fiberfill for stuffing the trunk
Gauge: 16 sc x 18 rows = 4 x 4 inches (10 x 10 cm) in single crochet. Gauge is not critical for this project, but maintaining consistent tension will help the cover fit snugly over a standard tissue box.
Abbreviations
- ch: chain
- sc: single crochet
- inc: increase (2 sc in one stitch)
- dec: decrease (sc two stitches together)
- sl st: slip stitch
- st(s): stitch(es)
- Rnd: round
Step-by-Step Instructions
Body (Make 1, in Sage Green)
The body forms the main cover that slips over your tissue box. Work in continuous rounds without joining unless otherwise noted.
- Rnd 1: Create a magic ring, work 6 sc into the ring. (6 sts)
- Rnd 2: Work inc in each stitch around. (12 sts)
- Rnd 3: (Sc in next st, inc) repeat around. (18 sts)
- Rnd 4: (Sc in next 2 sts, inc) repeat around. (24 sts)
- Rnd 5: (Sc in next 3 sts, inc) repeat around. (30 sts)
- Rnd 6: (Sc in next 4 sts, inc) repeat around. (36 sts)
- Rnd 7: (Sc in next 5 sts, inc) repeat around. (42 sts)
- Rnd 8: (Sc in next 6 sts, inc) repeat around. (48 sts)
- Rnds 9-20: Sc in each stitch around. (48 sts) – This forms the sides of the cover. Continue working even until the piece measures approximately 6 inches from the center.
- Rnd 21: (Sc in next 6 sts, dec) repeat around. (42 sts)
- Rnd 22: (Sc in next 5 sts, dec) repeat around. (36 sts)
- Rnd 23: (Sc in next 4 sts, dec) repeat around. (30 sts)
- Rnd 24: (Sc in next 3 sts, dec) repeat around. (24 sts)
- Rnd 25: (Sc in next 2 sts, dec) repeat around. (18 sts)
- Fasten off, leaving a long tail for sewing. Do not close the opening – this will be the bottom of the cover, which slips over the tissue box.
Trunk (Make 1, in Sage Green)
The trunk adds the signature elephant look. It is lightly stuffed and sewn to the front of the body.
- Rnd 1: Magic ring, 6 sc in ring. (6 sts)
- Rnd 2: (Sc in next st, inc) repeat around. (9 sts)
- Rnds 3-10: Sc in each stitch around. (9 sts)
- Rnd 11: (Sc in next 2 sts, inc) repeat around. (12 sts)
- Rnds 12-14: Sc in each stitch around. (12 sts)
- Rnd 15: (Sc in next 3 sts, inc) repeat around. (15 sts)
- Rnds 16-18: Sc in each stitch around. (15 sts)
- Fasten off, leaving a long tail. Stuff lightly with fiberfill, then sew the trunk to the front center of the body, positioning it so the tip curls upward slightly. The trunk should sit just below the top edge of the cover.
Ears (Make 2, in Sage Green and Dusty Rose)
These floppy ears give the elephant its gentle, endearing expression. Each ear uses two colors.
- With sage green:
- Rnd 1: Magic ring, 6 sc in ring. (6 sts)
- Rnd 2: Inc in each stitch around. (12 sts)
- Rnd 3: (Sc in next st, inc) repeat around. (18 sts)
- Rnd 4: (Sc in next 2 sts, inc) repeat around. (24 sts)
- Rnd 5: (Sc in next 3 sts, inc) repeat around. (30 sts)
- Rnd 6: (Sc in next 4 sts, inc) repeat around. (36 sts)
- Fasten off sage green. Attach dusty rose yarn.
- With dusty rose:
- Rnd 7: Sc in each stitch around. (36 sts)
- Rnd 8: (Sc in next 4 sts, dec) repeat around. (30 sts)
- Rnd 9: (Sc in next 3 sts, dec) repeat around. (24 sts)
- Fasten off, leaving a long tail. Fold the ear in half slightly and sew to the sides of the body, about 2 inches down from the top edge. Position them symmetrically on either side.
Tusks (Make 2, in Cream)
These small tusks add a charming detail beneath the trunk.
- Rnd 1: Magic ring, 4 sc in ring. (4 sts)
- Rnd 2: Sc in each stitch around. (4 sts)
- Rnd 3: Inc in each stitch around. (8 sts)
- Fasten off, leaving a long tail. Sew the tusks to the front of the body, just below the trunk, one on each side. Angle them slightly outward for a natural look.
Cheeks (Make 2, in Dusty Rose)
These rosy cheeks give the elephant a sweet, friendly face.
- Rnd 1: Magic ring, 6 sc in ring. (6 sts)
- Rnd 2: Inc in each stitch around. (12 sts)
- Fasten off, leaving a long tail. Sew the cheeks to the face, one on each side of the trunk, about 1 inch below the top edge. Position them slightly outward from the trunk.
Eyes (Optional)
Choose your preferred eye style:
- Safety eyes: Attach them between Rnds 5 and 6 of the body, about 1 inch apart, centered above the trunk. Ensure they are securely fastened before continuing.
- Embroidered eyes: Use black yarn to create small X-shaped stitches in the same position. This is a safer option if the cover will be around young children.
Assembly and Finishing
- Weave in all loose ends using your tapestry needle, being careful not to pull too tightly and distort the shape.
- Place the cover over a standard rectangular tissue box (approximately 9 x 5 x 4 inches). The trunk should be at the front, and the opening at the top will allow tissues to be pulled through.
- Adjust the trunk position if needed to ensure it doesn't obstruct the tissue opening. The trunk should curl slightly upward and to the side, away from the center opening.
- Gently shape the ears so they flop naturally over the sides of the box.
Tips for Success
- Mark your rounds: Use a stitch marker at the beginning of each round to keep track of your place, especially during the long even rounds of the body.
- Check your fit: Before finishing the body, test it against your tissue box. If it's too tight, you can add an extra increase round; if too loose, skip a round of increases.
- Stuff the trunk lightly: The trunk should be soft and flexible, not stiff. A light stuffing will help it hold its shape while still allowing it to curl naturally.
- Customize: Feel free to experiment with different color combinations to match your home decor. The pattern works beautifully in pastels, earth tones, or even bright, playful colors.
This Savanna Snuggle Elephant Tissue Box Cover is a delightful project that combines the charm of amigurumi with practical everyday use. Whether you're making it for yourself or as a handmade gift, the result is a cozy, whimsical addition to any room. Happy crocheting!



