Skeleton Jive Crochet Applique Free Pattern
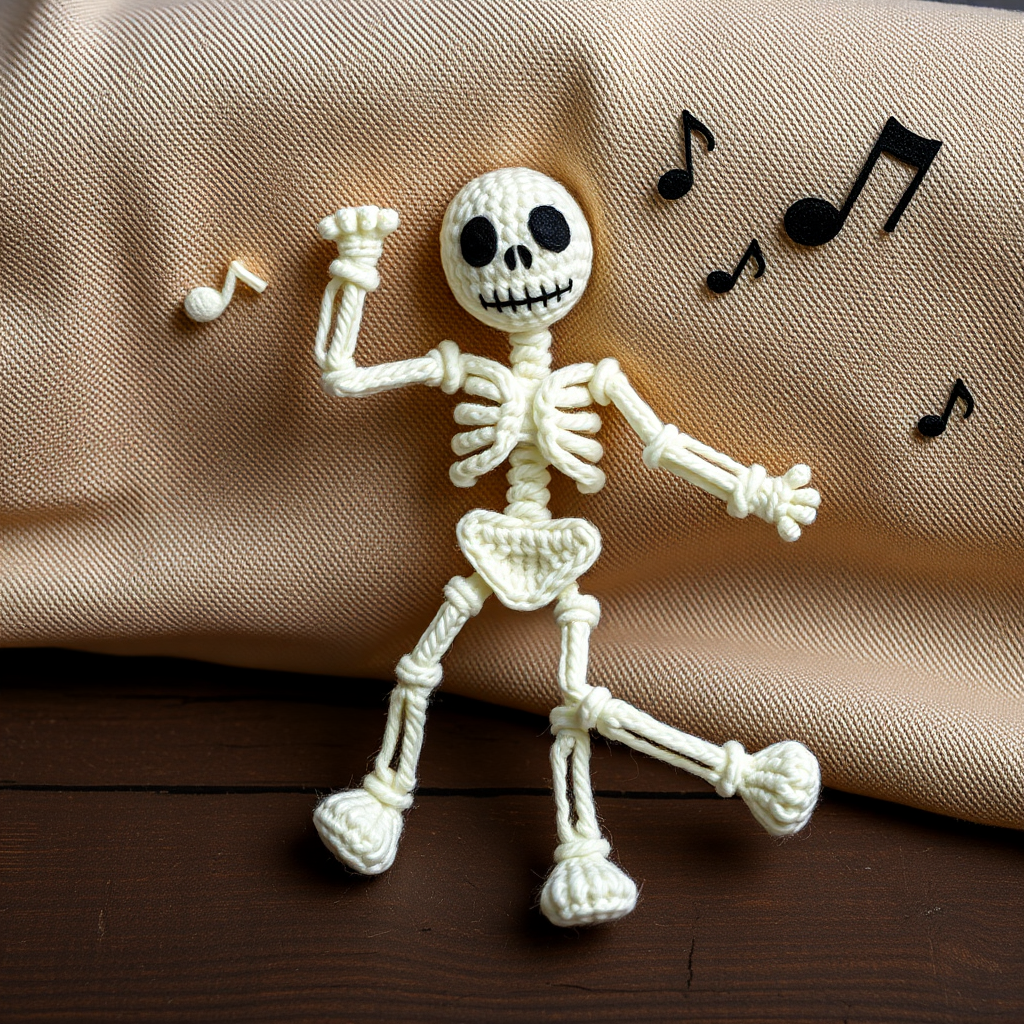
Get Your Groove On: Free Skeleton Jive Crochet Applique Pattern
Are you ready to add a little boogie to your next crochet project? This playful dancing skeleton applique is the perfect way to bring a whimsical, rock-and-roll vibe to anything you create. Whether you're sprucing up a plain tote bag, adding a funky touch to a child's sweater, or crafting unique Halloween wall art, this quick and engaging pattern is a guaranteed crowd-pleaser. With its lively pose, complete with one arm raised high and a leg kicked out in a dance move, this little skeleton is full of personality. Let's grab our hooks and get this party started!
Materials Needed
Before we dive into the steps, let's gather our supplies. This project is wonderfully portable and uses minimal materials, making it a great stash-buster.
- Yarn: Red Heart Super Saver in White (for the skeleton), Black (for features and notes), and a small amount of Silver or Gray for accent stitching.
- Crochet Hook: 3.5mm (E) crochet hook.
- Other: Yarn needle for sewing pieces together, scissors, and a small amount of fiberfill for stuffing the head.
Note on Gauge: Gauge is not critical for this project. However, aim for a tight, firm fabric. This will help the applique hold its shape and prevent the stuffing from showing through.
Step-by-Step Instructions
This pattern is broken down into small, manageable pieces. We'll start with the head, then move to the body, limbs, and finally the musical accents. Don't be intimidated—each part is simple and quick to make!
Part 1: The Head (Make 1)
We'll begin with the skull, which is worked in continuous rounds.
- Round 1: With White yarn, make a magic ring. Chain 1, then work 6 single crochet (sc) into the ring. Pull the tail tight to close the ring. (6 stitches)
- Round 2: Work 2 sc in each stitch around. (12 stitches)
- Round 3: *Sc in the next stitch, 2 sc in the next stitch*; repeat from * to * around. (18 stitches)
- Round 4-5: Sc in each stitch around for two rounds. (18 stitches)
- Round 6: *Sc in the next stitch, sc2tog (single crochet two together)*; repeat from * to * around. (12 stitches)
- Round 7: Sc2tog around. (6 stitches)
- Fasten off, leaving a long tail for sewing. Lightly stuff the head with fiberfill to give it a subtle 3D shape.
Part 2: Facial Features
These small pieces bring the skeleton to life. They are simple circles and a strip.
- Eye Sockets (Make 2): With Black yarn, make a magic ring. Chain 1, work 6 sc into the ring. Pull tight. Fasten off, leaving a tail. Sew these onto the head, positioning them about 2 rounds down from the top and 2 stitches apart.
- Nose (Make 1): With Black yarn, make a magic ring. Chain 1, work 4 sc into the ring. Pull tight. Fasten off, leaving a tail. Sew this centered between and slightly below the eye sockets.
- Mouth (Make 1): With Black yarn, chain 6. Sc in the 2nd chain from the hook and in each chain across. Fasten off, leaving a tail. Sew this onto the head in a slight curve, below the nose, to create a grin.
Part 3: The Torso and Ribcage
The body is worked in rows to create a tapered shape, perfect for a dancing figure.
- Row 1: With White yarn, chain 11. Sc in the 2nd chain from the hook and in each chain across. (10 stitches)
- Row 2-6: Chain 1, turn, sc in each stitch across. (10 stitches)
- Row 7: Chain 1, turn, sc2tog, sc in the next 6 stitches, sc2tog. (8 stitches)
- Row 8: Chain 1, turn, sc2tog, sc in the next 4 stitches, sc2tog. (6 stitches)
- Row 9: Chain 1, turn, sc2tog, sc in the next 2 stitches, sc2tog. (4 stitches)
- Fasten off, leaving a long tail for sewing.
Ribcage (Make 3): With White yarn, chain 6. Sc in the 2nd chain from the hook and in each chain across. Fasten off, leaving a tail. Sew these three strips horizontally across the torso, spacing them evenly to create the ribs.
Part 4: Arms and Legs
These are constructed in segments to allow for the dynamic, bent poses. Each limb is made of two parts plus a hand or foot.
Arms (Make 2):
- Upper Arm: With White, chain 7. Sc in the 2nd chain from the hook and in each chain across. (6 stitches) Fasten off, leaving a tail.
- Lower Arm: With White, chain 5. Sc in the 2nd chain from the hook and in each chain across. (4 stitches) Fasten off, leaving a tail.
- Hand: With White, make a magic ring, chain 1, work 5 sc into the ring. Pull tight. Fasten off, leaving a tail.
- Assembly: Sew the lower arm to the upper arm, then the hand to the lower arm. Attach the completed arms to the sides of the torso. Position them in a lively dance pose—one arm raised high, the other extended out to the side.
Legs (Make 2):
- Upper Leg: With White, chain 8. Sc in the 2nd chain from the hook and in each chain across. (7 stitches) Fasten off, leaving a tail.
- Lower Leg: With White, chain 6. Sc in the 2nd chain from the hook and in each chain across. (5 stitches) Fasten off, leaving a tail.
- Foot: With White, chain 4. Sc in the 2nd chain from the hook and in each chain across. (3 stitches) Fasten off, leaving a tail.
- Assembly: Sew the lower leg to the upper leg, then the foot to the lower leg. Attach the legs to the bottom of the torso. Position them in a kicking dance pose—one leg bent, the other straight.
Part 5: Musical Notes (Make 2)
These floating notes complete the "Jive" theme.
- Note 1 (Eighth Note): With Black, chain 4. Sc in the 2nd chain from the hook and in each chain across. (3 stitches) Fasten off. Then, with Black, make a magic ring, chain 1, work 6 sc into the ring. Pull tight. Fasten off. Sew the stem to the top of the circle.
- Note 2 (Quarter Note): With Black, make a magic ring, chain 1, work 6 sc into the ring. Pull tight. Fasten off. Then, with Black, chain 5. Fasten off. Sew the stem to the top of the circle.
Part 6: Final Assembly and Finishing Touches
Now for the fun part—bringing it all together!
- Attach the Head: Sew the head securely to the top of the torso.
- Attach Limbs: Ensure the arms and legs are sewn on firmly, as they will be the focal points of the dance pose.
- Add the Notes: Sew the musical notes near the hands, as if the skeleton is playing them mid-dance.
- Weave in Ends: Use your yarn needle to weave in all loose ends carefully.
Finishing Detail: To add an extra pop of detail, use the Silver or Gray yarn to embroider small stitches on the joints (elbows and knees) to suggest bones. For a functional twist, sew a small button or pin backing to the back of the applique to use it as a brooch or bag charm.
And there you have it—your very own Skeleton Jive applique, ready to bust a move on your favorite projects! This pattern is a fantastic way to use up scrap yarn and create a unique, personalized decoration. Happy crocheting!


