Slumbering Cloud Sheep Pillow Free Pattern – Crochet a Dreamy Fluffy Companion
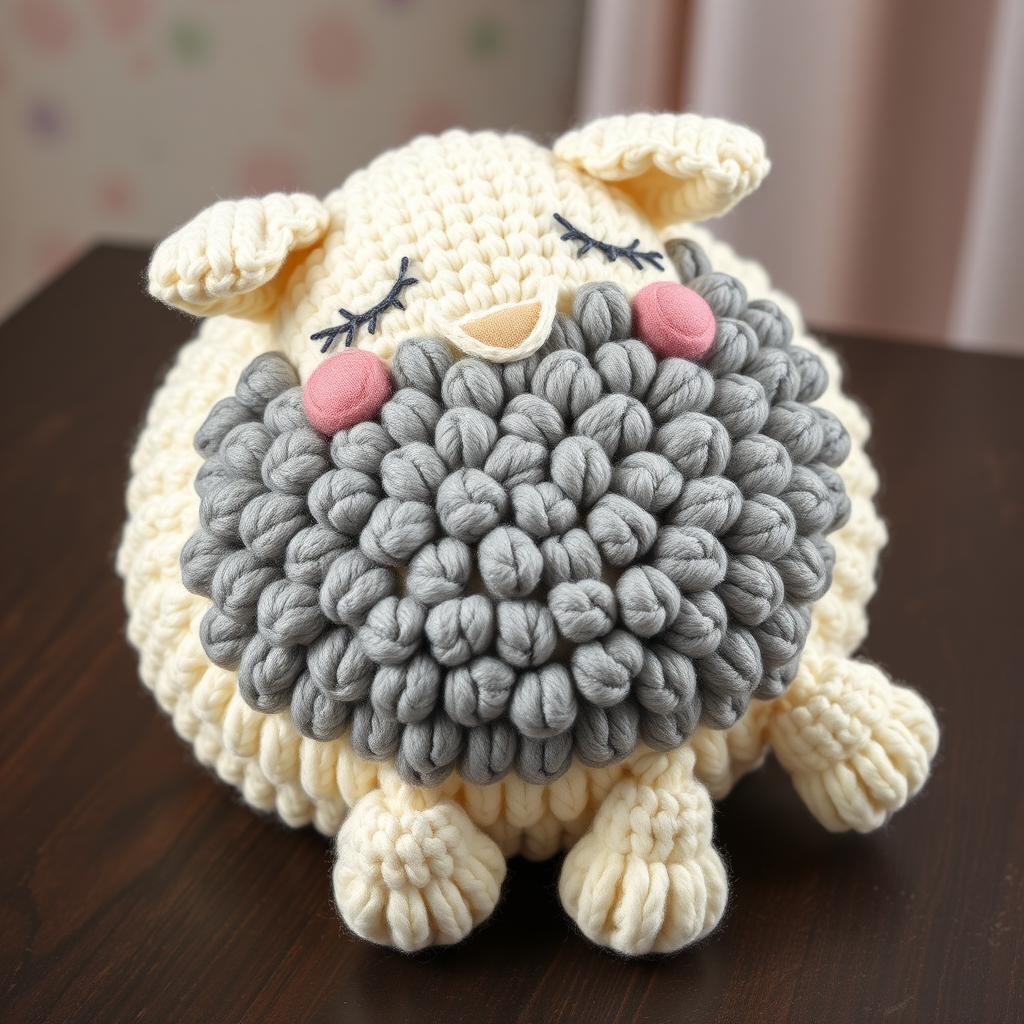
Slumbering Cloud Sheep Pillow Free Pattern – Crochet a Dreamy Fluffy Companion
Imagine sinking your hands into a cloud-soft pillow that brings a touch of pastoral serenity to your favorite cozy corner. The Slumbering Cloud Sheep Pillow is exactly that—a dreamy, huggable amigurumi-style cushion featuring a textured bobble fleece and a gentle, sleepy face. Whether you're crafting for a nursery, a reading nook, or simply treating yourself to a handmade treasure, this pattern is designed to be both beginner-friendly and deeply satisfying to create.
This free crochet pattern walks you through every step, from the first magic ring to the final fluff of those cloud-like bobbles. With worsted weight yarn and a 5.0 mm hook, you'll create a plush companion that's perfect for cuddling, decorating, or gifting. Let's dive into the materials you'll need and then guide you through each round with precision.
Materials Needed
Before you begin, gather these supplies to ensure a smooth and enjoyable crochet session:
- Yarn: Worsted weight yarn in three colors:
- MC (Main Color): Cream – approximately 250g for the head, body, ears, and legs
- CC1 (Contrast Color 1): Soft grey – approximately 120g for the fleece panel
- CC2 (Contrast Color 2): Blush pink – small amount for cheeks
- Hook: 5.0 mm crochet hook (or size needed to match gauge)
- Gauge: 16 single crochet (sc) x 18 rows = 4 x 4 inches. Always check your gauge to ensure the correct finished size.
- Fiberfill: Polyester stuffing for a firm, plush shape
- Stitch markers: To track rounds (especially important for spiral work)
- Tapestry needle: For sewing pieces together and weaving in ends
- Scissors: For cutting yarn
Pro tip: If you're new to amigurumi, use a stitch marker in the first stitch of each round and move it up as you go. This prevents losing your place in continuous spiral work.
Step-by-Step Instructions
This pattern is worked in continuous spirals unless otherwise noted. Always use a stitch marker to track your rounds. Let's begin with the head, then move to the body, fleece panel, ears, face details, and legs.
Head (Make 1, in MC – Cream)
The head is a classic amigurumi sphere with increases and decreases. Work carefully and stuff firmly when instructed.
- R1: Magic ring, 6 sc (6)
- R2: Inc in each st around (12)
- R3: (sc in next st, inc) around (18)
- R4: (sc in next 2 sts, inc) around (24)
- R5: (sc in next 3 sts, inc) around (30)
- R6: (sc in next 4 sts, inc) around (36)
- R7: (sc in next 5 sts, inc) around (42)
- R8: (sc in next 6 sts, inc) around (48)
- R9–R16: sc in each st around (48) – 8 rounds even, no increases or decreases
- R17: (sc in next 6 sts, dec) around (42)
- R18: (sc in next 5 sts, dec) around (36)
- R19: (sc in next 4 sts, dec) around (30)
- R20: (sc in next 3 sts, dec) around (24)
- R21: (sc in next 2 sts, dec) around (18)
Stuff firmly with fiberfill at this point. The head should be dense but not rock-hard—you want it huggable.
- R22: (sc in next st, dec) around (12)
- R23: dec around (6)
- Fasten off, leaving a long tail for sewing. Weave the end through the remaining stitches and pull tight to close. Weave in the end securely.
Body (Make 1, in MC – Cream)
The body is larger than the head to create a plump, pillow-like base. Follow the same spiral technique.
- R1: Magic ring, 6 sc (6)
- R2: Inc in each st around (12)
- R3: (sc in next st, inc) around (18)
- R4: (sc in next 2 sts, inc) around (24)
- R5: (sc in next 3 sts, inc) around (30)
- R6: (sc in next 4 sts, inc) around (36)
- R7: (sc in next 5 sts, inc) around (42)
- R8: (sc in next 6 sts, inc) around (48)
- R9: (sc in next 7 sts, inc) around (54)
- R10: (sc in next 8 sts, inc) around (60)
- R11–R20: sc in each st around (60) – 10 rounds even
- R21: (sc in next 8 sts, dec) around (54)
- R22: (sc in next 7 sts, dec) around (48)
- R23: (sc in next 6 sts, dec) around (42)
- R24: (sc in next 5 sts, dec) around (36)
- R25: (sc in next 4 sts, dec) around (30)
- R26: (sc in next 3 sts, dec) around (24)
Stuff firmly with fiberfill. The body should feel like a plush pillow—dense enough to hold its shape but soft to the touch.
- R27: (sc in next 2 sts, dec) around (18)
- R28: (sc in next st, dec) around (12)
- R29: dec around (6)
- Fasten off, weave in the end securely.
Fleece Panel (Make 1, in CC1 – Soft Grey)
This is the star of the show—the cloud-like texture that makes your sheep pillow look like a dreamy puff. The bobble stitch creates that fluffy, woolly appearance.
Foundation: Chain 40, turn.
- Row 1: sc in 2nd ch from hook and across (39 sc), turn.
- Row 2: ch 1, *bobble stitch, sc in next st* repeat across, ending with bobble in last st, turn.
How to make a bobble stitch: Yarn over (yo), insert hook into the stitch, pull up a loop, yo, pull through 2 loops (2 loops remain on hook). Repeat this process 3 times total in the same stitch (you'll have 4 loops on hook). Yo and pull through all 4 loops to complete the bobble.
- Row 3: ch 1, sc in each st across, turn.
- Repeat Rows 2–3 until the panel measures 12 inches long. Fasten off.
Attaching the panel: Sew the fleece panel onto the body, covering the front and sides. Leave the bottom edge open—this will be the pillow base where the legs attach. Use a whip stitch or mattress stitch for a clean, invisible seam.
Ears (Make 2, in MC – Cream)
These small folded ears add character and charm to your sleepy sheep.
- R1: Magic ring, 6 sc (6)
- R2: (sc in next st, inc) around (9)
- R3: (sc in next 2 sts, inc) around (12)
- R4–R6: sc in each st around (12) – 3 rounds even
Fold the ear flat and sew the bottom edge closed. Attach to the head at the sides, positioning them slightly above the eyes for a natural look.
Face Details
This is where your sheep comes to life. Take your time with the embroidery—it makes all the difference.
- Cheeks (CC2 – Blush Pink): Using satin stitch, embroider two small oval cheeks on the head. Place them on either side of where the nose will be, about 1 inch apart.
- Sleepy Eyes (CC1 – Grey): Using straight stitches, embroider two curved lines for closed, sleepy eyes. Start at the inner corner and curve downward and outward, like a gentle "U" shape lying on its side.
- Nose and Smile (CC1 – Grey): Embroider a small 'Y' shape for the nose, centered between the eyes and slightly below. Below the nose, add a gentle smile using a curved straight stitch.
Placement tip: Before embroidering, use pins to mark where you want the features. Step back and check the placement—it's easier to adjust pins than to remove stitches.
Legs (Make 4, in MC – Cream)
These little legs give your pillow stability and add to the adorable silhouette.
- R1: Magic ring, 6 sc (6)
- R2: (sc in next st, inc) around (9)
- R3–R5: sc in each st around (9) – 3 rounds even
Stuff lightly—just enough to give shape without making them stiff. Flatten the opening and sew it closed. Attach two legs to the bottom front of the body and two to the bottom back, spacing them evenly for balance.
Assembly
Now it's time to bring all the pieces together.
- Sew the head to the top front of the body, slightly overlapping the fleece panel. This creates a seamless transition from face to fluffy body.
- Ensure all parts are securely attached. Give each piece a gentle tug to test the strength of your seams.
- Weave in all loose ends with your tapestry needle. Trim any excess yarn.
Finishing Touches
- Optional hanging loop: Chain 20 stitches, fasten off, and sew the ends to the top of the head. This makes it easy to hang as a nursery decoration.
- Fluff the bobbles: Gently pull and shape the bobble stitches with your fingers to enhance the cloud-like texture. This step makes a huge difference in the final look.
- Final shaping: Give your pillow a gentle squeeze and reshape as needed. The sheep should look plump, serene, and ready for cuddles.
Your Dreamy Companion Awaits
Congratulations! You've just created a Slumbering Cloud Sheep Pillow that's as soft as a dream and twice as charming. This pattern is perfect for beginners looking to expand their skills—you've practiced magic rings, increases, decreases, bobble stitches, and embroidery, all in one project.
Whether this pillow graces a nursery shelf, a cozy reading corner, or becomes a heartfelt handmade gift, it's sure to bring warmth and whimsy wherever it rests. The textured bobble fleece invites touch, and that sleepy, gentle face is guaranteed to make anyone smile.
Happy crocheting, and may your days be filled with cloud-soft creations!



